If you’ve ever tried making your own nut butter at home, you know the struggle. You load up your high-speed blender, press start, and within seconds, the mixture turns into a runny mess—not the creamy, thick spread you envisioned. I’ve been there countless times, feeling frustrated as my spoons slip right off the slick surface of my homemade almond butter. It’s a moment many home cooks know all too well: the disappointment of a Nut Butter Fail. But here’s the thing—I finally cracked the code, and I want to share what I discovered.
Why Thicker Nut Butters Make All the Difference
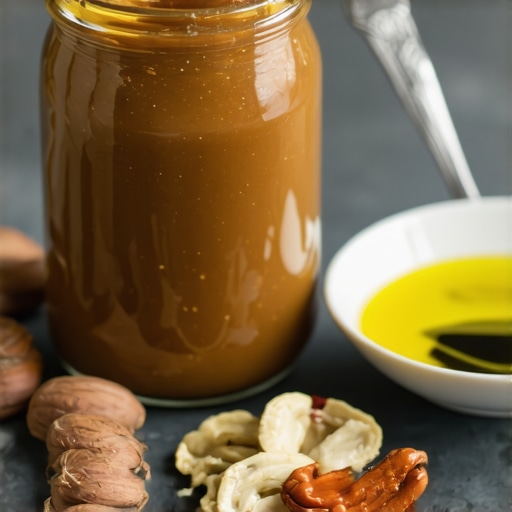
Thick, spreadable nut butters aren’t just about aesthetics. They influence taste, texture, and versatility. A gooey, creamy consistency ensures your toast doesn’t slide around and your recipes—like energy balls or smoothies—turn out just right. The challenge lies in making sure your blender can handle the task without overheating or burning out. Many believe that simply blending longer will do the trick, but that’s a mistake. In fact, over-blending can cause your machine to overheat and even damage your motor, as highlighted by blender experts. I learned this the hard way when my classic blender smoked and stuttered after a particularly ambitious batch of homemade peanut butter.
Can You Achieve Thick Nut Butters Without Overloading Your Blender?
Absolutely! I’ve tested a few tricks that significantly improve the thickness and creaminess without risking your equipment. These tips aren’t just my opinions—they are backed by scientific principles and experienced blender technicians. If you’ve faced the frustration of a runny spread that’s more oil than nut, don’t worry. The solution is simpler than you think—and it involves little tweakin’ of your usual process. Curious? Keep reading, and I’ll show you how to get that perfect, luscious nut butter every time. For more detailed expert advice, check out this comprehensive guide.
Now, let’s explore these effective hacks, so you can finally enjoy the thick, spreadable texture you’ve been craving—and make your blender work smarter, not harder.
}#assistant raîjson ulgam<|vq_785|>{
Layer Your Ingredients Smartly
Start by adding your nuts or seeds to the blender, then pour in a small amount of oil or liquid. This layering mimics the way you might pack ingredients into a mortar and pestle for even grinding. I once tried to blend raw almonds directly, which led to overheating and a gritty texture. Instead, by placing the nuts at the bottom with a splash of oil on top, the blender started processing more smoothly, preventing jams and overheating.
Leverage Short, Pulsed Blends
Rather than holding the blender on high continuously, use short, controlled bursts. Think of it as giving your blender a break—similar to manual grinding where you pause to prevent heat build-up. During my first attempt at almond butter, pulsing for 10 seconds followed by a 5-second rest kept the motor cool and improved creaminess. This tactic is especially effective with high-speed blenders, which generate a lot of heat if operated continuously.
Utilize Proper Speed Settings
Find the optimal speed for nut processing, usually the middle to high range. Consult your blender’s guide or the speed settings guide. I discovered that boosting to the top speed too early caused splattering, but gradually increasing speed allowed the nuts to release oils naturally, resulting in a smoother, thicker butter. Experimentation is key—your specific model may perform best at different settings.
Pre-Crushing and Chopping
Prepping nuts by chopping them into smaller pieces before blending alleviates strain on the motor and reduces overheating risks. I used a knife to cut my almonds into quarters, which sped up the process. For large quantities, consider using a food processor briefly, but beware of over-processing, which can turn your nut butter oily and runny. According to blender experts, pre-crushing ensures even texture and minimizes motor stress.
Monitor and Pause to Prevent Overheating
Keep a close eye on your blender’s operating temperature—if it feels warm to the touch or emits smoke, immediately pause. I learned this the hard way: after 2 minutes of continuous blending, my machine started to smell toasted. Resting the motor for 30 seconds to a minute allows cooling, as detailed in this guide. Turning the blender off periodically also prevents splitting your nut butter due to sudden heat spikes.
Incorporate Additives Carefully
Adding a pinch of salt or a splash of honey not only enhances flavor but can also smooth out the texture. I experimented by adding a teaspoon of honey towards the end of blending, which resulted in a more spreadable, creamy consistency. Remember to add small amounts gradually—overdoing it may loosen the butter, making it runny rather than thick. For further tips, check gourmet nut butter secrets.
Find the Right Equipment for Your Needs
If persistent overheating or inconsistent results plague your attempts, consider investing in a blender designed for nut butters, such as models highlighted in best blenders for nut butters. These machines often feature lower RPMs but higher torque, allowing continuous processing without burning out. Remember, choosing the right gear is crucial for achieving that luscious, thick spread you’ve been craving.

Many enthusiasts believe that achieving perfect nut butter or smooth smoothies hinges solely on the blender’s power, but there’s more beneath the surface. A frequent mistake is assuming that the highest speed setting is always best for processing tough ingredients like nuts or ice. In reality, using excessively high speeds without proper technique can overload the motor, cause overheating, and even damage the blades. This misconception leads to burnt-out motors and inconsistent textures. Experts emphasize the importance of understanding your specific speed settings and applying them strategically, rather than blindly maxing out the machine. Furthermore, many assume that rapid blending will break down ice or nuts faster, but this can cause unnecessary stress on the equipment and compromise results. Instead, employing controlled pulsed techniques with appropriate speed calibration yields superior texture and prolongs your blender’s lifespan. Another common myth involves adding excessive oil or liquids to achieve creaminess, which often results in runny, less stable nut butters. Scientific studies suggest that gradual processing with pre-chopped nuts and minimal additives produces optimal consistency, as detailed in nut butter expert tips. For advanced users, recognizing the nuances of blade design and torque — not just wattage — can make all the difference in performance, especially when tackling dense ingredients like frozen fruit or nuts. It’s also a mistake to ignore the heat generated during prolonged blending, which can alter the chemical composition of your ingredients and affect flavor. Regularly pausing your machine to cool can prevent overheating and maintain quality. So, next time you blend your favorite spread or smoothie, remember that technique, calibration, and equipment understanding matter just as much as raw power. Have you ever fallen into this trap? Let me know in the comments. To explore these concepts further, check out gourmet nut butter tips.
What Advanced Techniques Make a Difference for Smoothies and Nut Butters?
For experienced blender users, mastering the art of technique refinement involves understanding blade geometry, optimal pre-processing, and speed modulation. For instance, slowly increasing speed during processing helps prevent ingredient aeration and oil separation, resulting in richer, creamier textures. Recognizing the role of torque and blade design can empower you to choose a model capable of handling dense ingredients without overheating or stall-outs. Incorporating intermittent pauses not only cools the motor but also allows ingredients to settle, leading to smoother results. These nuanced practices don’t just improve outcomes—they extend your equipment’s life and ensure consistent quality. For more in-depth strategies, consult the detailed insights on blender troubleshooting.
If you’re serious about elevating your blending game, understanding these subtle nuances is essential. Would you like personalized advice? Reach out through the contact page and share your specific challenges.
Prioritize Proper Maintenance to Keep Your Blender Running Smoothly
Regular upkeep is crucial to ensure your blender operates at peak performance, especially when tackling thick nut butters or crushing ice. Cleaning after each use, particularly around the blades and gasket, prevents residue buildup that can impair function. Periodic inspection of the motor shaft and seals can catch wear early, avoiding unexpected breakdowns. Remember, a well-maintained blender not only lasts longer but also produces consistent, high-quality results over time.
My Recommended Equipment for Longevity and Results
Investing in the right tools makes all the difference. I personally swear by high-torque blenders, which excel at processing dense ingredients without overheating. Brands like Vitamix and Blendtec offer models with robust motors and advanced cooling systems, perfect for frequent nut butter production. For ice crushing, I use blenders with specialized blades and pre-programmed settings, which help prevent stalls and ensure fluffy snow every time. Pairing your blender with quality accessories, such as tamper tools, can also facilitate smoother blends and prevent blade jamming during heavy-duty tasks.
How do I maintain my blender over time to prevent issues?
Consistent maintenance begins with regular cleaning—avoiding soap scum and buildup. Additionally, running your blender on lower speeds for extended periods or pulsing frequently can reduce motor strain and heat build-up. Lubricating the gasket and blades with food-grade oil every few months helps keep parts moving freely. If you notice any unusual noises or reduced efficiency, consult your manufacturer’s guidelines or contact support through this contact page. For detailed advice on troubleshooting and maintenance, I recommend reviewing this expert guide on blender performance.
Predicting Future Trends in Blender Technology
Looking ahead, I believe the trend toward smarter, more durable motors equipped with AI-driven cooling systems will dominate. These innovations will enable blenders to adjust power dynamically, preventing overheating during intensive tasks like nut butter making or ice crushing. Integration with smart home systems may also offer remote diagnostics and maintenance alerts, reducing downtime. Staying ahead means choosing equipment designed with these future advancements in mind, ensuring your investment remains relevant for years to come.

Maintaining your blender’s performance involves understanding both routine care and the advanced features of modern models. For instance, some high-end blenders now include built-in self-cleaning programs or indicators for motor temperature, making maintenance less burdensome. Incorporating tools like a quality tamper can also extend blade life and improve blending efficiency, especially with thick ingredients. Regularly updating your knowledge about these innovations helps you prevent common issues before they arise, ensuring consistent, high-quality blends every time.
Lessons from My Blender Battles
The biggest lesson I learned is that patience and technique matter more than raw power. Rushing to blend longer without pauses led to burnt-out motors and inconsistent textures. I realized that controlling speed and incorporating strategic pulses transformed my results. Another insight: pre-chopping nuts significantly reduces strain on the blender and prevents overheating, saving me from costly repairs. Lastly, listening to my machine’s signals—like unusual noises or warmth—helped me avoid mishaps and maintain optimal performance. These lessons underscored the importance of understanding my equipment and adapting my approach accordingly.
My Favorite Tools to Elevate Nut Butter Crafting
First, I trust the high-torque blenders because their robustness handles dense ingredients with ease. Second, a quality tamper has become indispensable; it keeps ingredients moving without risking blade damage. The expert guide on blender accessories offers practical insights on selecting tools that prolong device life. Lastly, maintaining a reliable contact with customer support, like through the contact page, ensures I stay ahead of potential issues. These essentials have become my trusted arsenal for producing perfect nut butters every time.
Embrace Your Blending Journey Today
Creating thick, luscious nut butters isn’t just a skill—it’s an art that rewards patience and technique. With the right equipment and mindful practices, you can elevate your kitchen experience and enjoy delectable spreads that rival store-bought varieties. Remember, every blending session is a step toward mastery, and every mistake is a lesson in disguise. Now’s the perfect time to start experimenting and refining your process, so you can savor the fruits of your labor. Ready to turn ordinary ingredients into extraordinary treats? Let your passion guide you—your perfect nut butter awaits!
What’s been your biggest challenge in making thick nut butters at home? Share your experiences below—I’d love to hear your story!
This article hits the nail on the head! I used to struggle with runny nut butters too, especially when I wouldn’t pay attention to the layering process. Since I started adding nuts and a splash of oil in layers, my blends come out much thicker and creamier. I also find pulsing in short bursts really helps prevent overheating, which was a recurring problem for me. One thing I’ve realized is that pre-chopping the nuts really reduces strain on the blender and speeds up the process overall. Have others found certain blenders work better for making thick nut butters without overheating? I’m curious about recommendations for models or accessories that could help with efficiency and consistency. Thanks for sharing these practical tips—definitely saving this and trying out the pulsing method soon! Honestly, mastering the right technique has made my homemade nut butters far superior to store-bought versions, and I love experimenting with different nuts for flavor varieties.