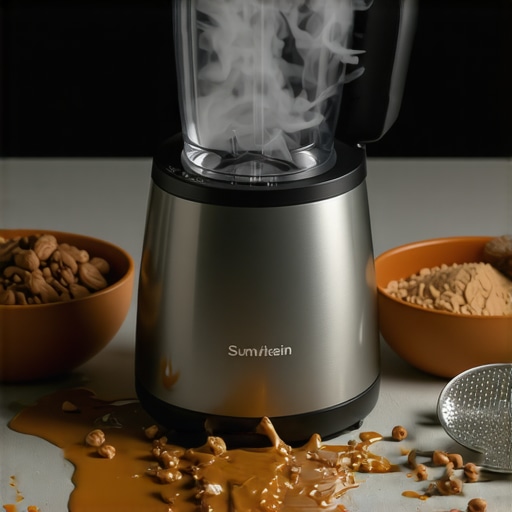
Picture this: you’ve finally decided to make homemade nut butter, a task you’ve been excited about for weeks. You’re blending your favorite cashews or almonds, expecting a creamy, delicious spread. Suddenly, your blender emits a puff of smoke, and panic sets in. My heart sinking, I wondered if I had just ruined my expensive appliance. That moment of realization was a lightbulb for me—understanding why blenders smoke during nut butter creation is crucial to avoiding costly damage and enjoying smooth, wholesome spreads at home.
Getting to the Root of Blender Smoke During Nut Butter Prep
Over the years, I’ve learned that the cause isn’t always obvious. High-speed blenders are powerful, but they can overheat when pushed beyond their limits—especially during demanding tasks like processing nut butters or crushing ice. When a blender is asked to work too hard, it can heat up quickly, and if it’s not designed for such prolonged strain, the motor might start to smoke. This is a clear sign that you’re overtaxing your machine.
In my early attempts, I made the mistake of blending nuts for too long without stopping, which caused my blender to overheat and smoke. That experience taught me to pay attention to the motor’s temperature and to use specific techniques and tools to prevent this from happening again. For reliable guidance, I refer to resources like this comprehensive guide on high-speed blenders for nut butters.
So, why does your blender smoke when making nut butter, and what can you do about it? Let’s dive into the reasons and solutions to keep your blender running smoothly and safely. Ready to master your nut butter projects? Keep reading, and I’ll share proven tips to prevent smoke and get the most out of your blender.
Is the Smoke Actually Dangerous or Overhyped?
Many skeptics fear that a bit of smoke spells the end of their blender. The truth is, minor smoke from overheating isn’t necessarily destructive—it’s a warning sign to give your appliance a break. Early on, I ignored these signs, risking permanent damage. Since then, I’ve learned that knowing how to recognize and respond to smoke can save your blender and your day. Trust me, with a few simple precautions, you can enjoy making nut butters without fear of smoke or motor burnout. Interested in selecting a blender that handles nut butters effortlessly? Check out top blenders for smoothie lovers for expert recommendations.
Control Your Blending Speed and Duration
One of the most effective ways to prevent smoke during nut butter or ice blending is to monitor your blend time closely. When I first started experimenting, I would blend continuously for over a minute, which led to overheating. Now, I blend in short bursts of 20-30 seconds, pausing between to let the motor cool. This technique is similar to jogging: moderate pace, interspersed with rest, keeps you moving longer without fatigue. For high-demand tasks, consider using a blender with variable speed settings designed for such purposes, like the models reviewed in top blenders for smoothie lovers.Many enthusiasts assume that owning a high-speed blender automatically guarantees perfect nut butters or ice crushing results. However, this misconception overlooks the nuanced skills and understanding needed to truly master your appliance. For instance, people often believe that blending for longer is better, but in reality, longer processing can lead to overheating, reducing the lifespan of your motor and risking smoke or damage. Recognizing that optimal results come from a combination of appropriate speed settings, timing, and ingredient prep is essential for advanced users. Moreover, there’s a common myth that all blenders are equally capable when it comes to frozen ingredients. Not all high-speed blenders handle ice crushing with the same efficiency, leading to frustration and potential damage if the machine is pushed beyond its limits. To avoid these pitfalls, experienced users pay attention to technical parameters like blade design, motor torque, and speed control features, which are highlighted in detailed reviews available on top blender reviews for nut butters and ice. An important advanced consideration is the temperature management during prolonged blending sessions. Excessive heat can degrade the flavor and texture of your nut butters and even cause motor burnout. This is why some of the best models incorporate cooling technology or require short, controlled blending bursts, followed by pauses. As noted by experts in blender performance science, understanding these hidden features allows for better results and equipment longevity. Are you aware that increasing the speed doesn’t always mean better blending? Sometimes, reducing the speed to optimal levels and adjusting ingredients can produce creamier nut butter or smoother smoothies without stressing your blender. This nuanced approach can make a significant difference, especially when dealing with tough ingredients like frozen berries or dense nuts. Remember, mastering your blender involves more than just turning the dial; it requires knowledge of the device’s capabilities, limitations, and the subtle interplay between speed, duration, and ingredient prep. Have you ever fallen into this trap? Let me know in the comments.
Maintaining your high-speed blender for nut butters and ice crushing is essential for long-term success and optimal performance. Over time, even the most powerful appliances can experience wear and tear, leading to reduced efficiency or unexpected failures. To keep your blender working flawlessly, I recommend investing in quality accessories and adopting specific maintenance routines that extend the lifespan of your equipment.
Invest in a Cooling Stand or Pad
High-speed blending generates significant heat, which can accelerate motor wear if not properly managed. Using a cooling stand or pad under your blender can help dissipate heat more effectively, reducing the risk of overheating and smoke during extended sessions. Personally, I use a silicone heat-resistant mat designed for kitchen appliances, which provides both stability and cooling benefits. This simple addition has noticeably improved my blender’s longevity, especially when preparing large batches of nut butters or frozen smoothies. For more details on supporting your appliance, explore tips for boosting your blender’s ice-crushing power.
Regularly Check and Tighten Blades
Over time, blender blades can become loose due to frequent use or wear. Loose blades lead to uneven blending, increased motor stress, and potential damage. I recommend inspecting your blades every few months and tightening any loose screws. When doing so, ensure you unplug the unit first and carefully follow the manufacturer’s instructions. I also label my blades with a resale or service date, so I know when to consider a replacement, which keeps my blends consistent and prevents motor strain. Need guidance on choosing resilient blades? Visit expert tips on gourmet nut butters and blade care.
Use Appropriate Cleaning Tools
Cleaning your blender regularly prevents buildup of nut residues and food particles that can impede performance and cause odors. I use a combination of non-abrasive brushes and drying racks designed for kitchenware. For deep cleaning, I fill the jar with warm water, add a splash of mild dish soap, and blend on high for 30 seconds. This process dislodges stubborn residues and keeps everything running smoothly. Additionally, avoid harsh chemicals or abrasive scrubbing, which can damage seals and blades. For detailed cleaning hacks, check out quick cleaning tips.
Plan for Upgrades to Stay Ahead
Technological advancements continue to improve blender efficiency and durability. In the future, I predict more models will incorporate smart cooling systems and self-maintenance alerts, helping users detect issues before they escalate. For example, some brands are already integrating sensors that monitor motor temperature and notify you when it’s time to pause or shut down. Staying informed about these innovations allows you to upgrade your equipment proactively, ensuring you’re always equipped for demanding tasks like making thick nut butters or crushing ice. If you’re considering an upgrade, I recommend exploring top blender recommendations for 2025.
One practical tip to extend your blender’s lifespan is to always start with ingredients at room temperature or slightly warmed. This reduces the strain on the motor when processing dense nuts or frozen elements, aligning with findings in blender performance science. Incorporate these maintenance practices and experiment with the latest tools to enjoy consistently smooth and delicious results. Want to master advanced techniques? Try implementing short, high-intensity blending bursts combined with proper cooling methods for unbeatable consistency. Start small—your blender will thank you for it!
What I Wish I Knew Before Overheating My First Nut Butter
One of the most valuable lessons I learned was to listen to my blender’s signs of strain. Initially, I thought pushing my high-speed blender for longer meant better results, but I overlooked the motor’s warning signals, like unusual heat or smoke. Recognizing these subtle cues early on could have saved me from costly repairs. Now, I prioritize short blending bursts and allow my appliance to cool, ensuring longevity and optimal performance.
Another insight was the importance of ingredient prep. Using ingredients at slightly warmer temperatures reduces stress on the motor, making the blending process smoother and less prone to overheating. Incorporating this simple step transformed my nut butter texture and preserved my blender’s health.
Lastly, I discovered that understanding my specific blender’s capabilities makes a difference. Not all models handle ice crushing or dense nuts equally well, and reading expert reviews helps me choose the right tool for demanding recipes. This awareness has encouraged me to select blenders with features like enhanced cooling systems and variable speed controls, which you can explore in top-rated high-speed blenders.
Tools That Up My Nut Butter Game
My go-to resource remains this comprehensive list of top blenders for nut butters. It helps me identify machines with the right torque and blade design, crucial for creamy textures. For maintaining my equipment, I rely on gourmet nut butter tips and proper blade care, which keeps my blender running smoothly long-term.
In terms of cleaning, I trust these quick cleaning hacks to prevent residue buildup that can cause overheating or odors. Regular maintenance, including blade tightening and checking for wear, has extended my blender’s lifespan significantly.
Your Turn to Nut Up and Blend Smarter
Now that you know the subtle signs of overheating and how to care for your blender effectively, you’re better equipped to create luscious, smooth nut butters without the worry of smoke or motor burnout. Remember, a well-maintained blender isn’t just about safety—it’s about consistently delicious results that make your kitchen experiments enjoyable. Embrace these tips, experiment safely, and turn every blending session into a success story.
What’s your biggest hurdle when making homemade nut butters, ice crushing, or smoothie mastering? Drop your thoughts below—I’d love to hear your experiences and tips!
This article really resonated with me, especially the part about controlling blending time to prevent overheating. I used to push my high-speed blender to its limits without giving it a rest, which occasionally caused smoke and quite a scare! Since adopting the method of short bursts and allowing the motor to cool down, I’ve noticed a significant improvement not only in safety but also in the quality of my nut butters. I’d love to hear from others—what’s been your biggest challenge when making nut butters at home? Do you have any tips for optimizing blending without risking damage? I think being mindful of the equipment’s limits and ingredient prep can make a real difference. Also, I recently tried using a silicone heat-resistant mat under my blender, which really helped with heat dissipation during long sessions. Has anyone else used cooling accessories like that? Sharing experiences could really help us all improve our techniques and keep our blenders running smoothly for years to come.