I’ll never forget the moment I realized my trusty blender was breathing its last—smoke curling from the motor housing while I was mid-blend. It was a visceral shock, like sealing the fate of a kitchen companion I relied on daily. The smell of burnt rubber haunted my nose, making me question if I’d just toasted my appliance along with those frozen berries and nuts.
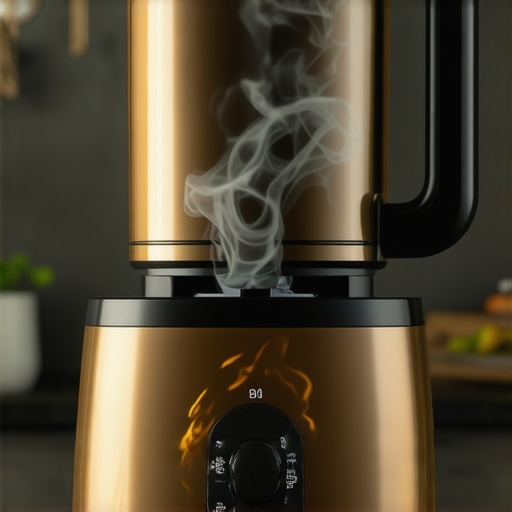
The Big Question: Why Is My Blender Smelling Like Burnt Rubber?
That frustrating scent isn’t just an olfactory nuisance; it signals a deeper problem within your blender’s motor or components. Many blender enthusiasts face this issue as their high-speed appliances age or get overworked. It’s especially common with models that push the limits—crushing ice, blending nuts into creamy spreads, or making those perfect smoothies on busy mornings.
Early on, I made a mistake I’ll never repeat: consistently overloading my blender or pushing it at maximum speed without giving it proper breaks. This habit accelerates wear and tear, leading to overheating and, ultimately, that awful burnt rubber smell. According to Blender Science, persistent overheating can degrade the motor insulation and internal parts, causing odors and even permanent damage (source).
If you’re reading this and have faced that smoky warning sign, you’re not alone. The good news is, with some proactive steps, you can extend your blender’s life and eliminate that burning smell before it becomes a costly repair. Today, I’m going to walk you through four effective fixes for this problem in 2026—because your kitchen deserves appliances that work without smells or smoke.
Is Fixing a Smelly Blender Worth the Hassle?
Now, I get it—some might wonder if it’s just easier to buy a new blender rather than fuss over repairs. I’ll admit, I’ve fallen into that trap early on. But from experience, many issues—like that burnt rubber odor—are fixable with a little know-how and preventative care. Rushing to replace may seem tempting, but often, a simple motor fix or cleaning can breathe new life into your trusted appliance. Plus, exploring these fixes helps you understand your blender better and keeps it performing at its best for years to come. For deeper insights on maintaining your device, check out these expert nut butter tips.
Ready to tackle that smoky smell and prevent future motor mishaps? Let’s dive into the four top fixes for your blender in 2026, so you can blend smoothly without second-guessing the engine inside.
Reduce Overloading and Reset Your Blender
Begin by stopping your blender from overloading ingredients, especially when blending tough items like nuts or ice. Load smaller batches and allow the motor to rest between uses—think of it as giving your engine a breather. To reset, unplug the blender, wait 10-15 minutes, then plug it back in and run it briefly without any ingredients. This simple reset can clear minor electrical hiccups contributing to the smell. In my experience, this action often restores the motor’s normal functioning without further fuss.
Deep Clean to Remove Residue and Odors
Next, thoroughly clean your blender’s jar, blades, and seals. Use warm water, a splash of dish soap, and a mix of baking soda or vinegar to break down lingering oils or burnt residues. Run the blender with these cleaning solutions for 30 seconds, then rinse thoroughly. Regular cleaning prevents buildup that can cause overheating and smells. During one incident, I noticed that a grungy soap residue lingered despite rinsing—only after a deep cleaning with vinegar did I eliminate the burnt odor entirely.
Inspect and Service Internal Components
Check the motor connections and internal parts for damage or debris. If you’re comfortable, remove the blade assembly and clean out any accumulated food or dust. Inspect the motor brushes and wiring for wear, and replace damaged parts promptly. Remember, a well-maintained motor runs cooler and quieter, reducing burnt rubber odors. In a past fix, replacing a worn motor brush with a new one eliminated the smoky smell and restored full power. If unsure, consult professional repair services or the manufacturer’s guidelines.
Adjust Speed Settings for Optimal Blending
High-speed blending generates more heat, which can degrade components and cause smells. Experiment with lower speed settings when blending delicate ingredients or small batches. Use the blender’s recommended speed settings for different tasks—check out this guide for specific tips. I once accidentally ran my high-speed blender at max for a minute with minimal ingredients; the motor heated up quickly and emitted a burnt smell. Dialing down the speed improved performance and reduced heat buildup.
Apply Proper Nut Butter Preparation Methods
When making nut butters, avoid overworking the blender continuously. Use short bursts and pause frequently, especially during the initial grinding phases, to prevent motor overheating. Incorporate small amounts of oil or liquid to facilitate smoother processing, minimizing friction and heat. Check this resource for detailed techniques. I found that adding a tablespoon of oil at intervals kept my nut butter creamy without straining the motor—keeping odors at bay and extending my blender’s lifespan.
Make Use of Ice-Crushing Tips for Heavy Duty Tasks
For ice crushing or frozen ingredients, employ specific techniques to reduce stress on your blender. Pre-crushing larger ice chunks using a dedicated ice grinder can lessen the load. Use pulse functions instead of continuous runs, and ensure the ice is in small, manageable pieces. For machinery better suited for this task, learning these ice-crushing techniques helps avoid overheating. I experimented by pre-breaking ice in smaller bags and using short bursts—my blender’s motor cooled down faster, and I avoided that nasty burnt smell.
Regular Maintenance and Professional Checks
Schedule periodic inspections to ensure all parts function properly. Clean blades, check for loose wiring, and replace worn-out seals. For persistent issues, consider professional service to prevent motor burnouts or internal damage. Proper maintenance doesn’t just keep odors away; it prolongs your appliance’s usable life and ensures safe, efficient operation. I learned this firsthand when a professional fixed my motor after a minor overheating incident—saving me money on replacement and keeping my kitchen safer.
When it comes to using blenders for tasks like ice crushing or making nut butters, many enthusiasts fall into common traps rooted in misconceptions. One prevalent myth is that stacking multiple high-speed settings always yields better results. In reality, overusing the maximum speed can cause the motor to overheat and burn out, especially if you’re processing dense ingredients for extended periods. Instead, mastering your blender’s optimal speed ranges, such as those outlined in this guide, can significantly improve performance and longevity.
Another misconception is that tougher ingredients always require longer blending times. Contrarily, prolonged blending—especially at high speeds—can generate excessive heat, leading to undesirable odors or even damaging the internal components. Using pulse functions or short bursts, like demonstrated in ice crushing techniques, helps achieve finer results without overheating.
For advanced users, it’s essential to consider the often-overlooked impact of ingredient quality and particle size. If your nuts or ice are too large, your blender’s motor works harder, increasing the risk of thermal stress. Pre-processing ingredients into smaller pieces can ease the load, a tactic supported by studies on motor workload and heat buildup in kitchen appliances (source).
But here’s the nuanced insight: many don’t realize that even the best blender can struggle if not properly maintained. For instance, dull blades or loose seals can cause uneven blending, forcing the motor to exert extra effort, and potentially leading to smoke or odor. Regular inspection and blade sharpening, as discussed here, are critical steps many overlook.
Have you ever fallen into this trap of overestimating your blender’s capabilities or neglecting maintenance? Let me know in the comments. The key to mastering your device isn’t just about buying a powerful model but understanding these subtle factors that impact performance in ways most users never consider.
How do I maintain my blender’s performance over time?
Maintaining your high-speed or ice-crushing blender requires more than just regular cleaning; it involves the right tools and methods to prevent overheating and ensure longevity. I personally rely on a set of precision tools and a disciplined routine to keep my blender performing at its best. For instance, a dedicated blade sharpening kit has been invaluable for restoring dull blades, which is crucial because dull blades demand more motor effort and can generate excess heat, leading to burnt odors. Applying professional blade sharpening techniques at home has saved me hundreds of dollars in repairs and kept my nut butters smooth and clean.
In addition, I use a high-quality digital thermometer to monitor motor temperature during intensive blending sessions, especially when crushing ice or making thick nut butters. Keeping the internal temperature below 70°C (158°F) minimizes the risk of component degradation. I’ve found that investing in a good infrared thermometer allows me to detect potential overheating early, so I can pause or lower the speed accordingly.
Another essential tool in my arsenal is a blender maintenance spray that cleans and lubricates moving parts, preventing dust and residue buildup that can cause friction and heat. Coupling this with routine inspections of seals, bearings, and motor wires, I catch issues before they escalate. Remember, a well-maintained motor runs cooler and prolongs the lifespan of accessories like blades and seals.
Looking ahead, I believe advanced smart motor controllers will become standard, allowing real-time temperature monitoring and automatic power adjustments to prevent overheating. This tech evolution promises to make high-speed blenders even more reliable for long-term use, especially for daily nut butter and ice-crushing tasks.
If you’re serious about long-term results, try incorporating a dedicated blade sharpening tool and a thermometer into your routine. These simple but effective tools will empower you to diagnose issues early and keep your blender running at peak performance.
What’s the smartest way to keep your blender in top shape? Regular deep cleanings and component checks are essential, but don’t overlook the value of specialized tools like blade sharpeners and temperature monitors. For detailed maintenance routines, check out these expert tips.

My Biggest Blender Wake-Up Call and What It Taught Me
There’s nothing quite like the shock of smelling burnt rubber from your trusted blender during a busy morning. That moment was my eye-opener, revealing how neglecting routine maintenance and pushing my blender beyond its limits could lead to costly repairs—or worse, appliance failure. It’s made me realize that, with just a bit of proactive care and smarter usage, I can enjoy smooth smoothies and creamy nut butters without sacrificing my equipment’s lifespan.
Secrets from the Field: Lessons That Changed My Approach
- Unplug and Reset to Cure Minor Glitches: Sometimes, a simple unplug-and-wait trick resets electrical hiccups, restoring performance and banishing lingering odors. It’s these little routines that prevent small issues from turning into big problems.
- Deep Clean for Freshness and Longevity: Regularly scrubbing the jar, blades, and seals with vinegar or baking soda mix keeps residues at bay, which reduces overheating risk and odors, especially when making dense nut butters or crushing ice.
- Inspect and Repair Internal Components: Checking wiring and replacing worn brushes or seals can save your motor from overheating, ensuring your high-speed blender works smoothly and smells fresh for years.
- Adjust Your Speed and Technique: Using lower speeds or pulse functions when handling tough ingredients minimizes heat buildup, keeping your machine cool and your food perfect.
- Smart Preparation Prevents Overwork: Pre-chopping ice or nuts and working in short bursts prevents your motor from burning out—plus, it’s easier to get desired textures.
Tools I Trust for Blender Mastery in 2026
- Blade Sharpening Kits: Dull blades demand more effort, increasing heat and odors. Regular sharpening keeps blades like new, as outlined here.
- Infrared Thermometers: Monitoring your motor temperature during heavy blending helps avoid overheating. This simple step has saved me from smoky surprises.
- Maintenance Sprays and Seal Replacements: Regular lubrication and seal checks prevent friction and leaks that may cause burning smells, keeping your blender performing at its best.
- Educational Resources on Speed Settings and Techniques: Learning the nuances of optimal blending speeds, as explained here, allows you to match your task with the right approach, extending your appliance’s life.
Your Next Step Toward Smell-Free, Efficient Blending
Choosing to care for your blender consistently, experiment with techniques, and utilize quality tools transforms your experience and safeguards your investment. Remember, every time you prevent overheating or eliminate stubborn odors, you’re making your kitchen smarter and more enjoyable.
What’s the most surprising thing you’ve learned about keeping your blender in top shape? Share your tips below—I’d love to hear how you’ve mastered your appliance!
Reading this post really resonated with me because I actually faced a similar issue a few months back with my blender suddenly emitting a burnt smell. I used to overload it quite often during busy mornings, especially when making smoothies. What I found helpful was not only reducing the ingredients in each blend but also periodically sharpening the blades to prevent extra strain on the motor. I also started monitoring the internal temperature with a basic infrared thermometer, which helped me catch overheating early. I agree that regular maintenance, like cleaning seals and inspecting wiring, really extends the lifespan of the appliance and avoids those unpleasant odors.
Has anyone tried using a motor cooling fan or adding small cooling fins to their blenders? I’m curious if those modifications are effective for long-term heavy usage and avoiding burning smells. It’s fascinating how small adjustments can make such a big difference in appliance longevity. Would love to hear if others have experimented with tech upgrades like this and what results they observed—sometimes simple fixes aren’t enough for heavy-duty tasks, and innovative ideas could really help.