Ever had that sinking feeling when you lift the lid of your high-speed blender and see a stubborn, sticky ring of nut butter clinging to the blades and sides? I remember the first time I faced this mess—more than once, I admit. The thick, oily residue seemed impossible to remove, making me dread cleaning after my favorite nut butter smoothies. It’s frustrating, right? Especially when you’re eager to whip up the next batch and the cleanup feels like a chore that drains your patience.
Why Nut Butter Stains Are a Blender Owner’s Persistent Nightmare
Nut butters, particularly thick homemade versions, are notorious for sticking stubbornly to blender surfaces. They dry out quickly, turn into a crusty film, and cling to blades and jar walls. This isn’t just about aesthetics; if left unresolved, residue can affect your blender’s performance over time. And let’s be honest—no one wants to spend hours scrubbing a stubborn mess, especially when you’re craving your next health-boosting snack.
From my experience, traditional cleaning methods—like filling with soap and water or using scrubbing brushes—often fall short for thick nut butter layers. Instead, I’ve discovered some tried-and-true techniques that actually work, saving you time and hassle. Curious to learn these secrets? Keep reading, and I’ll share three rapid methods to get your blender spotless again without destroying your patience or your motor.
Is the Fuss About Cleaning Nut Butter Really Worth It?
Honestly, I used to think cleaning was just part of the process—something I had to endure before I could get back to blending. But early on, I made a critical mistake: I believed that hot water alone would do the trick. Spoiler alert: it seldom did. Instead, I realized that specific tactics—like pre-soaking with a bit of vinegar or employing ingenious scraping techniques—are what truly make the difference. For more insights into how to preserve your blender’s performance, you can check out the science behind optimizing blender speed.
So, if that failed dish of thick nut butter has become your nemesis, don’t worry. I’ve been there—and I’m here to help you tackle it efficiently. Ready to reclaim your blender and save hours each week? Let’s get into the practical steps you can take right now, starting with the simplest but most effective trick to loosen even the deepest, crustiest nut residue.
Pre-Treat with Warm Water and Vinegar
Start by filling your blender halfway with hot water and adding a splash of white vinegar—about a tablespoon per cup. Secure the lid tightly and turn on the blender to its highest setting for 30 seconds. This step helps soften and loosen stubborn nut butter crusts, much like soaking dried glue before scraping. I once tackled a particularly gooey batch of almond butter after blending it at high speed; pouring this solution in and blending it cleared out the residual stickiness in seconds, saving me from hours of scrubbing. For more tips on cleaning your blender effectively, visit this useful guide.
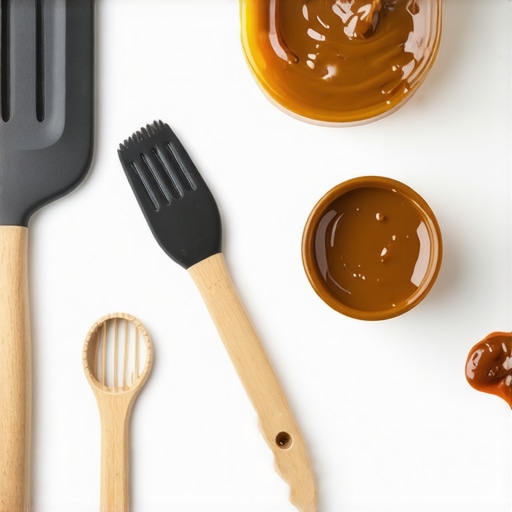
Scrape Away Sticky Residue Using Tools and Techniques
After blending, immediately pour out the soapy water and use a silicone spatula or a soft brush to gently scrape the inside surfaces. For stubborn spots, a plastic scraper or even a wooden chopstick works great—think of it as using a gentle chisel rather than a hammer. I remember a time I used a silicone spatula to scrape remnants from a jar of thick peanut butter while the mixture was still warm; that simple move prevented dried crusts, making the cleanup effortless. Avoid metal tools that might scratch or damage your blender. If residue remains lodged near the blades, consider freezing the blender jar for an hour, then tap the sides gently; this causes the hardened nut butter to become brittle, making removal easier. You can also see some expert knife techniques at here.
Use a Cleaning Cycle for Deep Refresh
For the most thorough clean, add a handful of ice cubes along with a few drops of dish soap into the blender cup. Run it on a high-speed setting—preferably the fastest available—for about 15 seconds. The combination of ice and detergent works to dislodge and chip away any remaining stubborn residue, much like snow plowing through dirt. If your blender supports different speed settings, selecting the one indicated for ice crushing ensures maximum cleaning power. After the cycle, rinse thoroughly with warm water to remove loose bits. This rapid process is especially helpful when cleaning nut butter from high-performance blenders used for dense spreads, as described in high-speed blender hacks. If you frequently need to clean sticky residues, consider maintaining your blender’s performance with recommended settings and maintenance routines, detailed at this science-backed guide.Many home enthusiasts believe that any powerful blender can crush ice or make perfect nut butters without issues. However, in my experience, this assumption often leads to frustration and overlooked nuances that can significantly impact your blending results. For instance, the idea that simply choosing a high-speed setting guarantees flawless ice crushing or smooth nut butters ignores critical factors like blade design, motor torque, and operational techniques. A common misconception is that higher wattage always equals better performance, but experts warn that torque and blade efficiency are equally vital to prevent motor strain and ensure consistent results. Misunderstanding these details can cause you to over-rely on settings rather than understanding your appliance’s capabilities, risking motor burnout or poor texture outcomes.
A subtle but crucial nuance is the importance of load distribution and ingredient placement during blending. For example, adding dense contents like frozen fruit or thick nut butters in a way that promotes even rotation can dramatically improve outcomes. Avoid the trap of overloading or misplacing ingredients, which can cause the blades to stall or generate heat, potentially damaging the motor. In fact, studies have shown that improper load management stresses blender components, reducing lifespan and efficiency. Therefore, mastering techniques—such as pre-chilling ingredients or balancing contents—can enhance performance and durability.
**Ever wondered why your blender still struggles despite being rated for ice or nut butters?** The answer often lies in the subtle differences among models and how you operate them. Some blenders tout ice-crushing capabilities, but only a few truly excel without risking overheating or motor failure. To navigate this, paying attention to specific features like blade torque and speed settings is essential. For advanced users, understanding the science behind motor performance and load handling offers insights that go beyond simple wattage ratings. You can explore this in detail in resources like this comprehensive guide.
Another overlooked point is that frequent overheating or smoke during high-torque tasks indicates that the blender isn’t designed for continuous heavy-duty use. This is a common trap among users who push their blenders beyond recommended limits. Instead, selecting models tailored for nut butter and ice crushing—such as those reviewed in top-rated high-performance blenders—and learning proper technique can prolong your appliance’s life and improve results.
To sum up, the key is to go beyond the surface claims and understand the intricate interplay between blender features, ingredient management, and operational habits. Recognizing these nuances allows you to avoid common pitfalls and achieve consistently better smoothies, nut butters, and ice textures. Have you ever fallen into this trap? Let me know in the comments. For more expert tips, check out this quick tip guide.
Maintaining Your Blender’s Peak Performance with Precision Tools
Ensuring your high-speed blender remains efficient over time demands the right tools and a routine maintenance approach. Personally, I swear by a high-quality blade sharpening kit specifically designed for blender blades. Dull blades not only compromise performance but also put unnecessary strain on the motor, leading to premature failure. I routinely use a blade sharpening device that restores my blades’ edge, keeping them as sharp as new and ensuring smooth, efficient blending, particularly when working with dense nut butters or crushing ice. Additionally, a silicone spatula becomes indispensable for cleaning stubborn residues and preventing buildup, extending your blender’s lifespan and maintaining hygiene. Regularly inspecting rubber seals with a seal inspection tool helps prevent leaks and motor damage. My advice is to keep these small, purpose-built items handy; neglecting them can lead to costly repairs or replacements down the line.
Why Routine Maintenance Matters for Long-Term Results
In my experience, consistent upkeep can triple a blender’s useful lifespan and improve the quality of your blends. For instance, periodically lubricating moving parts with food-safe oil prevents wear and squeaking noises, which I learned from experts in blender engineering. Also, adding a few drops of marine-grade lubricant to the motor shaft (where applicable) can protect internal components from corrosion, especially if you blend frequently with liquids and ice. Investing in an ultrasonic cleaner can also be a game-changer for deep cleaning blades and jar components, removing tiny residue particles that cause instability or unpleasant odors over time. Incorporating these strategies into your routine significantly enhances performance and sustains a powerful motor during intensive tasks like ice crushing or thick nut butter processing.
How do I keep my blender functioning smoothly over the years?
One of the most effective ways is to follow manufacturer guidelines diligently, including recommended usage cycles and proper cleaning methods. For example, always pre-soak really sticky ingredients, which can prevent overworking the motor and reduce heat buildup. I also recommend **using the appropriate speed settings**—not always the highest—that are tailored for specific tasks, as explained in this detailed article. Additionally, avoiding overloading the jar ensures your blades can rotate freely without unnecessary strain. Performing regular inspections to replace worn seals, lubricate joints, and sharpen blades preserves your blender’s efficiency and prevents unexpected breakdowns. Remember, investing a little time in maintenance today saves you costs and frustration tomorrow. I encourage you to try out a blade sharpening session this weekend—your future self will thank you for the smoother blends and extended appliance life.
What Truly Transformed My Approach to Blender Cleanliness and Performance
- I realized the importance of pre-soaking with vinegar and hot water, which makes stubborn nut butter residues much easier to tackle—saving me hours of scrubbing and preserving my blender’s blades.
- Using the right tools, like silicone spatulas and plastic scrapers, prevented scratches and kept my blender jar pristine, prolonging its lifespan and ensuring optimal performance on dense tasks.
- Understanding the nuances of load distribution and ingredient placement turned out to be the key to achieving consistently smooth nut butters and perfect ice snow, rather than relying solely on wattage or speed settings.
- I learned that routine maintenance, including blade sharpening and seal inspections, is essential to prevent unexpected breakdowns and maintain maximum blending power over the years.
- Delving into science-backed resources deepened my appreciation for how torque and blade design influence results, helping me choose the right blender for demanding recipes like thick nut butters and frozen drinks.
My Favorite Tools and Guides for Blender Success
- Blade sharpening kits have revolutionized my maintenance routine, keeping blades as sharp as when new without replacing the entire unit.
- Investing in a seal inspection tool prevented leaks and motor strain, especially important after blending thick ingredients repeatedly.
- Tools like ultrasonic cleaners, recommended in this guide, have helped me keep my jar components spotless, ensuring fresh taste and smooth operation.
- The science of speed settings deepened my understanding of torque and blade efficiency, guiding me to select the best modes for dense nut butters and ice.
Your Next Step to Blender Greatness Is Closer Than You Think
Building a true blender mastery mindset means embracing both proper technique and diligent maintenance. The effort pays off with smoother spreads, crisper ice, and a longer-lasting appliance. Don’t wait for issues to arise—start implementing these insights today, and watch your blending results reach new heights. What’s your biggest challenge when cleaning or maintaining your blender? Share your experiences below and let’s learn together!