Ever stood in front of your blender, expecting smooth, creamy nut butter, only to be met with stubborn dryness or a gritty texture that just won’t cooperate? I know that frustration all too well. One time, I spent ages trying to blend roasted almonds, only to end up with a paste that resembled chunky sand. It was a lightbulb moment for me—why does some nut butter refuse to become silky, especially with newer, supposedly more powerful blenders? Today, I want to share my journey and how I cracked the code with four simple fixes that work like magic in 2026.
Why Nut Butter Gets Stubbornly Dry and How to Fix It
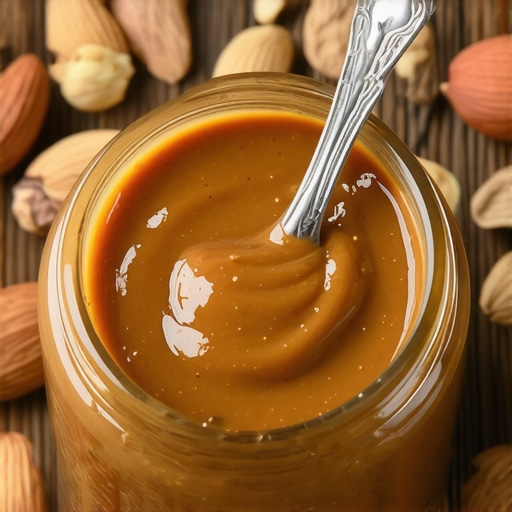
Many of us are excited about making our own nut butters at home, valuing freshness and control over ingredients. But the truth is, sometimes our high-speed blenders just can’t quite work their magic, leaving us with dry, clumpy results. This can be incredibly discouraging, especially when we’ve invested in what we thought were the best models. I learned early on that not all blenders are created equal for nut processing, and a few common mistakes might be sabotaging your results.
Did you know that overprocessing nuts or using insufficient oil can cause dryness? According to blender experts, the key to creamy nut butters is balancing the right amount of liquid and avoiding excessive heat buildup that dries out the mixture. I used to think that just blending longer would fix it—turns out, that’s a mistake. Overheating can cause the natural oils to evaporate, leading to that dry, crumbly texture. Instead, I discovered that strategic adjustments along the way make all the difference.
So, are you tired of your nut butters turning out gritty or drying out before reaching that perfect silky consistency? Well, don’t worry—you’re not alone, and more importantly, there’s a way to fix this. Before diving into the fixes, let me share a common error I made early on that’s worth avoiding: I failed to consider the importance of proper blade maintenance and speed settings. Using the wrong speed not only impacts texture but can also cause uneven blending and increase heat, worsening dryness. You can learn more about how to optimize your blender’s performance by exploring guides on [speed settings](https://blenders.kitchentechhq.com/the-ultimate-guide-to-speed-settings-in-blenders) or [nut butter preparation](https://blenders.kitchentechhq.com/mastering-nut-butter-preparation-in-your-blender).
Now that we’re on the same page about the causes and common pitfalls, let’s uncover four tried-and-true fixes that will help you get that beautiful, creamy nut butter every single time in 2026.
Control Your Blender’s Speed and Power
Start by selecting the appropriate speed. Use medium-high settings for initial processing to avoid overheating, then switch to lower speeds to finish the texture. Remember, high speeds generate heat that can dry out nuts, causing clumpiness. I once set my blender to the maximum, hoping for quick results, but the nuts turned dry and gritty. After reducing the speed and pausing periodically, I noticed a smoother, creamier consistency. For expert guidance, check out this comprehensive guide.
Add the Right Amount of Oil and Moisture
Introducing a splash of neutral oil like grapeseed or light olive oil helps achieve silky texture. Start with one teaspoon per cup of nuts, blending steadily. I once forgot to add oil while making almond butter, resulting in a dry, crumbly paste—so I added a little more oil, and it transformed completely. Be cautious not to overdo it, as too much oil can make the butter greasy. For more on optimal ratios, visit this detailed article.
Pause to Prevent Overheating and Dryness
Give your blender regular breaks—every 30 seconds—to let the motor cool down. Overprocessing heats the nuts, causing the natural oils to evaporate and resulting in dryness. During my second batch of cashew butter, I blended for a minute straight, and the result was dry and crumbly. Taking deliberate pauses, I kept checking the texture, ensuring it remained smooth and creamy. This step preserves the nut’s moisture and oils. For tips on managing heat, see this advice.
Adjust Your Technique with Proper Processing Stops
Use short pulses and scraping to guide nuts toward the blades, avoiding overprocessing. When nuts stick to the sides, pause, scrape, and blend again. I once ignored this and overworked a batch of peanut butter, causing it to turn dry and gritty. Applying short bursts, then checking and redistributing the mixture, kept the texture consistent. For more precision, check these techniques.
 Many home enthusiasts believe that simply purchasing the most powerful, high-speed blender guarantees perfect nut butters or ice crushing results. However, _size_ isn’t everything—expertise in technique and understanding nuances matter more. For instance, some assume that blending at maximum speed continuously will produce creaminess faster, but this can cause overheating, oil separation, or even damage to your blender, as highlighted by studies on blender performance here. Another common misconception is that grinding nuts longer always leads to smoother textures; in reality, overprocessing can generate excess heat, drying out oils and causing grit. To avoid this, applying short pulses and cooling periods is more effective. Additionally, many think that ice crushing depends solely on motor power, but blade design and processing techniques are equally critical. Ignoring these factors leads to jammed blades or uneven snow-like consistency, which could have been prevented with proper knowledge. Always consider blade sharpness, ice size, and process pauses to optimize results, as discussed in this article. For serious nut butter consistency, selecting the right motor torque and using targeted processing stops make a difference, which is why many fail by relying solely on brute power. Moreover, neglecting to clean blades thoroughly can cause dullness over time, reducing efficiency and leading to gritty or uneven texture. Regular maintenance is essential, and you can find detailed cleaning tips at this resource. Remember, mastering your blender’s settings, understanding the science behind each function, and recognizing the importance of technique often outweighs simply having the most expensive model. If you’re eager to elevate your blending game, explore these advanced tips. Have you ever fallen into this trap? Let me know in the comments.
Investing in a high-quality blender is just the beginning; ensuring its longevity and peak performance requires deliberate maintenance and the right tools. Regular upkeep not only prolongs your device’s lifespan but also guarantees consistently smooth results for nut butters, smoothies, or ice crushing. One of my favorite practices is using a specialized blade sharpening kit, which I personally rely on every six months. This simple addition keeps the blades razor-sharp, maintaining efficient processing and preventing issues like dullness that can lead to uneven blends or motor strain. You can find effective options at this sharpening kit. Additionally, a quality set of silicone tamper tools is invaluable for thick mixtures, enabling you to guide ingredients towards the blades without risking damage. These tools are especially useful when making dense nut butters or frozen desserts, reducing the need to manually scrape or reprocess ingredients multiple times.
Another aspect often overlooked is the importance of clean, accessible control settings. I always keep a flashlight nearby when cleaning my blender’s control panel and blade assembly—dirt or residue buildup can cause inconsistency or even damage. Proper cleaning not only preserves aesthetics but also maintains electrical integrity. For detailed cleaning routines, I recommend reviewing guides at this resource. Also, periodic inspection of the motor vents with a soft brush helps prevent overheating during heavy use, especially when processing frozen fruits or thick nut butters. Preventative maintenance like this ensures your high-speed blender continues to perform at its best without unexpected stall or wear.
Looking ahead, I predict a surge in smart maintenance features integrated directly into blenders by 2028, such as self-cleaning cycles or diagnostic alerts. These innovations will empower users to troubleshoot minor issues before they escalate, much like the diagnostic tools found in advanced electronics. Meanwhile, investing in quality tools now, like blade sharpeners and meticulous cleaning routines, provides immediate gains in performance and extends your blender’s life. One tip I urge you to try today is incorporating a weekly blade sharpening session—this tiny effort keeps your blades cutting like new, especially when tackling dense ingredients. After all, a well-maintained blender not only saves money but also transforms your culinary creations into pure perfection.
Lessons Hidden in the Blending Journey
- One of the toughest lessons I learned was that patience and deliberate technique trump raw power. Even the most advanced blenders need time, careful adjustments, and respect for their limits to produce perfect nut butter.
- I discovered that adding just the right amount of oil isn’t about convenience—it’s about making your ingredients cooperate. Overlooking this step often led to dry, crumbly textures that were hard to salvage.
- Pausing periodically during processing isn’t a sign of weakness but a vital step to prevent overheating and preserve that silky texture. Rushing past this cost me dearly in both texture and motor health.
- Having an intuitive sense for when to scrape, pulse, or add moisture transformed my results from mediocre to masterpiece. Technique truly matters more than brute strength.
My Go-To Tools for Nut Butter Success
- High-Quality Blenders with Variable Speeds: Choosing a blender that offers precise control over speed settings, like those described in this guide, makes all the difference when aiming for that perfect consistency.
- Blade Sharpening Kits: Keeping your blades razor-sharp ensures efficient processing without overworking your motor. Regular maintenance, as discussed here, keeps your blender in prime condition.
- Silicone Tamper Tools: These help guide dense ingredients toward the blades, especially useful for thick nut butters or frozen treats, reducing the need for reprocessing and keeping textures smooth.
- Proper Cleaning Supplies: Regularly cleaning and inspecting your blender, with tips from this resource, ensures peak performance and longevity.
Your Next Step Toward Nut Butter Perfection
The journey to consistently smooth, creamy nut butter is ongoing, but every tweak and technique learned brings you closer. With the right tools, patience, and a keen understanding of your blender’s unique needs, you can elevate your homemade spreads beyond expectations. Don’t let misconceptions or impatience hold you back—embrace these expert insights and turn every batch into a culinary triumph. The power to transform simple nuts into decadent butter is in your hands—go ahead, make it happen! Which of these tips will you try first to improve your nut butter game? Share your thoughts below and let’s inspire each other to blend with confidence.