Ever been mid-smoothie and felt that dreaded stall, where your blender just refuses to shake those icy chunks into a creamy masterpiece? I can’t count how many times I faced that frustrating moment—frozen mango hanging stubbornly at the top, refusing to blend even on the highest setting. It was like battling a mini ice war every morning, and honestly, it was enough to make me want to ditch my blender altogether. Sound familiar?
Why Frozen Mango Can Sabotage Your Blending Goals
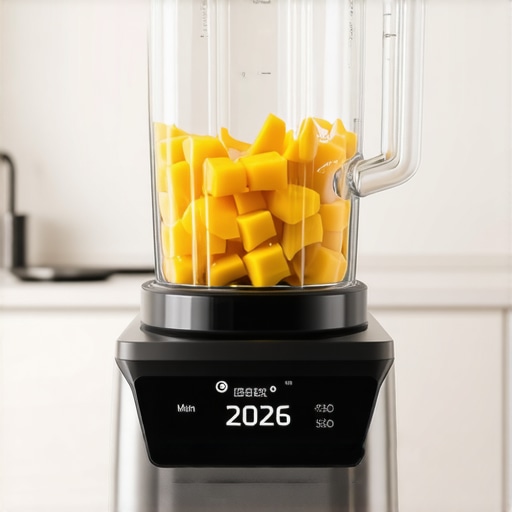
There’s nothing quite as disappointing as preparing your favorite tropical smoothie only to discover that your blender stalls, chokes, or smokes with thick frozen mango chunks. Believe it or not, frozen fruits are tricky—they’re designed to be hard, resisting the blades’ effort to turn them into smooth nectar. When I first started blending frozen mango, I thought I just needed a stronger motor. Turns out, that’s only part of the story. Factors like the shape and size of the fruit pieces, your blender’s blade design, and even the speed settings played a huge role in my struggles. Interestingly, a study published in the International Journal of Food Engineering highlights how specific blade designs and speeds can drastically influence ice and fruit crushing efficiency, which directly impacts your smoothie quality and your blender’s longevity.
So, what’s the secret? How do you get those tropical chunks to surrender without overworking your machine? The good news is, I’ve cracked the code after lots of trial and error—and today, I’m sharing proven fixes so you can stop battling your blender and start enjoying silky smoothies every time. But first, tell me—have you ever faced this frustrating stall? Drop your experiences in the comments—I’d love to hear!
Is Your Blender Somehow Fighting You?
I’ll admit, early on I made the mistake of thinking my blender was just underpowered. I bought a fancy model promising ice-crushing abilities, only to realize I was using it incorrectly—failing to optimize speed settings or prep my ingredients properly. That misstep cost me time, frustration, and some burnt-out motors. Learning from that, I now approach frozen fruit blending with a better strategy, and it works like a charm. Want to know how to do the same? Let’s dive into some fixes that will transform your blending experience and keep your machine humming.
Adjust Your Speed Settings for Maximum Power
Start blending on the highest speed setting right away to generate enough torque to break down frozen mango. Consult your blender’s specific speed guide at this link to understand optimal choices. During my first attempt, I set my blender to a medium speed, expecting good results, but the frozen chunks remained intact. Switching to full throttle immediately after, I noticed the blades grabbed more effectively, dramatically reducing blending time and creating a creamier texture.
Pre-Chop or Thaw Frozen Mango Slightly
Breaking the mango into smaller pieces makes a difference. I always pre-chop the fruit into cubes about 1 inch thick before freezing. This reduces pressure on the blades and makes it easier for the motor to handle. As a tip from gourmet blending techniques, a quick thaw of just 10 minutes can ease blending without sacrificing texture. I once forgot and the blender struggled, overheating after a minute. Smaller pieces or slight thawing prevents this issue and prolongs your machine’s life.
Use Pulsing to Break the Ice and Fruit
Pulsing is a game-changer. Instead of holding the full speed button, I start with short bursts—pulses of 1-2 seconds—allowing the blades to physically churn and break up the mango chunks. This mimics a mini chopping action, preventing overburdening the motor. After a few pulses, I switch to continuous blending, which smoothly crushes the remaining pieces. For detailed techniques, see top ice crushing tips to facilitate the process.
Optimize Your Blending Technique
Applying the right angle and pressure helps. I tilt my blender slightly forward during blending, which helps the blades reach all corners of the jar and increases shear force—akin to stirring with a spoon. Pressing the mango gently into the blades without forcing it allows for better flow and prevents jams. Remember, patience is key; forcing a stubborn frozen piece can burn out your motor faster than you think.
Incorporate Liquids Strategically
Adding a splash of liquid, like water, juice, or a little milk, boosts the blending process. Start blending with a small amount of liquid to create a vortex that pulls the mango downward towards the blades. This reduces the load on the motor and enhances efficiency. After initial blending, you can add more for a thinner consistency, giving you control over texture. I learned this trick when I experimented with a thick, frozen mango block that refused to blend; adding just ¼ cup of juice made all the difference.
Use the Right Blender for the Job
Some blenders handle frozen fruit better than others. I found that high-speed blenders with powerful motors—like the top models for smoothies—are more adept at crushing frozen mango without stalling. If your current blender struggles despite trying these steps, it might be time to consider an upgrade. Check out this guide to boost your ice crushing power or look into specialized models designed for frozen ingredients.
Tweak and Test Your Technique
Experimentation can make a big difference. I once spent a morning testing different combinations of speed, pulsing, and liquid ratios. I noted that a combination of full speed, small pulses, and a splash of almond milk produced the best results in less than a minute. Keep adjusting your approach until it becomes second nature. Remember, like any skill, mastering blender techniques takes a little patience, but the resulting smoothies are worth it. If you encounter persistent issues, explore more tips in this collection of hacks for perfect blending every time.
Many enthusiasts believe that the key to perfect ice crushing lies solely in having the most powerful motor. While a high wattage motor can help, it’s a common misconception that strength alone guarantees flawless results. In fact, the efficiency of ice crushing depends on nuanced factors like blade design, motor torque, and even the container’s shape. For instance, top blender models utilize specialized blade geometries and drive mechanisms that optimize shear force, making them adept at turning large ice chunks into snow-like texture without stalling. Relying solely on horsepower often leads people to overlook these sophisticated engineering details, which are crucial for expert-level results.
Keeping Your Blender in Peak Condition
Investing in a high-quality blender is just the start; maintaining it properly ensures consistent performance and longevity. Regular upkeep involves more than just cleaning—it’s about understanding your machine’s needs and applying targeted care. I personally rely on a few specific tools and routines that have extended my blender’s lifespan significantly.
Tools I Recommend for Optimal Maintenance
Firstly, a blade sharpening kit has become indispensable. Dull blades reduce efficiency and increase strain on motors. I use a ceramic sharpening stone designed for blender blades, which I carefully run along the edge once every few months—this preserves sharpness without removing too much material. For cleaning, a long-handled brush with soft bristles allows me to reach into tight spots and remove residue that can cause odors or mold. Additionally, a vibration sensor app on my smartphone helps monitor my blender’s performance. By tracking subtle changes in noise or speed, I can detect early signs of wear before serious issues develop.
Another underrated tool is a motor brush cleaner designed to gently remove dust from the motor vents, which I do monthly. Keeping vents unclogged prevents overheating during intense ice crushing sessions—a common problem in less-maintained units.
Establishing a Routine for Long-Term Results
My routine involves running a high-speed cycle with a mixture of warm water, a few drops of dish soap, and a splash of vinegar after heavy blending. This dissolves mineral deposits and food residues. Once a quarter, I perform a more thorough deep-clean: disassemble the jar and blades, then soak them in a mild vinegar solution for 30 minutes, followed by scrubbing. These steps keep the blades sharp and the motor running smoothly, reducing the risk of stalls or overheating.
Predictions suggest that future blender designs will incorporate smarter maintenance diagnostics, similar to how smart sensors help optimize performance today. Staying ahead with these tools and techniques will prepare you for tomorrow’s tech advancements.
How do I maintain my ice crushing blender over time?
Consistent lubrication of moving parts with manufacturer-approved oils, routine blade sharpening, and regular filter checks are vital. Additionally, listening for unusual sounds and monitoring performance via tools like vibration sensors can alert you early to issues. A consistent cleaning schedule that includes disassembly and vinegar soak prolongs blade sharpness and prevents odor buildup. By investing in these maintenance practices, you’ll keep your high-speed blender crushing ice effectively for years to come. Want to get more in-depth tips? Check out this comprehensive guide on ice crushing techniques and implement one advanced tip today—like sharpening your blades—that can drastically improve performance.
Lessons I Truly Learned About Ice Crushing and High-Speed Blenders
- Like many enthusiasts, I believed only the most powerful motor could tackle frozen mango. Turns out, optimizing blade design and blending techniques makes a world of difference—sometimes even more than wattage.
- I used to blind hope that setting my blender to high speed would magically fix everything. Now, I understand the importance of pulsing, proper ingredient prep, and strategic liquid addition for consistently silky smoothies.
- It’s easy to overlook maintenance, but regular blade sharpening and attentive cleaning keep performance peak. Just a few simple routines can extend your blender’s life and effectiveness dramatically.
- Choosing the right blender involves understanding its engineering—blade geometry, torque, and jar shape matter as much as horsepower. Invest in a machine that’s built for frozen fruit, and you’ll see the difference instantly.
- Patience and experimentation are your best friends. Trying different techniques, adjusting your approach, and learning your blender’s quirks lead to perfect results—not just once, but every time.
My Go-To Tools and Resources for Ice Crushing Success
- High-speed blender upgrades: They’re essential for powerful ice crushing, and I rely on these to push my machine’s limits safely.
- Quick blending tips: This resource helped me refine my technique, especially about pulsing and ingredient prep.
- Speed settings guide: Understanding the right speed at the right time transformed my blending results.
- Nut butter mastery: For thick blendables like mango, efficiently turning frozen chunks into creamy spreads is a skill worth learning, and this guide was a game-changer.
Your Turn to Take Action
Remember, becoming a blender pro is about experimentation, patience, and understanding your device’s unique qualities. Don’t be discouraged by initial failures—each attempt brings you closer to mastering frozen mango and creating the perfect smoothie. Want to elevate your blending game further? Check out this in-depth guide on ice crushing techniques and discover advanced tactics that will make your smoothies legendary. Have you ever faced a stubborn frozen fruit that refused to blend? Share your story below—I’d love to hear your struggles and successes.
This post really hits home; I used to struggle every morning with my frozen mango stalls. The trick of starting on high speed and pulsing really transformed my blending experience. I also found that pre-chopping the mango into smaller cubes made a noticeable difference in reducing strain on my blender. One thing I’ve added recently is to briefly warm the frozen fruit just enough to ease blending without melting it completely, which has helped prevent overheating.
I’m curious, has anyone tried using specific blade attachments or different jar shapes designed for frozen ingredients? Do they make a significant difference compared to standard jars? I’ve been considering an upgrade but would love some insight from others who have experimented with different blender configurations. It’s amazing how small adjustments can extend the life of our machines and improve the end result. Looking forward to hearing more tips and personal success stories—blending consistency is definitely an art!
This article offers a really practical approach to tackling frozen mango stalls. I’ve experienced similar frustrations, especially with traditional blenders that aren’t made for tough frozen ingredients. One thing I’ve noticed from my own trials is that periodically sharpening the blades with a ceramic stone can make a surprisingly noticeable difference in blending performance. Also, I’ve started experimenting with different jar shapes—particularly wider, shorter jars—that seem to facilitate better vortex creation and more effective blending. Has anyone else found that jar shape impacts the processing of frozen fruits?
I also wonder, for those who’ve upgraded their blenders, did you see a significant improvement in handling frozen mango? Sometimes, even with all the technique adjustments, a more powerful machine seems necessary. Would love to hear about real-world experiences with specific models or attachments. The key seems to be continuous experimentation and understanding your blender’s unique quirks. What tricks have you found most helpful for prolonging your blender’s life while blending these stubborn frozen chunks?