It was a chaos of clattering ice and stubborn nut chunks, and I was ready to toss my old blender out the window. I remember the moment vividly—trying to whip up a smoothie on a scorching summer day, only to be met with a sluggish motor and lumpy results. That day, I realized: the blender I trusted no longer cut it. If you’ve ever experienced a half-blended smoothie or a nut butter that refused to get creamy, you’re not alone. These frustrations are more common than you think, and honestly, they hold us back from achieving the healthy recipes we crave.
Why Your Blender Might Be Holding You Back in 2025
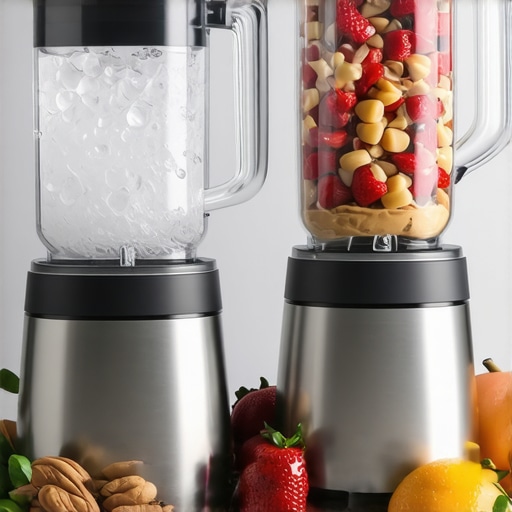
In recent years, the market has flooded with new high-speed blenders designed to handle tough ingredients effortlessly. But not all blenders are created equal, especially when it comes to crushing ice and making smooth, delicious nut butters. Personally, I used to settle for mediocre results, thinking I just wasn’t skilled enough. It wasn’t until I learned about the latest innovations and how to select a blender with the right power and features that everything changed. Today, I want to share that journey—and how upgrading can transform your kitchen.
Did your previous blender struggle with icy drinks or thick nut butters? If so, you’re not alone. Many early models lacked the necessary motor strength or blade design to handle these tasks effectively. This mistake delayed my progress and made everyday recipes frustrating. Now, I only use blenders optimized for ice crushing and nut butter production, which you can explore through detailed guides like best low-maintenance blenders for 2025. Admittedly, understanding what features matter was my first step toward efficiency.
By choosing the right high-speed blender, you’ll unlock the potential to craft healthier, tastier recipes, like homemade nut butters or perfectly crushed ice for your smoothies. Want to see how the top models stack up? Check out top ice crushing and nut butter blenders for 2025. The right equipment not only saves time but elevates your entire recipe game.
Next, let’s explore practical tips to maximize your blender’s potential and get those creamy results that make healthy eating so satisfying. Ready to upgrade your blending experience?
Boost Your Ice Crushing Power
Start by ensuring your blender has sufficient wattage; aim for at least 1,000 watts to handle ice and tough ingredients with ease. Use the boost your ice crushing techniques by adding small ice cubes gradually and pulsing instead of continuous blending. I remember a morning when I { } attempted to crush a large bag of ice all at once, only to strain my motor; breaking it down into batches made a huge difference, leaving ice powdery and smooth.
Optimize Your Blade Design and Placement
Look for blenders with six or more blades positioned to create a vortex—this pulls ingredients toward the blades for consistent blending. When I first upgraded to a model with improved blade design, my smoothies became creamier, and toppings like crushed nuts incorporated seamlessly. Remember, sharp blades cut through ingredients more efficiently, reducing blending time and motor stress. Check out ice crushing techniques to understand how blade geometry makes a difference.
Adjust Speed Settings Strategically
Use variable speed controls to adapt to different textures—start slow to combine ingredients, then ramp up for smoothness. For nut butters, a consistent high speed is essential; I once underestimated this, stopping my blender prematurely, resulting in chunky, uneven butter. Experimenting with the speed settings helps you find the perfect balance, ensuring a thick, glossy consistency every time.
Employ Proper Techniques for Nut Butters
To create gourmet nut butters, begin with chopped nuts and pulse briefly to break down initial pieces. Then, blend on high for several minutes, scraping down the sides regularly. I claimed my first batch of almond butter as a disaster—oily and chunky—until I learned to low and slow start, then increase speed gradually. For expert tips, visit nut butter secrets. Patience is key—allow the blades to do the work without overwhelming the motor, which prolongs your device’s life.
Refine Your Technique with Practice
Consistent practice helps master timing and ingredient layering. I once tried to make a super thick smoothie without knowing about pre-softening frozen fruit; the result was a frozen mess. Learning to pre-warm ingredients or add liquids in stages improves texture and reduces strain. Use the tips from smoothie secrets to elevate your game.
Many home chefs and smoothie enthusiasts believe that simply choosing a high-wattage blender guarantees perfect ice crushing or creamy nut butters. However, this misconception overlooks the critical nuances that separate good results from great ones. For instance, many assume that a powerful motor alone will handle tough ingredients like ice or nuts effortlessly, but without attention to blade design, speed control, and ingredient preparation, even the most expensive blender can underperform. It’s essential to understand the importance of blade geometry and vortex creation—sharp, well-placed blades ensure ingredients are drawn towards the blades more effectively, reducing blending time and stress on the motor. Overlooking this aspect can lead to motor burnout or uneven textures. Furthermore, many underestimate the significance of employing proper techniques, such as pulsing and layered ingredient addition, to achieve the desired consistency.
Keep Your Blender in Top Shape: Essential Maintenance Tips
To ensure your high-speed blender continues delivering excellent results for ice crushing, nut butters, and smoothies, regular maintenance is crucial. Start by thoroughly cleaning the blades after each use with warm water and a gentle detergent—this prevents residue buildup that can impair performance. For the motor base, avoid submerging it in water; instead, wipe it down with a damp cloth to remove dust and splashes.
Periodically inspect the blades for dullness or damage. Dull blades require replacement, as sharp blades are vital for efficient blending and reducing motor strain. Personally, I replace my blades every 12 months, which aligns with expert advice from blender maintenance tips. Lubricate any moving parts if your model permits, following the manufacturer’s guidelines, to prevent rust and ensure smooth operation.
For long-term results, keep the blender motor cool by avoiding overloading it with large batches or excessively frozen ingredients. Allow the motor to rest between heavy blending sessions—this prolongs its lifespan and maintains power. Additionally, check the power cord regularly for fraying or damage to prevent electrical hazards.
What Tools Help Keep Your Blender Running Smoothly
I rely heavily on specific tools to maintain my blender’s performance. A set of silicone cleaning brushes helps reach those tricky blade crevices without scratching, ensuring a deep clean that maintains blade sharpness. For sharpening dull blades, I use a dedicated blade sharpener designed for kitchen blades; this restores edge precision without costly replacements.
Investing in a good-quality blender lubricant is also a game-changer. I apply it annually to the motor shaft, based on manufacturer recommendations, which minimizes friction and keeps everything running quietly and efficiently.
How do I maintain my blender over time?
Consistent inspection, proper cleaning, and gentle handling are your best allies for long-term performance. Following these practices allows your blender to crush ice and process nuts like a pro year after year. Remember, a well-maintained blender extends its lifespan significantly, saving you money and ensuring your recipes turn out perfectly each time. For more detailed maintenance routines, visit blender maintenance guide.
Looking to fine-tune your blender’s ice crushing capability? Explore advanced techniques to boost ice crushing and optimize your results. I highly recommend trying the pulsing method with small ice chunks—this simple adjustment can dramatically improve your texture and extend your blender’s life. Regular maintenance combined with smart techniques ensures you’ll enjoy perfect smoothies and nut butters for years to come.
What I Wish I Knew About Blender Power and Technique
One of the biggest lessons I learned was that wattage isn’t everything. A powerful motor is essential, but without the right blade design and smart blending techniques, even the most robust blender can fall short. I used to believe that high wattage alone would handle ice and nuts effortlessly, but I was surprised to discover that blade geometry and vortex creation play equally crucial roles. This insight significantly improved my results and extended my blender’s lifespan.
Gems from My Toolkit for Perfect Blends
Over time, I curated a set of tools that keep my blender performing at its best. A set of silicone brushes ensures thorough cleaning without scratching blades, while a dedicated blade sharpener rekindles dull edges, restoring cutting efficiency. Investing in quality blender lubricants and periodic inspections has also made a noticeable difference in maintaining peak performance. These tools turned out to be game-changers in my blending journey and could do the same for you.
Fuel for Your Blend Journey and Your Heart
Stepping into better blending habits can be empowering. Remember, every smoothie or nut butter you make gets you closer to a healthier, more vibrant life. The right blender, combined with proper technique and maintenance, is an investment in your wellbeing and culinary adventures. So, don’t wait—experiment, learn, and enjoy each step toward smoother, tastier creations. Your perfect blend awaits, and you’ve got what it takes to master it.
Reading this post really resonated with my own blending frustrations, especially when trying to get that perfect, creamy nut butter without overloading my blender. I completely agree that blade design and proper technique are just as important as wattage. When I upgraded to a model with six blades and a vortex system, I noticed a huge difference in both efficiency and texture. One tip I found helpful for nut butters is starting with chopped nuts and gradually increasing the speed, which prevents the blades from sticking or overheating. Also, regular maintenance, like cleaning the blades thoroughly and periodically sharpening them, has extended my blender’s lifespan significantly. Has anyone tried using specific brands of blender lubricants? I’m curious if they truly make a noticeable difference in noise reduction and motor longevity, especially with frequent use for ice crushing and nut butters. Would love to hear others’ experiences with maintaining high performance over time.
I couldn’t agree more with the importance of blade design and proper technique when it comes to blending tough ingredients like ice and nuts. Over the years, I’ve noticed that even with high-wattage blenders, dull blades or poor placement can really compromise the results. Regularly sharpening and replacing blades has been a game-changer for me, especially since I do a lot of homemade nut butters and icy smoothies. Also, I’ve started using a high-quality blender lubricant recommended by the manufacturer, and it definitely seems to prolong both the motor’s lifespan and the overall quietness of my blender. For those who are concerned about motor longevity, do you think investing in a lubricant is worth it? Or are there other maintenance tips that have worked better for you? It’s fascinating how the little details like blade geometry and maintenance routines can make such a big difference in professional results at home.
Reading this post really hits home for me. I’ve gone through the same frustrations trying to get smooth nut butters and icy smoothies with my older blender, which struggled with tough ingredients. Since upgrading to a model with a six-blade vortex system and over 1,200 watts, the results have been noticeably better—creamy texture and no more engine strain. I also learned that really paying attention to pre-chopping nuts and gradually increasing speed helps prevent overheating and sticking. Maintenance has become a key part of my routine, especially regular blade sharpening and cleaning, which keeps performance optimal.
One thing I’ve noticed is that using a good blender lubricant, as recommended by the manufacturer, reduces noise and prolongs motor life. I’m curious, has anyone experimented with different brands of lubricants, and if so, which ones worked best for you? Also, do you think that preventive maintenance like this can significantly extend your blender’s lifespan, or is it more about optimizing performance temporarily? Would love to hear some tips from fellow enthusiasts on keeping high-performance blenders running smoothly long-term.