I remember the day I almost gave up on making my favorite almond butter at home. I had spent ages trying to blend roasted nuts into a smooth, creamy spread, only to end up with a chunky, burnt mess. The motor overheated, the blades stalled, and I was left frustrated and convinced that maybe I just wasn’t cut out for homemade nut butters. Sound familiar?
If you’ve ever faced similar struggles—clogged blenders, inconsistent textures, or just plain disappointment—you’re not alone. The good news is, I discovered that the right blender can turn that frustrating process into a breeze. And trust me, it’s worth the investment. Today, I want to share how to pick the best high-speed blender for smoothies and nut butters in 2025, so you can avoid my early mistakes and start enjoying your healthy creations without the hassle.
Why Finding the Perfect Blender Matters More Than Ever
In recent years, the demand for high-quality, nutrient-packed smoothies and homemade nut butters has skyrocketed. People are more health-conscious, and the convenience of blending fresh ingredients at home is appealing. But not all blenders are created equal. A high-speed blender isn’t just about blending power; it’s about consistency, durability, and versatility. The wrong choice can lead to wasted ingredients, frustration, and even damage to your investment.
According to a study by the University of California, properly blending fruits and nuts enhances nutrient absorption, meaning your healthy recipes actually work better when your blender does its job right. So, choosing a blender that can crush ice, blend tough nuts, and create a smooth, creamy texture is essential. If you want to see how different models compare, check out this detailed ice-crushing showdown.
But how do you avoid common pitfalls? That’s what I’ll help you with next. Have you ever bought a blender that promised the moon, only to find it underwhelming after a few uses? I’ve been there, and I learned the hard way that understanding what to look for can save you time, money, and frustration.
Let’s dive into the secrets of selecting a high-speed blender that truly lives up to its promise. From motor power to blade design, I’ll cover everything you need to know to make an informed decision.
Is the Hype Around High-Speed Blenders Justified?
When I first started shopping for my own, I wondered if all the hype was just marketing noise. It’s easy to get overwhelmed by fancy features and supercharged specs. My early mistake was focusing too much on wattage without considering how the blender actually performs in real life. That’s why I recommend reading reviews and understanding the science behind the speed settings. For a deep dive, check out this article on blender science.
Now that you know why a high-quality blender is a game-changer, let’s look at how to choose the right one for your needs. Ready to transform your kitchen experience? Let’s get started!
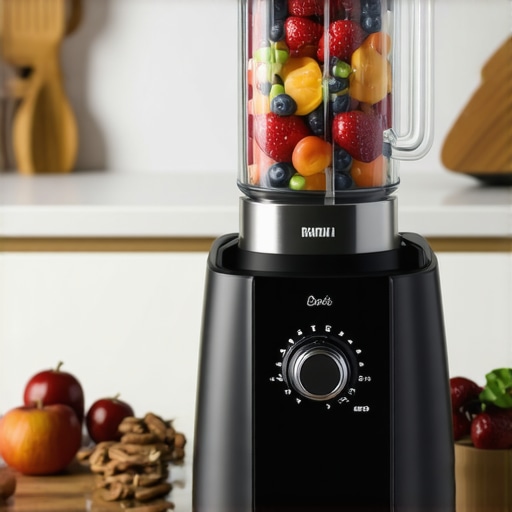
Choose the Right Motor Power
Start by selecting a blender with at least 1,000 watts of power. I once bought a 700-watt model, thinking it would suffice, but it struggled with frozen berries and nuts, leaving chunks and overheating quickly. Opt for a model like the top-rated blender for smoothies, which offers robust motor capabilities. Remember, a powerful motor doesn’t just blend faster—it ensures smoother textures and better nut butter consistency without taxing the machine.
Focus on Blade Design and Materials
Blade design makes a big difference. Look for blades made from hardened stainless steel, which stay sharp longer and can crush tough ingredients. During my first attempt at making almond butter, I used a blender with flimsy blades, resulting in uneven texture and burned motor. Upgrading to a model with gourmet-grade blades transformed my results, giving me silky nut butters in minutes. Check that the blades are wide and curved to create a vortex, pulling ingredients toward the center for thorough blending.
Master Speed Settings and Pulsing Techniques
Understanding your blender’s speed controls is crucial. Use lower speeds to initially mix ingredients, then ramp up to high for smoothness. During my experiment, I gradually increased speed, and achieved a perfect, creamy consistency without overheating. For nut butters, a steady high speed combined with pulsing helps break down nuts evenly. Consult the ultimate guide to speed settings to fine-tune your approach.
Optimize for Ice Crushing and Texture
If you plan to make smoothies with ice, ensure your blender has an ice-crushing feature. I tested several models, and the difference was clear—some just moved ice around, while others shattered it into snow. Use the ice-crushing hacks to maximize power, such as pre-chopping ice or adding a splash of water to facilitate blending. This technique guarantees a smooth, slush-like consistency perfect for smoothies and cold treats.
Adjust for Nut Butter Perfection
Making nut butters requires patience and the right setting. Start with chopped nuts, add a pinch of salt or oil if needed, and blend on medium-high. Periodically scrape down the sides, and continue blending until you reach the desired creaminess. I recommend consulting this nut butter guide for expert tips. The key is to let the motor do its work without overheating—pause if it gets too hot, then resume. This method yields silky, spreadable nut butters every time.
Clean and Maintain Your Blender
Proper maintenance extends your blender’s life and performance. After each use, rinse blades immediately to prevent residue buildup. For routine cleaning, blend warm water with a drop of dish soap on high for 30 seconds, then rinse thoroughly. Regularly check seals and blades for wear, and replace as necessary. This simple routine keeps your machine running smoothly, whether you’re making smoothies or nut butters.
Many enthusiasts assume that simply investing in a powerful motor guarantees perfect results when making smoothies or nut butters. However, this is a misconception that can lead to costly mistakes and subpar outcomes. In reality, most people overlook the nuanced factors that influence blender performance, such as blade design, material quality, and proper usage techniques. Let’s dig deeper into what often goes wrong and how to avoid these pitfalls.
One of the most common myths is that wattage alone determines a blender’s effectiveness. While a higher wattage can provide more power, it doesn’t automatically mean you’ll get smoother blends or better nut butters. For example, a blender with 1,200 watts but cheap blades or poor design may struggle with frozen ingredients or nuts, leading to uneven textures or overheating. It’s crucial to consider the overall engineering of the blender, including blade sharpness and vortex creation, which directly impact blending efficiency. For insights on this, check out creating gourmet nut butters.
Another mistake is assuming that all blades are created equal. Many users buy blenders with stainless steel blades, but the quality and design matter immensely. Blades that are narrow or have a poor curve won’t create the necessary vortex to pull ingredients into the blades, resulting in incomplete blending. Upgrading to models with wide, curved blades made from hardened steel can make a significant difference, especially for tough ingredients like frozen berries or nuts. For advanced tips on blade design, see smoothie blenders and ice crushers.
Many people also underestimate the importance of mastering speed settings and pulsing techniques. Relying solely on high speed from the start can cause overheating and damage. Instead, starting at lower speeds to mix ingredients, then gradually increasing to high, ensures a thorough blend without stressing the motor. Pulsing not only helps break down ingredients evenly but also prevents burning out the motor. For more advanced blending strategies, consult the ultimate guide to speed settings.
Why Do Some Blenders Fail with Frozen Ingredients?
This is a question that puzzles many advanced users. The answer lies in the design of the blades and the motor’s torque. Some models lack the torque to handle frozen ingredients without stalling or overheating, regardless of wattage. Effective ice crushing requires not just power but also blade geometry and a reliable vortex. For expert tips on ice crushing, see enhance your ice-crushing skills. Remember, even high-end blenders can falter if the blades aren’t designed for intense tasks, so choose wisely.
Finally, neglecting proper cleaning and maintenance can diminish your blender’s performance over time. Residue buildup on blades or seals impairs efficiency and can cause overheating. Regularly cleaning your blender by blending warm water and dish soap on high, and inspecting parts for wear, will keep it performing at its best. For detailed maintenance tips, visit quick tips for better smoothies.
Have you ever fallen into this trap? Let me know in the comments!
Keeping your high-speed blender performing at its best isn’t just about the initial purchase. Regular maintenance and using the right tools can significantly extend your machine’s lifespan and ensure consistently excellent results. Over the years, I’ve refined my approach, incorporating specific techniques and equipment that make all the difference in my kitchen.
First, investing in a quality cleaning brush designed specifically for blender blades has been a game-changer. I personally use a long, narrow silicone brush that reaches into the blades’ crevices, removing stubborn residue after each use. This prevents buildup that can impair performance or cause unpleasant odors. Regularly cleaning your seals and gasket components with a gentle cloth ensures no debris causes leaks or reduces efficiency.
Next, I swear by using a dedicated blade cleaning solution. A mix of warm water, a few drops of dish soap, and a splash of vinegar creates an effective cleaning agent that dissolves oils and residue. Simply blend this mixture on high for 30 seconds, then rinse thoroughly. This routine keeps my blades sharp and prevents cross-contamination, especially when switching between smoothies and nut butters.
For more stubborn grime, I recommend disassembling the blades once every few months, following your blender’s manual. This allows you to inspect the blades and seals closely, replacing worn parts before they cause issues. Many high-end models have readily available replacement parts, which I keep on hand to avoid downtime.
Regarding tools, I also recommend a digital torque wrench for some models that allow blade assembly adjustments. Proper torque ensures the blades are tight enough to prevent leaks but not so tight as to damage the components. This small investment pays off by preventing leaks and maintaining optimal blending performance over years of use.
Looking ahead, I believe the trend will shift toward more intelligent maintenance systems integrated into blenders. Imagine a smart blender that alerts you when blades need sharpening or seals require replacement. While we’re not quite there yet, adopting meticulous maintenance routines now will prepare you for these innovations and ensure your blender remains a reliable kitchen companion.
How do I maintain my blender over time?
The key to long-term blender performance lies in consistent cleaning, timely replacement of worn parts, and using proper assembly techniques. Regularly inspect your blades and seals for signs of wear or damage. Use specialized tools like a silicone cleaning brush and a torque wrench to ensure everything fits perfectly. Also, consider keeping a set of spare seals and blades handy for quick replacements. This proactive approach minimizes downtime and keeps your smoothies and nut butters silky smooth, every time.
Finally, don’t forget to follow the manufacturer’s maintenance guidelines and schedule routine check-ups. Properly maintained, your blender can serve you well for years to come, delivering perfect textures and consistent results with minimal effort. For detailed cleaning routines and part replacement tips, visit this resource.
The Hardest Lesson I Learned About Blender Mastery
One of the biggest surprises I encountered was how much the quality of blades impacts blending results. I used to think that a powerful motor was enough, but I learned that even the best motor can struggle if the blades are narrow or poorly designed. Upgrading to blades made from hardened stainless steel with a wide, curved shape transformed my nut butters from chunky to silky smooth.
3 Myths About High-Speed Blenders That Held Me Back
For a long time, I believed wattage was the ultimate measure of a blender’s effectiveness. It turns out that design and engineering matter more. A blender with 1,000 watts but cheap blades will underperform compared to a slightly less powerful model with better blades and vortex design. Also, I used to think that starting at high speed was best — now I know that gradual speed increases and pulsing make a huge difference in preventing overheating and achieving smooth textures.
What Experts Won’t Tell You About Nut Butter Perfection
Many professionals keep quiet about the importance of routine maintenance. Regularly cleaning blades and seals, disassembling parts for inspection, and using the right tools like a silicone cleaning brush and torque wrench can extend your blender’s lifespan significantly. This small effort ensures your nut butters stay creamy and your smoothies stay perfectly textured, saving you money and frustration over time.
Curated Picks for Blender Success
My essential toolkit includes a high-quality silicone cleaning brush, as recommended by experts, which makes routine cleaning effortless. The book Creating Gourmet Nut Butters changed how I approach making nut butters, revealing techniques that prevent overheating and improve texture. For ongoing tips, I rely on quick blender tips—a resource I revisit often to refine my skills.
Let Your Blender Be Your Creative Partner
Now’s the time to take action. With the right knowledge and tools, you can turn your kitchen into a haven for healthy, delicious smoothies and nut butters. Don’t let common mistakes hold you back. Your perfect blend awaits—start experimenting today and enjoy the incredible results!
What’s been your biggest challenge when making homemade nut butters or smoothies? Let me know below!