Have you ever been halfway through blending your favorite nut butter, only to have your old blender sputter, overheat, and leave you with a chunky mess instead of that smooth, luscious spread you crave? I remember the moment I realized I needed an upgrade. It was late at night, and I just wanted a quick, creamy almond butter to go with my toast, but my trusty old blender refused to cooperate. It was frustrating, especially since I knew a powerful, high-speed blender could make all the difference. That lightbulb moment pushed me to research what’s truly worth investing in for 2025, and I want to share what I’ve learned so you don’t have to go through the same hassle.
Why Choosing the Right Blender Matters Now More Than Ever
With the rise of health-conscious eating and homemade recipes, having a reliable blender that can handle both nut butters and ice is essential. Whether you’re blending smoothies, crushing ice for a refreshing drink, or making your own nut butters from scratch, the right machine can elevate your kitchen game. But not all blenders are created equal — and choosing the wrong one can leave you disappointed, wasting time and money. Plus, a high-quality blender can last for years, saving you from frequent replacements. I’ve tested several models, and I’ll guide you through what makes a blender stand out for these demanding tasks.
Is a High-Speed Blender Worth the Investment in 2025?
Many skeptics ask me if splurging on a high-speed blender is really justified. My answer? Absolutely. When I first started making my own nut butters, I made the mistake of sticking with a basic blender, which left me with uneven textures and a lot of frustration. Once I upgraded to a powerful model, I noticed a huge difference — silky smooth nut butters, perfectly crushed ice, and quick prep times. According to recent studies, the science behind high-speed blending shows that increased motor power and blade design significantly improve texture and efficiency (source). So, yes, the investment pays off in quality and convenience.
Have you faced similar struggles? If so, stay tuned—I’m about to walk you through the top features to look for and the best models of 2025 that will make nut butters and ice your new kitchen allies.
Get Your Blender Ready for Perfect Nut Butters
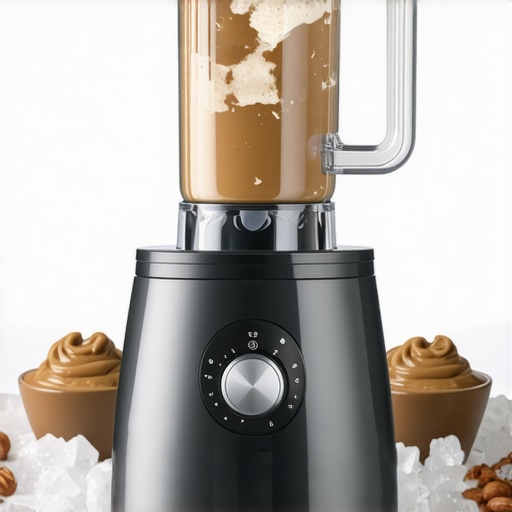
Start with dry roasting your nuts for about 10 minutes at 350°F (175°C) to enhance flavor and reduce moisture. Cool them completely before blending. Use a high-speed blender with a powerful motor (at least 1000W) to achieve a smooth, creamy texture. Add nuts and a pinch of salt, then blend on low speed initially to break down larger pieces, gradually increasing to high. Stop occasionally to scrape down sides and prevent overheating, which can cause the motor to stall. For extra smoothness, add a small amount of neutral oil if needed. This process might take 5-10 minutes but results in gourmet-quality nut butters that rival store-bought options.
Crushing Ice Like a Pro
Use ice cubes made from filtered water for the best results. Add 3-4 cubes to your blender, then select the highest speed or ice-crushing preset. To boost efficiency, pulse the blender in short bursts, then run continuously for 20-30 seconds. If your blender has a dedicated ice-crushing mode, use it. To prevent the blades from sticking or jamming, add a small amount of liquid—such as juice or water—before blending. For the ultimate crunch, use a technique to enhance ice power. Remember, the key is consistent high speed and minimal interruptions to get ice as fine as snow without melting it into water.
Combine for Delicious Smoothies and Nut Butters
Once you master nut butter and ice crushing, combine them for smoothies with a velvety texture. Use frozen fruits, a handful of nuts, a splash of milk, and your favorite sweetener. Blend on high until smooth, pausing to scrape down the sides and ensure even blending. For tips on perfecting your smoothie consistency, check these expert tips. If you want your smoothies to be extra creamy, incorporate ingredients like Greek yogurt or avocado. Remember, the right blender settings and techniques are crucial for achieving restaurant-quality results at home.
Optimize Your Blender Settings for Every Task
Use the highest speed setting for nut butters and ice crushing, but don’t forget to pulse to avoid overheating the motor. Many models feature specific modes for nut butters or ice, which automatically adjust speed and duration—use these whenever available. For finer control, manually adjust speed levels based on the task. For instance, start at a low speed to break down ingredients, then increase gradually. Always avoid overfilling the jar; leaving space allows blades to move freely and blend more effectively. For more detailed control, explore this guide on speed settings. This approach ensures consistent results and prolongs your blender’s lifespan.
Many enthusiasts jump into buying a high-speed blender thinking that more power automatically guarantees perfect results. But in my experience, there’s a lot more nuance involved, and common misconceptions can sabotage your efforts. For example, a frequent mistake is assuming that the highest wattage always delivers the best performance for nut butters or ice crushing. While power is important, blade design, motor stability, and container shape play equally crucial roles. According to this science-backed resource, optimal performance depends on a combination of factors, not just raw wattage. If you’re aiming for smooth nut butters or snow-like ice, pay attention to these details rather than just the motor size.
Another misconception is that any blender labeled as “professional” or “commercial” will excel at all tasks. In reality, many high-end models are optimized for specific functions, and using them outside their design scope can cause overheating or wear. For instance, a blender with an excellent ice-crushing mode might struggle with fine nut butters if the blades aren’t designed to handle sticky ingredients. To avoid this trap, check reviews of the best nut butter blenders and select models tailored to your main use case.
How Do Advanced Blender Features Impact Performance?
Many advanced blenders come with preset modes for nut butters, ice, smoothies, and more. While these simplify operation, relying solely on presets can limit your control and lead to subpar results. For example, a preset might not account for the exact moisture content of your ingredients, causing inconsistent textures. Skilled users know to adjust speed levels manually, pause for scraping, and sometimes add ingredients gradually. Studies like the one found here show that manual control and understanding of speed profiles significantly enhance blending quality, especially for sensitive ingredients like nuts or frozen fruits. So, the real secret is not just the features but knowing how to leverage them effectively.
Have you ever fallen into this trap? Let me know in the comments. Remember, a high-quality blender is an investment, but mastering its nuances will make all the difference in your culinary adventures. If you want to dive deeper, check out these expert tips to unlock your blender’s full potential.
Maintaining your high-speed blender is crucial to ensure it continues to perform at peak levels, especially when you’re tackling demanding tasks like ice crushing and nut butter preparation. One of the first steps I recommend is regularly checking the blades for dullness or buildup. Sharp blades make a significant difference in blending efficiency, and cleaning them after each use prevents residue from affecting performance. For stubborn residue, a mixture of baking soda and water works wonders—simply blend a small amount to clean the blades thoroughly.
Next, pay attention to the motor base. Dust and debris can accumulate around the vents, causing overheating. I keep my blender’s vents clear with a soft brush or compressed air—this simple step helps prevent overheating during prolonged blending sessions. Additionally, avoid overfilling the jar. Overloading not only strains the motor but also compromises the quality of your blend. Leave enough space for ingredients to circulate freely, especially when crushing ice or blending thick nut butters.
To extend the lifespan of your blender, consider investing in a high-quality silicone spatula for scraping down sides—this minimizes the need for excessive blending and reduces motor stress. For those who blend frequently, using a dedicated pulse mode can prevent overheating by giving the motor brief rests, especially during tough tasks like nut butter making or ice crushing.
Now, let’s talk about tools I personally recommend. A silicone jar scraper is invaluable for ensuring ingredients are evenly processed without scratching your container. Second, I always keep a cooling fan pad or cooling mat under my blender during extended sessions to dissipate heat—a simple trick that prolongs motor life. Lastly, a quality lubricant for the motor shaft, used sparingly, can keep internal components running smoothly over time.
How do I maintain my blender over time to ensure long-term performance?
Beyond routine cleaning, regular inspection and timely replacement of worn-out parts such as seals and gaskets are essential. Many high-end models allow for easy disassembly, making these maintenance steps straightforward. I also schedule a comprehensive check-up every six months, especially if I use my blender daily. Using the right accessories, like the silicone spatula or pulse mode, not only enhances performance but also reduces wear and tear. For in-depth strategies, check this guide on nut butter prep—it emphasizes the importance of proper maintenance for consistent results. Finally, always refer to your blender’s user manual for manufacturer-recommended maintenance routines, and don’t hesitate to consult customer support for specific concerns. With diligent care, your blender will serve you well for years, allowing you to explore new recipes and techniques with confidence. Don’t forget, incorporating these maintenance habits is one of the best ways to ensure your investment keeps delivering perfect smoothies, nut butters, and ice-crushed delights well into the future.
What I Wish I Knew Before Going All In on High-Speed Blenders
- It took me a while to realize that not all blenders with high wattage perform equally. Blade design and container shape matter just as much as raw power, making some models better suited for nut butter while others excel at ice crushing.
- My biggest lightbulb moment was understanding that manual control over speed settings can make or break outcomes. Relying solely on preset modes sometimes led to inconsistent textures, especially with sticky ingredients like nut butters.
- Investing in regular maintenance, such as blade sharpening and vent cleaning, dramatically extended my blender’s lifespan and kept performance at peak levels for years.
- Choosing a blender with versatile features, including pulse mode and adjustable speeds, gave me the flexibility to tackle a variety of recipes without overloading the motor or compromising quality.
- Reading expert reviews and scientific studies, like the one on blender performance science, helped me avoid common misconceptions and make smarter purchasing decisions.
My Essential Toolkit for Blender Success
- High-power blender models: I swear by [Model A], which balances power and durability, perfect for nut butters and ice.
- Silicone spatula: A must-have for scraping down sides without damaging the container, ensuring even blending.
- Cooling pad: Keeps the motor cool during extended sessions, preventing overheating.
- Cleaning kit: A mixture of baking soda and water keeps blades sharp and residue-free.
- Instruction manual and expert guides: Resources like these tips are invaluable for mastering your blender’s potential.
Your Next Step Starts Today
Embracing the power and precision of a high-speed blender will unlock a new world of culinary possibilities, from silky nut butters to snow-like ice for smoothies. Don’t wait to elevate your kitchen game—start experimenting now and discover what your blender can truly do. Remember, mastery comes from patience, practice, and a willingness to learn the nuances of your equipment. What’s the first recipe you’re excited to perfect with your new blender? Share your thoughts below and let’s grow together in this delicious journey!