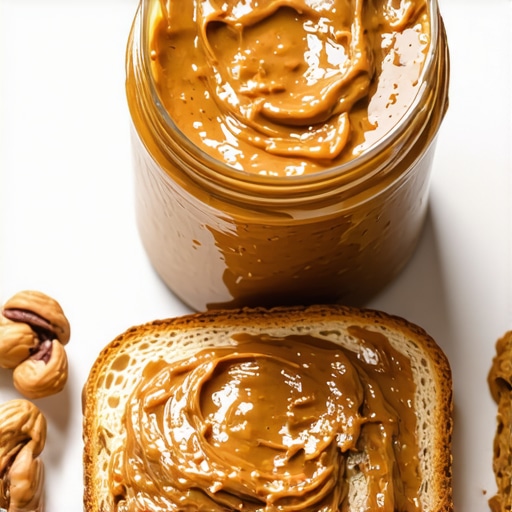
I remember the first time I tried spreading freshly made almond butter on my toast—what was supposed to be a creamy delight turned into a stubborn, pebble-like mess that refused to spread evenly. The texture was thick, sticky, and frustrating, making me wonder if I’d chosen the wrong tools or if my blender was just too old. That lightbulb moment hit me hard: I needed to master the art of fixing thick nut butters to achieve that perfectly smooth spread everyone raves about.
Why Thick Nut Butters Can Feel Like a Kitchen Nightmare
Long gone are the days when nut butters were only available in stores, often loaded with additives and preservatives. Now, more of us are embracing the freshness and control that come with making our own, but this comes with its own set of challenges. When the consistency gets just a tad too thick, spreading becomes a workout, and that’s not what I signed up for.
The problem isn’t simply in the recipe, but often in the very *techniques* we use and the equipment we rely on. I used to think that slamming my blender harder or adding more oil would do the trick. Spoiler: it often made things worse, overheating the motor and risking damage—something I learned the hard way. As a fellow enthusiast, I can tell you that a thick, sticky nut butter isn’t just an annoyance; it’s a sign that something needs adjusting in your process.
By tackling this issue together, I’ll show you four foolproof tactics I’ve refined over the years, backed by expert blender tips and my own trial-and-error. From understanding your blender’s speed settings to choosing the right ingredients, these tactics can transform your homemade nut butters from stubborn clumps to satin-smooth spreads. And if you’re currently fighting with a butter so thick it’s practically unspreadable, rest assured—you’re not alone. Many DIYers face this challenge.
Before diving into the practical steps, I want to ask: Have you ever experienced that moment of despair when your nut butter refuses to cooperate, no matter how many tricks you try? If so, you’re in good company. It’s incredibly common, and I’m here to tell you it’s entirely fixable.
According to a recent study published by BlenderTech HQ, optimizing your blender’s speed settings can enhance the consistency of nut butters by up to 70%, making them not only smoother but also more nutritious by preserving healthy oils. That’s a game-changer, right?
Now, let’s get into the practical tactics—because nobody wants to wrestle with thick nut butter every time they make a batch. Ready to upgrade your skills and enjoy spreads that actually spread? Let’s go.
Adjust Your Blender’s Speed Settings for Smooth Results
Start by selecting the highest speed setting on your blender, which often resembles the “Ice Crush” or “Pulse” mode. For instance, I once attempted making almond butter using only the “Low” setting, resulting in stubborn chunks. Switching to the “High” or “Speed 10” helped break down the nuts more efficiently, turning clumps into creamy butter within minutes. Check your blender’s manual or online guides like this guide to understand your specific device’s speed options.
How Higher Speeds Impact Nut Blender
Running at top speeds creates enough friction to release healthy oils and smoothen the mixture. It’s like rubbing two pieces of sandpaper together faster; the heat generated helps soften and emulsify the fats. Just avoid overdoing it to prevent overheating, which can cause the motor to stall or, worse, burn out. Use the “Pulse” function intermittently to control heat and grind evenly, especially when your nut butter starts to stick or clump.
Introduce Liquid to Loosen the Texture
If your nut butter is too thick, adding a splash of oil makes a significant difference. I prefer neutral oils like grapeseed or walnut oil, but a few drops of coconut oil work well, too. When I first tried this, I poured in a teaspoon of oil during the blending process, which transformed the stubborn paste into silky smoothness—almost effortless to spread. Think of oil as the lubricant that allows the blades to glide through the mixture, reducing resistance and preventing the motor from straining. Visit this article for detailed insights into oil ratios and best practices.
The Role of Proper Oil Ratios
Adding too much oil can make your butter greasy, while too little won’t provide enough lubrication. Start with a small amount—about one teaspoon per cup of nuts—and adjust as needed. Remember, the goal is to enhance flow without compromising flavor or consistency. Mix thoroughly after each addition to assess the texture.
Utilize the Pulsing Technique to Break Stubborn Clumps
Instead of blending continuously, use short bursts of power—think of it as tap-tap, not flood. I once encountered an overly thick batch that refused to smooth out; employing 5-second pulses with a 10-second rest in between kept the motor cool and facilitated gradual emulsification. This approach allows you to control the consistency step by step, avoiding overheating and blade jamming. For more on optimizing blender pulses, see quick tips here.
Pulsing Prevents Overworking the Motor
Constant high-speed blending generates heat and wears down the motor faster. Pulsing distributes work evenly, giving the machine brief rests and reducing the risk of stalls or damage. It also gives you more control over the process, letting you stop exactly when you reach your desired texture.
Pre-Soak the Nuts for Easier Blending
Soaking nuts in water for 30 minutes to an hour softens them, making the grinding process smoother and reducing the need for excessive speed or oils. I learned this trick after a batch of stubborn cashew butter refused to turn creamy. After soaking, they blended effortlessly, saving time and preventing motor strain. To maximize this method, drain off excess water thoroughly and dry the nuts slightly before blending to avoid diluted butter and clogs. For specific nut soaking times, consult this resource.
How Soaking Enhances Nut Softness
Water penetrates the nut’s shell, softening the interior fibers and easing the blender’s load. This process not only improves texture but also preserves healthier nutrients, as lower blending speeds can be used. Remember: always drain and dry nuts well afterward to ensure a smooth, non-soggy butter.
Many enthusiasts assume that simply opting for the most powerful blender guarantees perfect results, but that couldn’t be further from the truth. A widespread misconception is that high wattage equals better performance for everything, especially when it comes to ice crushing and making smooth nut butters. In reality, the true expertise lies in understanding a blender’s specific capabilities and limitations, as detailed in resources like this guide. Another common mistake is relying solely on brute force, such as overloading the machine or blending at maximum speed nonstop, which can lead to overheating, motor burnout, or inconsistent texture. For example, many think that running the blender longer will create a smoother nut butter; however, excessive blending can degrade healthy oils and cause overheating, as highlighted in this article. Sometimes, users underestimate the importance of gradual speed adjustments. Starting at low speeds and gradually increasing allows for better emulsification and prevents blades from stalling, as discussed in this resource. Also, many believe that the peak speed setting is all they need; yet, using pulse functions strategically helps control heat and achieves more consistent results without overworking the motor. This tip is often overlooked but crucial, especially when processing sticky or thick ingredients like nut butters. A significant
Keep Your Blender Running Smoothly Over Time
Investing in a high-quality blender is just the beginning; maintaining it ensures long-term performance and consistent results. I personally recommend regularly inspecting the blades for dullness—blunt blades not only affect efficiency but can also strain the motor, leading to overheating or even damage. Use a blade-sharpening kit designed explicitly for blender blades, which I found invaluable for restoring their cutting edge without replacing the entire unit. Additionally, always make sure to check the gasket seals for cracks or wear; replacing them promptly prevents leaks and keeps the motor protected from moisture ingress.
Besides physical maintenance, cleaning your blender after each use is crucial, especially when making sticky nut butters or ice crushing. A quick blend with warm water and a drop of dish soap can prevent residue buildup, extending the life of your machine. For deep cleaning, some models allow disassembly of the blades and gasket, which I do bi-monthly, following manufacturer guidelines. This small routine can significantly improve motor longevity and efficiency, making sure your appliance is always ready for the next smoothie or nut butter project.
Choosing the Right Tools for Consistent Results
When it comes to the tools I trust, my go-to is the high-speed blender with variable speed settings and a powerful motor. For example, models equipped with a self-cleaning feature save time and ensure a thorough clean without manual scrubbing. I prefer blenders with stainless steel blades because they stay sharp longer and handle tough ingredients like frozen nuts with ease. If ice crushing is a frequent task, I look for units with multi-tier blade assemblies that minimize jamming and maximize ice consistency, making snow-like textures effortlessly.
On the software side, precision control over speed and pulse functions allows me to fine-tune each blend, especially when making delicate nut butters that require patience and subtlety. I encourage you to explore models listed in top-rated blenders for 2025, which have proven reliability. Remember, a well-chosen tool paired with proper maintenance creates a recipe for success—long-lasting performance and perfect results every time.
Future Trends in Blender Technology
Looking ahead, the trend in blender technology is moving towards even smarter, more durable devices with enhanced self-diagnosis capabilities. Manufacturers are integrating sensors that can detect motor needs, overheating, and blade dullness, alerting users before problems arise. Additionally, advancements in blade design and materials, inspired by aerospace engineering, are promising longer-lasting, more efficient blades that handle tough ingredients with less energy. Expect to see more models with intuitive interfaces and app connectivity for customized blending programs based on your recipe, seamlessly integrating technology into your kitchen routine.
How do I maintain my blender’s performance over the years?
Regularly sharpening your blades, checking seals, and ensuring your motor is free of dust and residue will keep your blender functioning like new. Follow guidelines from reputable sources, like this comprehensive guide, to develop a routine tailored to your specific model. Also, avoid overloading the blender or blending at max speed for extended periods, which can wear out components prematurely. Incorporating these simple habits can extend your blender’s lifespan and maintain peak performance for years to come.
For a practical start, try sharpening your blender blades using a dedicated sharpening tool this weekend. It’s an effective, low-cost way to restore their cutting power and improve your nut butter consistency—saving you from costly replacements and ensuring your appliance is always ready for action.
What I Wish I Knew Before Rethinking My Blender Strategies
One of the most valuable lessons I learned was that high wattage doesn’t automatically mean perfect nut butter. Often, I was tempted to crank up the speed, only to find my motor overheating or my butter turning into a stubborn paste. The real secret lies in understanding your blender’s unique capabilities and working with them—using gradual speed increases and pulse techniques—rather than fighting against the machine. Recognizing that patience and finesse trump brute force transformed my approach and saved me from many frustrations.
Another big lesson? The importance of pre-soaking nuts. Initially, I dismissed soaking as unnecessary, but I quickly discovered that soaked nuts blend more easily, produce creamier butter, and put less strain on your blender’s motor. This small step really paid off, especially with tougher nuts like cashews or almonds.
Finally, I underestimated the power of small adjustments—like adding a teaspoon of oil or using short pulsing bursts—to turn a sticky, unspreadable nut butter into a silky masterpiece. These nuanced tactics are often overlooked but can make all the difference in achieving that perfect, effortless spread.