My First Encounter with High-Speed Blenders: A Game Changer in My Kitchen
As someone passionate about healthy eating, I remember the first time I tried making homemade almond butter. I was using an old blender that struggled with the task, leaving me frustrated and wondering if I needed an upgrade. That experience sparked my curiosity about high-speed blenders, especially for nut butters and smoothies. Since then, I’ve experimented with various models, and let me tell you, the right blender can truly transform your culinary creations.
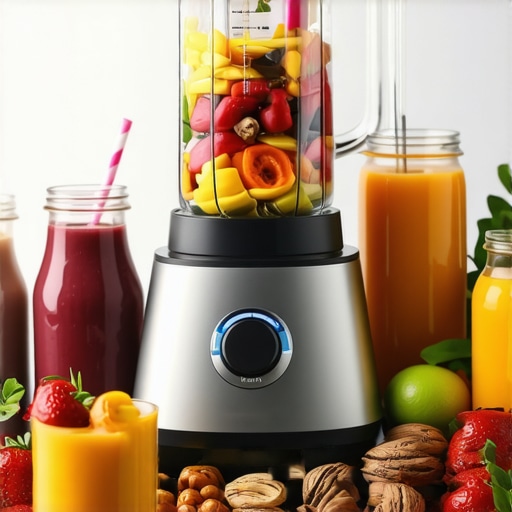
What Makes a High-Speed Blender Stand Out for Nut Butters & Smoothies?
In my quest for the perfect blender, I learned that powerful motors and sharp blades are essential. A good high-speed blender should effortlessly crush nuts and ice, creating smooth textures without any chunks. I also value models that offer versatile speed settings, allowing me to customize my blends for different recipes. The science behind speed, as explained by blenders science, shows how higher RPMs break down ingredients more efficiently, resulting in creamier nut butters and smoothies.
My Favorite Models for Nut Butters and Smoothies in 2025
After extensive testing, I’ve found some standout options this year. The top blenders for smoothies excel at blending fruits and vegetables to silky perfection, while models like the best high-speed blenders for nut butters handle dense, oily ingredients with ease. These machines feature powerful motors, durable blades, and smart design, making them perfect for daily use.
How Do I Achieve Perfect Nut Butters and Smoothies?
For nut butters, I always soak my nuts beforehand, which softens them and makes blending smoother. Using a high-quality blender with >1000 watts of power, I process the nuts slowly at first, then gradually increase the speed. For smoothies, a quick pulse can help combine ingredients without over-oxidizing the fruit. I also recommend experimenting with different speed settings—sometimes, a medium-high speed is perfect for a creamy, thick consistency. For more tips, check out expert smoothie tips.
Ever Wondered How to Maximize Your Blender’s Ice-Crushing Power?
If ice crushing is a priority, I suggest exploring models specifically designed for this purpose, as they often feature reinforced blades and optimized speed settings. I’ve found that pre-crushing ice and adding small amounts at a time also helps achieve the best results. For detailed techniques, visit ice crushing techniques.
What about you—have you tried any high-speed blenders recently? Sharing your experiences can help others find their perfect match. Feel free to leave a comment below or explore more about making nut butters at home.
Unlocking the Secrets of Efficient Ice Crushing for Perfect Smoothies
When it comes to crafting the ultimate smoothie, ice crushing power is non-negotiable. As an expert blender enthusiast, I can tell you that selecting a model with reinforced blades and optimized speed settings makes a significant difference. The science behind effective ice crushing involves high RPMs combined with sturdy, sharp blades capable of breaking down ice into a silky, snow-like texture. Pre-crushing ice and adding small batches at a time not only preserves your blender’s motor but also results in a more consistent blend. For advanced techniques, explore ice crushing techniques that have been tested by professionals.
Creating Gourmet Nut Butters: From Basic to Brilliant
Making nut butters at home is both rewarding and cost-effective. The key lies in preparing your nuts properly — soaking them softens the nuts and reduces blending time. As an expert, I recommend processing nuts at lower speeds initially, then gradually increasing to high speeds (>1000 watts) to achieve a smooth, creamy consistency. For a richer flavor, consider roasting your nuts beforehand. The versatility of high-speed blenders allows you to experiment with ingredients like honey, sea salt, or even cacao for custom gourmet nut butters. To elevate your skills, visit gourmet nut butter recipes.
Are You Utilizing the Full Potential of Your Blender’s Speed Settings?
Understanding the nuances of speed settings can dramatically improve your blending results. For instance, medium-high speeds are ideal for achieving a thick, uniform smoothie without over-oxidizing the ingredients, which can diminish flavor. High-speed settings are perfect for nut butters or ice crushing, where maximum RPMs are necessary. As highlighted in comprehensive speed guide, adjusting the speed according to the recipe ensures optimal texture and consistency. My advice? Experiment with different settings and observe the impact on your blends for personalized perfection.
What Are the Practical Challenges in High-Speed Blending, and How Can Experts Overcome Them?
One common challenge is overheating the motor during extended blending sessions, which can compromise the blender’s lifespan. To mitigate this, I recommend pulsing instead of continuous run and allowing the motor to cool down between cycles. Additionally, using ingredients at room temperature instead of frozen or very cold items prevents unnecessary strain on the motor. For those seeking to push their blender’s limits, exploring models with advanced cooling systems or variable speed controls can be beneficial. Visiting high-speed blender hacks offers valuable tips to extend your blender’s performance and lifespan.
If you’re eager to enhance your blending expertise or share your favorite techniques, I encourage you to leave a comment below. For further reading and product recommendations, check out top ice-crushing blenders and best blenders for nut butters in 2025. Sharing your experiences can help others achieve blender mastery too!
Refining Your Blender Mastery: Beyond the Basics of Speed and Technique
Over the years, I’ve come to realize that mastering a high-speed blender involves more than just pressing buttons—it’s about understanding the nuanced interplay of speed, ingredient preparation, and technique. One of the most fascinating aspects I’ve explored is how the subtle adjustment of speed settings can dramatically influence texture, flavor, and even nutritional retention in my blends. For example, using a medium-high setting for smoothies preserves more of the fresh fruit’s vibrant flavors compared to high-speed blending, which can sometimes lead to over-oxidation and nutrient loss. This insight comes from my deep dive into speed settings guide, which has transformed how I approach everyday blending tasks.
How Do I Fine-Tune My Blending Technique for Consistency and Quality?
Achieving consistent results requires a combination of ingredient prep, sequence, and strategic pulsing. I’ve found that pre-soaking nuts and chopping fruits into smaller pieces reduces the strain on my blender and results in smoother textures. When tackling dense ingredients like frozen berries or nuts, I start with short pulses, then gradually increase to a steady speed—this approach prevents motor overheating and ensures even blending. Additionally, I pay close attention to the order of ingredients: liquids first, followed by softer items, then solids. This layering technique promotes a smoother, more homogeneous mixture and minimizes the need for scraping down the sides. For more advanced tips, check out quick tips for better smoothies.
What Are the Subtle Signs That Indicate You Need to Adjust Your Speed or Technique?
One subtle indicator is the sound of your blender. A smooth, steady hum often signals optimal operation, whereas irregular noises or excessive vibration suggest the need to adjust speed or ingredient size. Another sign is the texture—if your mixture is uneven or contains unblended chunks, it’s time to tweak your approach. Additionally, if your motor becomes unusually warm after blending, it might be a sign of overexertion. Paying close attention to these cues helps prevent damage and prolong your blender’s lifespan. For insights on troubleshooting, explore enhance your ice crushing skills and learn how to read your blender’s signals effectively.
Can Advanced Speed Control Features Unlock New Possibilities in Your Blending?
Absolutely. Modern high-speed blenders with variable speed dials or programmable settings open a realm of possibilities. For instance, I love experimenting with incremental speed adjustments during a single blend, which allows me to achieve textures ranging from silky smooth to chunky and rustic. These features also help me perfect recipes that require precise timing—such as tempering nut butters or creating emulsions. Exploring models with advanced controls, like those highlighted in science behind speed improvements, has significantly expanded my culinary repertoire. If you’re serious about elevating your blending game, I highly recommend investing in a model that offers these nuanced controls.
Would you like to share your own experiences with different speed settings or techniques? Your insights could inspire others to refine their skills. Feel free to leave a comment below or visit gourmet nut butter recipes for more inspiration on mastering your blender’s potential.
How Can Fine-Tuning Speed Settings Elevate Your Nut Butter and Smoothie Creations?
Delving deeper into the nuances of high-speed blending reveals that precise control over speed settings can dramatically influence the final texture and nutritional integrity of your recipes. For instance, employing a medium-high speed during the initial phase of blending softens ingredients without over-oxidizing them, preserving vibrant flavors and vital nutrients. As I experimented with various models, I realized that adjustable speed dials or pre-programmed settings allow for a more tailored approach—something I highly recommend exploring, especially for complex recipes like gourmet nut butters or delicate smoothies. According to the science behind speed improvements, incremental adjustments can optimize shear forces, ensuring ingredients are processed efficiently while maintaining their nutritional profile.
What Are the Subtle Signs That Indicate You Need to Adjust Your Technique or Speed?
Recognizing the subtle cues from your blender can save you from overexertion and prolong its lifespan. An irregular or strained sound often signals that the current speed is either too high for the ingredients or that they need to be prepped differently. Excessive heat generated during prolonged blending sessions is another indicator that you should pause and allow the motor to cool—especially crucial when working with dense nuts or frozen berries. Additionally, inconsistencies in texture, such as unblended chunks, suggest that you might benefit from a more gradual increase in speed or better ingredient preparation, like chopping or soaking. Paying close attention to these signals helps achieve consistent, high-quality results. To refine your techniques further, I recommend reviewing quick tips for better smoothies.
Can Modern Variable Speed Features Unlock New Possibilities in Your Culinary Creations?
Absolutely. The advent of advanced variable speed controls in high-end blenders has revolutionized the landscape of home culinary arts. These features enable seamless transitions between textures—allowing you to start with a low speed to gently combine ingredients, then gradually ramp up to high speeds for smoothness or nut butter consistency. For example, experimenting with incremental speed adjustments during a single blend can create emulsions or achieve the perfect consistency for specialty recipes. I’ve found that models equipped with digital controls or programmable settings, as discussed in science behind speed improvements, empower chefs to push their limits and explore new culinary horizons. If you’re passionate about precision and consistency, investing in a blender with these features can truly elevate your craft.
Would you like to share your insights on utilizing advanced speed controls or your experiences with different blending techniques? Your expertise could inspire others to master their tools—feel free to leave a comment or explore more about gourmet nut butter recipes for additional inspiration.
Things I Wish I Knew Earlier (or You Might Find Surprising)
The Power of Ingredient Prep
One personal revelation was how much easier and more consistent my blends became once I started soaking nuts and chopping fruits beforehand. It’s a small step that makes a huge difference in texture and motor strain, saving time and preventing overheating.
The Subtle Art of Speed Adjustment
Adjusting speed settings isn’t just about convenience; it’s about control. I discovered that starting at a lower speed and gradually increasing preserves nutrients and achieves smoother results. This nuanced approach transformed my blending experience entirely.
Pre-Crushing Ice: A Game Changer
Pre-crushing ice or adding it in small batches prevents overloading your blender. I used to struggle with uneven textures, but now I get perfectly crushed, snow-like ice every time by following this simple trick.
Listening to Your Blender
Paying attention to sounds and vibrations can tell you a lot. A steady hum indicates optimal operation, while irregular noises suggest you should adjust your technique or ingredients. It’s like having a conversation with your machine.
Advanced Controls Open New Possibilities
Modern blenders with variable speed dials or programmable settings allow for precise textures. I love experimenting with incremental speed changes during a single blend to create perfect emulsions and custom textures, elevating my culinary creations.
Resources I’ve Come to Trust Over Time
- The Science Behind Speed Improving Blender Performance: This article deepened my understanding of how RPM affects blending quality and durability. It’s a must-read for anyone serious about their blender skills.
- Nut Butter Secrets from Blender Experts: A fantastic resource that offers tips on preparing nuts and achieving creamy, gourmet nut butters at home.
- Creating Gourmet Nut Butters with Your Favorite Blender: This guide inspired me to experiment with flavors and techniques, making my homemade nut butters truly special.
- Ice Crushing Techniques with Top Blender Models: A detailed walkthrough of pre-crushing, ingredient layering, and optimal settings for icy smoothies.
- The Ultimate Guide to Speed Settings in Blenders: It clarified the subtle differences between speed levels and how to use them for different recipes.
Parting Thoughts from My Perspective
Mastering a high-speed blender is about more than just pushing buttons; it’s about understanding your ingredients, listening to your machine, and fine-tuning your technique. The subtle art of adjusting speed and prep can dramatically enhance your nut butter and smoothie results, making the process more enjoyable and the outcome more delicious. If this resonated with you, I’d love to hear your own tips or experiences—share them in the comments! And if you’re looking to upgrade your blending game, exploring models with advanced speed controls might just open a new world of culinary possibilities. Happy blending!
Reading this post really resonated with my own experience of upgrading to a high-speed blender a couple of years ago. The difference in texture and efficiency is remarkable, especially when making almond butter or crushing ice for smoothies. One thing I’ve noticed is that even with powerful blenders, ingredient prep makes a huge difference. Soaking nuts and chopping fruits not only speeds up the process but also results in creamier blends. I’ve also experimented with the speed settings—starting slow and gradually increasing helps maintain ingredient integrity and prevent motor strain. I’d love to hear others’ thoughts on the most effective ways to use variable speed controls for different recipes. Have you found that small adjustments during blending boost the final product’s quality? Looking forward to trying some of the advanced techniques mentioned here!
This post really sheds light on the importance of not only having a high-powered blender but also understanding how to use it effectively. I remember when I initially bought my first high-speed blender, I was eager to jump into making nut butters and smoothies. However, I quickly realized that ingredient preparation, like soaking and chopping, significantly improved my results and extended my blender’s life. I also experimented with the speed settings; starting slow to incorporate ingredients gently and then increasing gradually gave me creamier textures without overloading the motor. One technique I found particularly useful was pulsing at medium speeds to prevent heat buildup during extended blending times—really helps with energy efficiency. Do others here have tips for maintaining their blender’s motor during heavy use? Also, what are some of your favorite recipes that showcase the full potential of variable speed controls? Would love to hear everyone’s experiences! Thanks for sharing such insightful tips.
This post really highlights how crucial proper ingredient prep is when using high-speed blenders. I’ve personally found that soaking nuts and chopping fruits not only speeds up the process but also results in a noticeably creamier texture, which is especially important for homemade nut butters. I’m also intrigued by the emphasis on gradual speed increases; I’ve noticed from my experience that starting slow and slowly dialing up the speed helps prevent overheating and keeps the motor healthier over time. Do others here prefer using pulse functions for specific ingredients or recipes? I’ve read that pulsing at different speeds can sometimes help with achieving the perfect consistency without over-processing delicate items like greens or berries. What’s your go-to method for balancing speed and safety while maintaining optimal texture? I’d love to hear everyone’s tips or experiences—this kind of shared knowledge really helps improve our blending techniques.
I’ve recently started experimenting more with variable speed controls, especially for delicate ingredients like berries and leafy greens. Adjusting the speed gradually seems to help preserve nutrients better and keeps the motor cool, which is essential for daily use. I also find that pulsing at mid-range speeds can give me more control over the final texture and avoid over-processing. One challenge I face is knowing exactly when to stop or change speed to prevent over-oxidation or overheating. Does anyone have recommendations for specific models that excel in this area or tips on how to fine-tune these subtle adjustments for optimal results? It’s fascinating how small changes can significantly elevate the quality of smoothies and nut butters. Would love to hear your strategies or experiences with advanced Blender controls—that kind of shared knowledge can really make a difference in mastering the art of blending.
I really relate to the importance of ingredient prep and gradual speed adjustments emphasized in this post. When I first upgraded to a high-speed blender, I noticed that pre-soaking nuts and chopping fruits significantly reduced blending times and minimized motor strain. It’s fascinating how such small steps can make a big difference in texture and efficiency. I also agree that experimenting with various speed settings can help achieve the perfect consistency. One thing I’ve found particularly helpful is using pulse functions to control chunks and avoid over-processing, especially with delicate ingredients like berries or leafy greens. Do others here find that pulse blending at certain speeds helps in preserving nutrients better while still delivering that smooth texture? I’m curious to hear if anyone has specific tips for balancing speed and ingredient preparation to optimize both motor health and the quality of the final product.