I’ll never forget the moment I tried making my first truly creamy, velvety nut butter at home—and ended up frustrated, with a blender that struggled to crush ice and blend even the simplest smoothie. It was a lightbulb moment that revealed just how critical quality equipment is for vibrant, healthy recipes. I realized that investing in a powerful, high-speed blender wasn’t just about convenience; it was about unlocking the full potential of my kitchen creations.
This realization led me on a journey to discover what exactly makes a blender excellent for smoothie lovers, nut butter enthusiasts, and ice crushers alike. Today, I want to share my insights because I believe everyone deserves to experience the joy of a perfectly blended treat without the frustration or guesswork. If you’ve ever felt disappointed with your current blender’s performance, you’re in the right place. Together, we’ll explore the best options for 2025 and how to choose one that elevates your culinary adventures.
Why a High-Speed Blender Will Change How You Blend
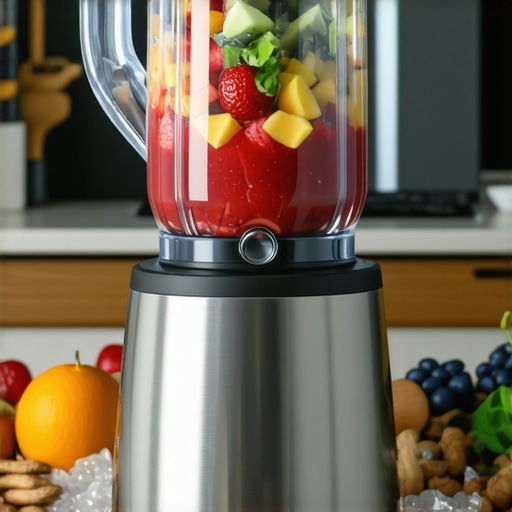
Imagine blending your favorite fruits and veggies into a smooth, frosty drink in seconds, with no chunks or lingering ice pieces. Or making nut butters at home that rival those found in gourmet shops—silky, fresh, and free from additives. These achievements are only possible with the right equipment. High-speed blenders are designed to deliver the power and consistency needed to crush ice effortlessly, pureé dense ingredients, and whip up creamy nut butters.
Early on, I made a costly mistake—thinking that any powerful motor would do the trick. But without the right blades, speed settings, and container design, my blender faltered. That oversight cost me time, money, and frustration. For instance, I didn’t pay attention to the science behind blending speeds, which is crucial for optimal results (learn more about blending science here). Recognizing these nuances transformed my approach and helped me select a model that truly meets the demands of 2025 recipes.
Is the Price Tag Really Justified?
Many skeptics ask whether splurging on a high-performance blender is worth it. I get it—these machines can be expensive. But consider the convenience, efficiency, and culinary versatility they bring to your kitchen. They save you time, improve texture and taste, and open up a world of healthful recipes you might not attempt otherwise. Plus, investing wisely means choosing a durable, well-designed blender that grows with your needs. Want to see top contenders? Check out the best blenders for smoothie lovers in 2025.
Select the Right Container
Choosing the proper container is crucial. Opt for a tall, narrow jar with a sturdy base to maximize blending power and minimize spills. When I first tried making a peanut butter, I used a generic jar, which led to uneven blending and messes—but switching to a specialized container allowed the blades to circulate ingredients more efficiently, resulting in a creamy texture.
Layer Ingredients Strategically
Place liquids and soft ingredients at the bottom, followed by harder items like nuts or ice. For example, when crafting a smoothie with frozen berries and almond milk, I pour the milk first, then add berries, then nuts. This setup facilitates initial blending at the blades’ local level, reducing strain on the motor and ensuring uniformity.
Utilize Pulse and Low-Speed Settings First
Start with short pulses to break down large chunks, then gradually increase speed. I remember struggling with chunky smoothie bits, but by pulsing twice to crush big items and then ramping up to full speed, I achieved a silky consistency. This technique prevents overloading the motor and ensures control. Learn more about ice-crushing techniques with top blender models.
Push Ingredients Towards the Blades
Use the tamper or spatula (if available) to gently push ingredients into the blades during blending. During my Nut Butter experiments, gently pressing nuts down prevented air pockets that can stall the motor. Always do this with the machine off to avoid accidents. Think of it as helping a snowplow clear snow—controlled pushing enhances efficiency.
Adjust the Speed for Consistency
Begin at low speeds, then gradually shift to high. For nut butters, I start at a slow speed to break nuts into smaller pieces, then increase to full speed. This step ensures even blending without overworking the motor or causing overheating. Refer to science behind speed settings for detailed insights.
Incorporate Liquids to Aid Blending
If the mixture is too thick and isn’t circulating, add more liquid gradually. For thick nut butters or frozen drinks, a splash of water or oil can make all the difference. I found that adding a teaspoon of oil during nut butter processing helped achieve an ultra-smooth spread without lumps. This prevents the blades from straining and prolongs the machine’s lifespan.
Clean as You Go
Rinse the jar immediately after use or fill it with warm, soapy water and run the blender briefly. This prevents ingredient buildup, especially crucial when making sticky nut butters. I discovered that cleaning right after blending saved time and avoided clogs, keeping my equipment in top shape. Check quick tips for better smoothies.
Many enthusiasts believe that simply owning the most powerful motor guarantees perfect smoothies or nut butters. However, this is a misconception rooted in oversimplification. One of the most overlooked aspects of high-speed blenders is the critical role of blade design and material. Not all high wattage motors perform equally; the efficiency of blending depends heavily on blade geometry and sharpness, which influence shear force and blending uniformity. For instance, a blender with a lesser motor but superior blade design can outperform a more powerful one with subpar blades, especially in making smooth nut butters (learn more about blades and nut butter).
Investing in a high-speed blender is just the first step; keeping it in peak condition over time ensures you consistently achieve smooth smoothies, creamy nut butters, and effortless ice crushing. Proper maintenance involves a combination of regular care, using the right tools, and understanding the lifespan of key components. I personally swear by having a dedicated set of cleaning tools and scheduling routine checks, which prolongs my blender’s lifespan and maintains its efficiency.
One invaluable tool I rely on is a cleaning brush specifically designed for blender blades. These brushes have angled bristles that reach into the tight corners of the blade assembly, making it easier to remove residue and prevent buildup. After each use, I disassemble the blender jar carefully and rinse the blades, then use the brush with warm soap water. This process prevents long-term grime accumulation, which can dull blades and strain motors.
Tools I Recommend to Keep Your Blender Running
Another tool I highly recommend is a lubricating spray suitable for motor parts—it’s essential for maintaining the motor’s smooth operation, especially if your blender sees frequent use. I ensure that I apply a few drops to the motor base every few months, as this reduces friction and overheating during intensive blending sessions. When purchasing replacement blades or gaskets, I seek out OEM parts from the manufacturer, which are engineered for durability and fitment, reducing the risk of leaks or damage.
Scheduling periodic thorough checks of the sealing gaskets and container rims is also key. A worn gasket can lead to leaks, especially when blending thick nut butters or frozen ingredients. Replacing these parts at the first signs of wear is a simple tactic that saves time and preserves your machine’s efficiency.
What’s Next for Long-Term Blender Maintenance?
As technology advances, manufacturers are incorporating smart diagnostics into their high-end models, which can alert you to motor issues or blade dullness via connected apps or indicators. I predict that in the near future, you’ll be able to receive notifications for routine maintenance tasks directly on your smartphone, making upkeep even more seamless. Currently, I consult the science behind speed and performance to fine-tune my maintenance schedule and ensure optimal blending power.
How do I maintain my blender over time?
Learning to disassemble and clean your blender thoroughly after each use, replacing worn parts promptly, and applying regular lubricants can dramatically extend its lifespan. Remember, a well-maintained blender not only performs better but also lasts longer, saving you money and frustration. Try incorporating a monthly deep-clean with a mixture of baking soda and vinegar to remove mineral deposits and residual odors—it’s an inexpensive, effective way to keep everything running smoothly.
By integrating these tools and habits into your routine, you’ll ensure your high-speed blender remains capable of delivering perfect textures for years to come. Don’t ignore small signs of wear; addressing them early prevents costly repairs and keeps your culinary adventures going strong.

Lessons That Changed My Blender Journey
One of the most eye-opening lessons I learned was how crucial blade design truly is—ultimately more important than just wattage. Once I switched to a model with sharper, engineered blades, my nut butters transformed overnight, silky and evenly blended every time.
Second, patience beats speed—I realized that starting slow with pulse settings and gradually increasing gives me control and prevents motor burnout. It’s a simple trick, but it saved me countless headaches and extended my blender’s lifespan.
Lastly, regular maintenance isn’t just a chore—it’s a game-changer. Disassembling and cleaning immediately after use, especially when working with sticky ingredients, kept my blades sharp and motor humming. This routine, along with periodic gasket checks, has turned my blender into a long-term kitchen partner.