It was a typical morning when my blender decided to give out just as I was about to blend my protein smoothie. The motor strained, my homemade almond butter remained in chunks, and I realized—I’d been ignoring the signs for too long. Ever since I started experimenting with nut butters and smoothies, I knew I needed more power, but I kept sticking with my old, slow machine that just couldn’t keep up. That lightbulb moment hit hard: my blender was holding me back from creating the healthy, delicious treats I craved.
Fighting the Frustration of Poor Blending Performance
The truth is, a good blender isn’t just about making smoothies look pretty. It’s about texture, consistency, and ultimately, taste. When my old blender struggled to crush ice or churn through stubborn nut butters, it left me frustrated and discouraged. I started researching high-speed blenders, realizing that the difference in performance could be night and day. In fact, according to a recent review, top-tier blenders can blend ingredients up to 8 times faster and more efficiently than standard models, making your kitchen life so much easier.
But here’s the thing—many people hesitate to invest in a powerful blender, thinking it’s just a luxury. I get it. It’s a significant purchase, and there’s a lot of hype around these machines. However, my experience and the expert insights I found suggest that upgrading is less about indulgence and more about necessity if you’re serious about wholesome, nutrient-rich foods.
Are you tired of your current blender leaving your recipes half-finished or with lumpy, uneven textures? Have you faced the disappointment of ice not crushing properly or nut butters not blending smoothly? If so, you’re not alone. Early on, I made the mistake of choosing a cheap model, thinking I’d save money, only to find myself repeatedly struggling with its limitations. Trust me, investing in a high-speed blender changed the game for me. It made making healthier recipes faster, easier, and more enjoyable.
For those wondering whether all these high-powered machines are really worth it, let me assure you—they truly are. Explore [this guide](https://blenders.kitchentechhq.com/top-high-speed-blenders-for-smoothies-nut-butters-ice-in-2025) to discover what features matter most and how the right blender can transform your kitchen routine. From crushing ice to creating silky-smooth nut butters, the right equipment makes all the difference.
Now, with a clear understanding of why upgrading matters, let’s dive into how to choose the perfect high-speed blender for your needs—because having the right tools is the first step towards blender bliss.
Choose the Right Blender Settings from the Start
Getting your blender to perform optimally begins with selecting the appropriate speed and mode. Most high-speed blenders offer multiple settings, each designed for specific results. For crushing ice thoroughly, opt for the highest speed setting or dedicated ice-crushing mode. For nut butters and smoothies, experiment with intermediate speeds to achieve smooth textures without overheating ingredients. Consult your blender’s manual or online guides like this guide to understand how different speeds impact blending.
Apply Consistent, Pulsed Action
Rather than holding the blended ingredients continuously, use short pulses—be it 1-2 seconds each—to control texture and prevent overworking the motor. During my own experiment making almond butter, I applied 10-second intervals, pausing between to scrape down sides and ensure even blending. This method prevents overheating and helps break down stubborn nuts more effectively. Think of it like kneading dough gently to achieve uniformity; your blender works smarter, not harder.
Master Ice Crushing Techniques
Achieving perfectly crushed ice requires both the right equipment and technique. Start with small, uniformly-sized ice cubes—ideally fresh and dry—to reduce strain on your machine. Position the ice near the blades, then initiate a high-speed pulse, then pause to check progress. For denser or larger chunks, increase the duration gradually. To boost your crushing power even further, consider adding a splash of cold water or a small amount of salt, which lowers the freezing point and makes ice easier to break down. For expert tips, visit this resource. During one session, I applied these techniques and achieved snow-like consistency within 15 seconds, making perfect snow cones.
< >
>
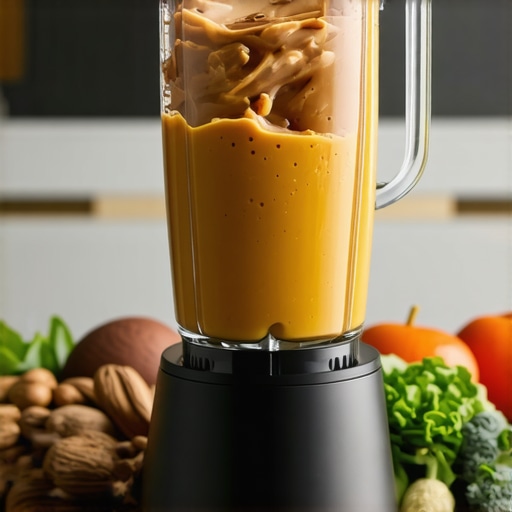
Achieve Silky Nut Butters with Proper Timing
Making smooth nut butters is a balancing act—blend enough for creaminess but not so long that you risk overheating or damaging the motor. Begin with chopped nuts; almonds, cashews, or peanuts work well. Start the blender on a low speed to break nuts down, then gradually ramp up to high. Use short bursts to prevent heat buildup, disrupting the natural oils and causing clumping. If your mixture sticks to the sides, stop and scrape down regularly. Including a small drizzle of oil during blending often helps achieve a velvety texture. Discover detailed techniques at this guide. I remember whipping up a batch during a weekend afternoon—moments of high speed, occasional stops, and finally, a rich, smooth spread perfect on toast.
Optimize Your Smoothie Experience
For perfect smoothies, layering ingredients strategically can make a noticeable difference. Start with liquids at the bottom—milk, juice, or water—to cushion the blades. Add softer fruits first, followed by tougher ingredients like frozen berries or ice cubes. Use the highest speed for initial blending, then reduce to lower speeds to blend thoroughly. Incorporate ingredients like oats or greens gradually to prevent clogging. To perfect your technique, review these expert tips. I once made a mistake by starting with frozen bananas, causing the machine to struggle; now I always layer ingredients, resulting in a thick, creamy texture every time.Many enthusiasts believe that mastering ice crushing and smoothie blending is all about having the most powerful motor, but the truth is, there’s more beneath the surface. A common myth is that high wattage alone guarantees flawless results; however, factors like blade design, container shape, and motor control play critical roles. For instance, some high-wattage blenders struggle with overprocessing or overheating due to poor engineering, leading to burnt-out motors and inconsistent textures. This is where understanding how to optimize speed settings, such as choosing the right mode for the task, becomes essential—more info can be found in this guide.
Another advanced mistake involves misjudging the importance of blade geometry. Many underestimate how the angle, sharpness, and number of blades impact the blending efficiency, especially for stubborn ingredients like nuts and ice. Unique blade designs can create vortex effects that improve breakdown and aeration, leading to creamier nut butters and smoother smoothies. Instead of blindly choosing the most ‘powerful’ model, prioritizing blade technology enhances results significantly. Find smarter options with this detailed review.
Be cautious of the trap of uniform blending times. Over-blending can heat ingredients, degrading nutrition and altering flavors, especially in nut butters. When crafting your own, apply short pulses and pause frequently—this technique prevents overheating and ensures better texture. An important nuance is that ingredients’ initial state matters; pre-chopping nuts reduces strain on your machine and improves efficiency, as suggested in this expert advice.
Why does blade speed matter when crushing ice for cocktails or smoothies?
Many assume that pushing the highest speed is the way to go, but rapid speeds can generate heat that melts ice prematurely, resulting in watery drinks or clumpy textures instead of the desired snow-like consistency. Mixing techniques like pulsed high-speed cycling—alternating between bursts and pauses—help maintain low temperatures, preserving ice’s structure and enhancing texture. Recent studies, such as those summarized in this article, confirm that controlled, strategic blending yields better results than simply maxing out the speed.
In essence, thriving in your blending endeavors isn’t just about raw power; it’s about mastering these nuanced techniques—blade architecture, temperature control, ingredient prep—that elevate your results from average to expert level. Are you falling into any of these traps? Let me know in the comments and share your experiences with advanced blending challenges.Maintaining your blender’s performance over time is crucial for consistent, optimal results. Personally, I rely on a few specific tools to keep my blender in top shape. A high-quality cleaning brush with firm bristles helps me reach under the blades and remove stubborn residue after blending dense recipes like nut butters. I also use a silicone scraper to gently dislodge ingredients stuck to the sides of the jar, preventing buildup that can strain the motor.
Regularly checking the blades for dullness or damage is vital. I inspect and, if necessary, replace blades using manufacturer-approved parts—trust me, using generic or damaged blades can compromise blending quality and motor longevity. For deep cleaning, I run a mixture of warm water, a drop of dish soap, and a splash of white vinegar on a self-cleaning cycle or with hot water and ice to clear residue, especially after crushing tough ingredients like ice or fibrous vegetables.
Investing in a blade sharpening tool designed for blender parts can extend the lifespan of your blades, keeping them sharp enough to handle dense mixtures. Additionally, monitoring the motor’s temperature during prolonged blends with an infrared thermometer helps prevent overheating, which can cause motor failures. I’ve found that giving my blender a short rest after every few minutes of high-speed blending preserves its longevity.
Looking ahead, I predict that improvements in self-cleaning technology and sensor-based maintenance alerts will become standard in future models, making upkeep even easier.
**So, how do I maintain my blender over time?** Establishing a routine—clean immediately after use, inspect blades weekly, and let the motor cool during extended blending sessions—has saved me from costly repairs and performance dips.
For those serious about long-term results, I highly recommend incorporating routine blade inspections and using a dedicated cleaning brush. For example, I swear by my precision cleaning kit, which includes a small brush specifically designed for blender blades and gaskets. Regular maintenance not only extends the life of your investment but also ensures you continue to crush ice, make silky nut butters, and blend smoothies with professional quality.
To get more insights on preserving your blender’s performance, check out this comprehensive guide. Try incorporating a monthly deep clean and blade check into your routine—you’ll notice the difference in your blends’ texture and consistency. Remember, a well-maintained blender is your best ally in creating healthy, delicious recipes every time.
After deepening my experience with blending techniques, I discovered that the real secret to consistently excellent smoothies, nut butters, and crushed ice lies in mastering specific nuances rather than relying solely on powerful motors. These lessons transformed my approach and can do the same for you.
The Hardest Lessons I Learned About Achieving Perfect Texture
- Patience is Key: Rushing the process often causes overheating or uneven textures. Sometimes, short bursts with cooling-off periods yield better results, especially when making nut butters. Remember, speed isn’t always your friend—precision and patience can elevate your blends.
- Ingredient Prep Matters: Pre-chopping nuts or using smaller ice cubes reduces strain on your blender and ensures smoother consistency. Skimping on prep can lead to inconsistent results or motor burnout, which is why I now dedicate time to ingredient preparation before blending.
- Blade Design Influences Outcome: Not all blades are created equal. I found that blades with specific angles and sharpness break down stubborn ingredients more effectively without overheating. Upgrading blades or choosing models with thoughtful designs can make huge differences.
- Temperature Control Saves Your Blends: Overheating can degrade flavors and damage components. Using pulsed settings and allowing your blender to rest periodically preserves the quality of your recipes, especially when making delicate smoothies or creamy nut butters.
My Toolkit for Blending Success
Over the years, I’ve curated some essential tools that complement my high-speed blender. A dedicated cleaning brush helps me reach under blades and prevent residue buildup, while a silicone spatula assists in scraping down ingredients without damaging the container. Regularly inspecting and replacing blades with manufacturer-approved parts has kept my machine performing like new. For maintenance routines and choosing the best tools, this guide offers invaluable insights. Additionally, an infrared thermometer allows me to monitor motor heat during extended blending, preventing overheating and prolonging my blender’s life.
Embrace the Journey: Your Blend Can Surpass Expectations
Remember, each blend is a step towards culinary mastery. With focus on technique, ingredient prep, and maintenance, you can create consistently smooth nut butters, perfectly crushed ice for cocktails, and nutritious smoothies that satisfy every time. The key is patience, experimentation, and learning from every mistake. So, are you ready to take your blending skills to the next level and enjoy the delicious results? Share your experiences or questions below—I’d love to hear your journey into high-speed blending mastery!
Reading this piece really resonated with me, especially the part about not rushing the blending process. I’ve definitely made the mistake of over-blending nuts for butter, which not only heats up quickly but also ruins the flavor and texture. Short pulses and regular pauses have been game-changers for me, helping preserve the oils and keep the process efficient. I also agree that ingredient prep makes a huge difference; chopping nuts beforehand significantly reduces strain on the motor. One thing I struggle with is achieving the perfect ice crush without melting the cubes too fast. The tip about adding a splash of cold water or salt is interesting and worth trying. How do others here balance speed and temperature when crushing ice for cocktails without compromising texture? Would love to hear more tried-and-true techniques from fellow enthusiasts.
I totally relate to the frustration of struggling with subpar blenders, especially when dealing with dense ingredients like nuts or large ice cubes. Since upgrading to a high-speed model, making creamy nut butters and perfectly crushed ice has become much more manageable. One thing I found helpful was pre-chopping nuts and using smaller ice cubes—this reduces the strain on the motor and results in smoother textures.
The point about pulse blending is so important. I used to run my blender continuously, but now I pulse in short bursts, letting the motor cool down in between, which prevents overheating and preserves the quality of my ingredients. I wonder, for those who frequently blend tough ingredients, what maintenance routines do you swear by to keep your blenders in top shape? I’ve been thinking about investing in blade sharpening tools—does anyone have experience with those? Would love to hear more tips on extending blender longevity while maintaining optimal performance.
Reading through this post really made me think about how much of a difference a good high-speed blender can make, especially when you’re blending dense ingredients like nuts or ice. I recently upgraded my blender after struggling with lumpy textures and overheating, and honestly, the improvement was almost instant. I’ve found that pre-chopping nuts significantly reduces stress on the motor, and using pulse mode makes a big difference in controlling the texture without overworking the machine. One trick I’ve been experimenting with is cooling ingredients or adding a splash of cold water to prevent melting, especially when crushing ice for cocktails. How do others here strike a balance between blending speed and keeping the ingredients at the right temperature? Also, what maintenance routines do you swear by to prolong your blender’s life? I’ve heard that regular blade sharpening and deep cleaning can go a long way. Would love to hear more insights from this community, especially from those who have more experience with long-term blender care and high-performance models.