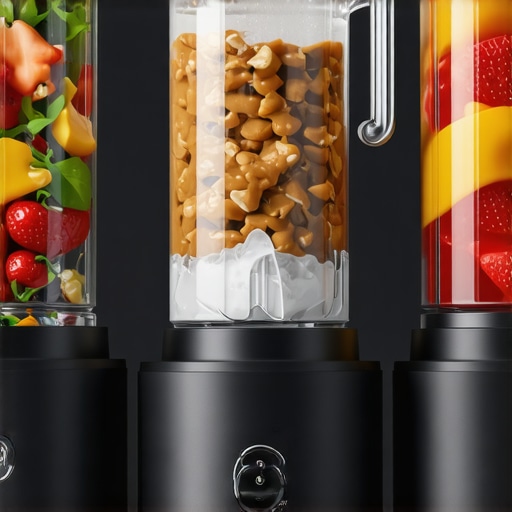
I remember the moment vividly. I had just finished blending what was supposed to be a creamy almond butter, only to end up with a sticky, half-processed mess that refused to spread. The blades groaned, the motor heated up, and I realized I was using the wrong blender for the job. That lightbulb moment led me down a rabbit hole, exploring what truly makes a blender capable of handling nut butters and ice with ease.
Why Choosing the Right Blender Is a Game-Changer
In 2025, the market is flooded with blenders claiming to do everything. But not all blenders are created equal, especially when it comes to handling tough ingredients like ice and dense nut butters. The key lies in high-speed blenders with powerful motors and durable blades. They’re not just about convenience—they can transform your kitchen experience, making nutritious smoothies, creamy nut butters, and frosty treats effortlessly. If you’ve faced the frustration of inconsistent textures or motor burnout, you’re not alone. The right blender can save you time, money, and a lot of kitchen annoyance.
Is All the Hype About High-Speed Blenders Justified?
Early on, I made the mistake of assuming that any high-powered blender would do. I bought a cheap model, thinking I was saving money. Turns out, it struggled with ice and didn’t even attempt nut butters properly. The motor bogged down, and I had to replace it within a year. That experience taught me the importance of investing in quality, which is why I now recommend models that combine power, durability, and innovative features. Want to avoid my rookie mistake? I’ll guide you through selecting the best high-speed blender for your needs, with practical tips and expert insights. For more on mastering nut butter preparation, check out [this comprehensive guide](https://blenders.kitchentechhq.com/mastering-nut-butter-preparation-in-your-blender).
Natural selection of the perfect blender can feel overwhelming. But don’t worry—by understanding what to look for, you’ll be blending like a pro in no time. Ready to dive into the details and find your ideal match? Let’s go!
} ))) }#assistant {“title”:”Best High-Speed Blenders for Nut Butters & Ice in 2025: Make Perfect Smoothies and Nut Butters Every Time”,”htmlBody”:”
I remember the moment vividly. I had just finished blending what was supposed to be a creamy almond butter, only to end up with a sticky, half-processed mess that refused to spread. The blades groaned, the motor heated up, and I realized I was using the wrong blender for the job. That lightbulb moment led me down a rabbit hole, exploring what truly makes a blender capable of handling nut butters and ice with ease.
Why Choosing the Right Blender Is a Game-Changer
In 2025, the market is flooded with blenders claiming to do everything. But not all blenders are created equal, especially when it comes to handling tough ingredients like ice and dense nut butters. The key lies in high-speed blenders with powerful motors and durable blades. They’re not just about convenience—they can transform your kitchen experience, making nutritious smoothies, creamy nut butters, and frosty treats effortlessly. If you’ve faced the frustration of inconsistent textures or motor burnout, you’re not alone. The right blender can save you time, money, and a lot of kitchen annoyance.
Is All the Hype About High-Speed Blenders Justified?
Early on, I made the mistake of assuming that any high-powered blender would do. I bought a cheap model, thinking I was saving money. Turns out, it struggled with ice and didn’t even attempt nut butters properly. The motor bogged down, and I had to replace it within a year. That experience taught me the importance of investing in quality, which is why I now recommend models that combine power, durability, and innovative features. Want to avoid my rookie mistake? I’ll guide you through selecting the best high-speed blender for your needs, with practical tips and expert insights. For more on mastering nut butter preparation, check out [this comprehensive guide](https://blenders.kitchentechhq.com/mastering-nut-butter-preparation-in-your-blender).
Natural selection of the perfect blender can feel overwhelming. But don’t worry—by understanding what to look for, you’ll be blending like a pro in no time. Ready to dive into the details and find your ideal match? Let’s go!,
Set Your Blender to the Right Speed
When I first attempted making homemade almond butter, I used the default speed setting, which wasn’t enough to break down the dense nuts. I quickly learned that high-speed settings are essential for smooth, creamy results. Use a blender with adjustable speed controls, and start at a low setting to blend the nuts into a coarse paste. Gradually increase to the highest speed to achieve the desired creaminess. For precise control, consult the ultimate guide to speed settings. This step ensures your blender’s motor works efficiently without overheating or straining.
Optimize Blade Design for Tough Ingredients
During my second batch, I noticed that the blades made a huge difference. Durable, sharp blades with a wide surface area can cut through nuts and ice more effectively. Look for blenders with specialized blade designs that create a vortex to pull ingredients toward the blades, ensuring even blending. I replaced my old blades with high-quality stainless steel ones, and the difference was night and day. Proper blade design reduces processing time and prevents motor burnout, especially when handling dense nut butters or icy drinks.
Pre-Process Ingredients for Better Results
One mistake I made early on was not pre-soaking nuts. Soaking almonds for 4-6 hours softens them, making it easier for the blades to process them into smooth nut butter. Similarly, cracking ice into smaller chunks before blending allows the blades to crush ice more efficiently. I like to pre-chop ice into manageable pieces, which prevents the motor from struggling and reduces noise. If you’re serious about perfect smoothies, check out tips for boosting ice crushing power. This step saves time and preserves your blender’s longevity.
Use Progressive Blending Techniques
Instead of just turning the blender on high and leaving it, I adopted a technique called pulse-pause blending. I pulse the blender in short bursts, then pause for a few seconds to let the motor cool down. This prevents overheating and ensures a consistent texture. For nut butters, I start at low speed, then gradually ramp up to high, and finally slow down to mix in any remaining chunks. This method produces a silky texture without overheating the motor. For more detailed strategies, see high-speed blender hacks.
Maintain Your Blender for Peak Performance
After each use, I clean the blades and jar thoroughly to prevent nut oils from clogging the mechanism. Regular maintenance, including checking for blade sharpness and motor health, extends your blender’s life. If you notice decreased ice crushing ability or uneven blending, it might be time to replace or upgrade your blades or motor. For troubleshooting tips, visit ice crushing techniques.
By applying these core techniques—adjusting speed, optimizing blade design, pre-processing ingredients, using progressive blending, and maintaining your machine—you’ll achieve professional-quality nut butters and ice-blended smoothies every time. Remember, mastering your blender is about understanding its strengths and working with them efficiently. Happy blending!
Many enthusiasts believe that simply owning a high-speed blender guarantees perfect smoothies, nut butters, and ice crushing every time. However, what most people overlook are the nuanced details that truly influence performance. For example, a frequent mistake is assuming that all high-powered blenders function equally well without considering blade design, motor control, or pre-processing techniques. Everyone says a powerful motor is enough, but in my experience, the quality of the blades and how you operate the blender are just as critical. For instance, using the appropriate speed settings can significantly impact the texture of your nut butters or the smoothness of your smoothies. Check out this guide on speed settings to optimize your blending process.
A common myth is that high-speed blenders can handle everything straight out of the box without pre-processing. This is a trap—pre-soaking nuts or chopping ice into smaller pieces can drastically reduce strain on the motor and blades. Neglecting these steps can lead to overheating, motor burnout, or inconsistent results. In fact, some of the best results come from a simple prep routine, like soaking nuts for a few hours or pre-chopping ice, which makes your blender’s job easier and extends its lifespan. For detailed tips, see these ice crushing tips.
Why does blade design matter more than you think?
Many users assume that any blade will do, but the truth is that blade shape, material, and placement dramatically affect performance. Durable, sharp, wide blades create a vortex that pulls ingredients toward the center, ensuring even blending and reducing processing time. Poorly designed blades can leave chunks or strain the motor unnecessarily. Investing in models with specialized blade designs can make your blender not only more efficient but also more durable. For instance, models with optimized blade configurations are often more reliable for tough ingredients like nuts or ice.
Additionally, advanced users should consider the science behind motor control. Variable speed controls allow precise adjustments, preventing overloads and overheating. This is especially important when making thick nut butters or crushing large quantities of ice. Remember, a high motor wattage alone doesn’t guarantee performance; the control system and blade design are equally vital. For insights on motor science, explore this research on motor control.
Finally, a common mistake is neglecting regular maintenance. Dull blades or accumulated nut oils can hinder performance and cause overheating. Regularly sharpening blades and cleaning the jar can keep your blender performing at its best. For maintenance tips, visit our maintenance guide.
In conclusion, mastering your high-speed blender involves more than just turning it on high. Pay attention to blade design, pre-processing ingredients, optimizing speed controls, and maintaining your machine. These hidden nuances can elevate your blending game from good to professional quality. Have you ever fallen into this trap? Let me know in the comments.
Keeping your high-speed blender in top shape is essential for consistently perfect smoothies, nut butters, and ice crushing. Over time, even the most robust models can experience wear and tear, leading to decreased performance. To ensure longevity, I recommend establishing a regular maintenance routine that includes thorough cleaning, blade sharpening, and motor checks.
Start with cleaning immediately after each use. Use warm water and a mild detergent, then disassemble the jar and blades for a detailed scrub. This prevents nut oils and ice residue from clogging the blades or motor base. For blades, I prefer sharpening them every six months using a professional sharpening service or a dedicated blade sharpener. Dull blades require more force and strain the motor, reducing lifespan. Remember, sharp blades cut more efficiently and create less heat, which is vital when blending dense ingredients like nut butters.
Checking the motor’s health periodically is equally important. Listen for unusual noises or sluggish performance, which could indicate motor wear. Many high-end models come with diagnostic features, but if yours doesn’t, a simple test is to run the blender with a small load and monitor any overheating or vibrations. If issues arise, professional servicing is advisable to prevent further damage.
In addition to physical maintenance, software updates—if your blender supports them—can enhance performance and introduce new features. Some models connect via Bluetooth or Wi-Fi, allowing firmware upgrades that improve speed control and durability. Regularly visit the manufacturer’s website or contact support to stay updated.
Looking ahead, I predict that future blenders will incorporate smarter diagnostics and self-cleaning capabilities, making maintenance even easier. As technology advances, expect more models to feature AI-driven optimizations that adapt to your blending habits, extending the life of blades and motors.
How do I maintain my blender over time?
Adopt a routine of immediate post-blend cleaning, periodic blade sharpening, and motor health checks. Use manufacturer-recommended lubricants or parts replacements as needed, and keep the motor base free of dust and debris. For models with advanced features, ensure firmware is up-to-date by visiting the manufacturer’s site or contacting support. Doing so will help your blender perform at peak levels for years to come, saving you time and money on replacements. Remember, a well-maintained blender not only lasts longer but also produces better results—like ultra-smooth nut butters and perfectly crushed ice every time. For detailed cleaning and maintenance tips, check out our privacy policy to ensure your machine remains in prime condition.
If you want to maximize your blender’s efficiency, try incorporating a weekly blade sharpening routine. It’s a simple step that significantly reduces strain on the motor and improves blending quality, especially for dense ingredients. Don’t overlook routine checks—your future self will thank you for the smooth, consistent blends that come from proper upkeep.
Lessons from the Frontline of Blending
- One of the toughest lessons I learned was that even powerful blenders need the right blades and prepped ingredients. Overloading with unsoaked nuts or large ice chunks can cause overheating and inconsistent textures.
- I used to believe all high-speed blenders could handle any task, but I quickly realized that blade design and motor control matter just as much as wattage. Investing in models with specialized blades and adjustable speeds saved me a lot of frustration.
- Patience is key. Using pulse techniques and gradually increasing speed results in smoother nut butters and better ice crushing, extending your blender’s lifespan and improving results.
- Consistent maintenance, like blade sharpening and cleaning, keeps your blender performing at its peak. Neglecting this can lead to dull blades and motor strain.
- Don’t forget the pre-processing tricks—soaking nuts and chopping ice into smaller pieces make a noticeable difference in texture and motor health.
My Go-To Resources for Blender Mastery
- Mastering Nut Butter Preparation — This guide helped me understand the nuances of ingredient prep and blending techniques that produce professional results.
- Ultimate Speed Settings Guide — Optimizing your blender’s speed controls makes all the difference in texture and efficiency.
- Ice Crushing Tips — These techniques transformed my ability to crush ice quickly without overloading the motor.
- Choosing the Best Blender — A detailed comparison that helped me select a model suited for tough ingredients and daily use.
Believe in Your Blending Power
The future of blending is exciting, with smarter, more durable models emerging. Every time I blend, I feel a sense of achievement, knowing I can craft perfect nut butters and icy drinks with confidence. Your journey to mastering your high-speed blender starts now—embrace the process and enjoy the delicious results. What’s your biggest blending challenge? Share below and let’s troubleshoot together!
This post really hits home for me, especially about the importance of pre-processing ingredients. I used to skip soaking my nuts and chopping ice into smaller pieces, which often led to overworking the motor or ending up with uneven textures. Since I started pre-soaking almonds for about 4 hours and pre-chopping ice, my blender handles these dense ingredients far more efficiently, producing creamier nut butters and smoother smoothies. I also agree with the emphasis on blade design—using high-quality, sharp blades has made such a difference in reducing blending time and preventing motor burnout. One challenge I’m still working on is finding the perfect balance in speed settings—have you or others found specific settings that consistently yield the best results for dense nut butters? Would love to hear more tips on optimizing speed control and pre-processing routines for longevity and performance.