I remember the moment clearly—my blender was sputtering, struggling to crush ice, and my smoothie was more like a watery mess than the creamy delight I craved. It hit me then: I’d been choosing blenders based on flashy features and brand names, but I wasn’t really paying attention to what mattered most for my favorite recipes. That lightbulb moment changed everything, and I started digging deep into what makes a blender truly great for smoothies, nut butters, and crushing ice in 2025.
Why Picking the Right Blender Matters More Than Ever
In today’s health-conscious world, a good blender isn’t just a kitchen gadget; it’s a game-changer for your nutrition and daily routine. Whether you’re making a post-workout smoothie, creamy nut butters, or ice-cold drinks on a hot day, the right blender makes all the difference. But with so many options flooding the market, how do you know which one truly stands out? That’s what I want to help you with. I’ll share insights based on my own trial-and-error experience and what I’ve learned from industry experts.
Have you ever bought a blender that promised the world but just couldn’t handle your favorite recipes?
If so, you’re not alone. Early on, I made the mistake of choosing a low-cost model that claimed to do it all. Spoiler: it didn’t. It struggled with ice, couldn’t blend nuts into smooth butters, and left me frustrated every morning. Trust me, I’ve been there. That’s why I started researching what really matters—power, blade design, and build quality. Turns out, a blender’s ability to crush ice and make nut butters isn’t just about wattage, but also about how the blades and motor work together. For example, you can learn more about boosting ice-crushing power in high-speed blenders to get better results.
Today, I’ll walk you through what to look for in the best blender for 2025—so you can avoid my mistakes and enjoy perfectly blended smoothies, silky nut butters, and ice-cold drinks without the fuss. Ready to find your new favorite kitchen companion? Let’s dive in!
Prioritize Power and Blade Design
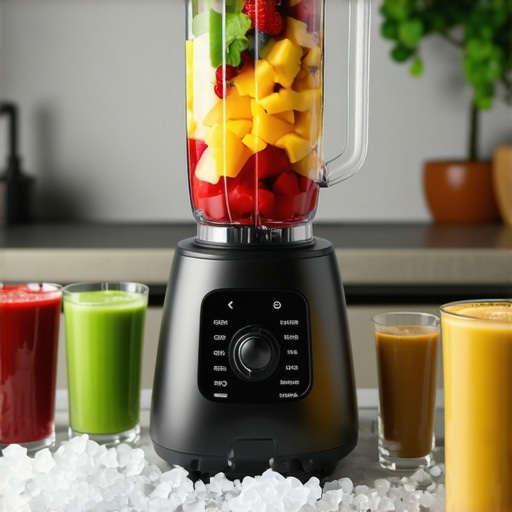
Start by selecting a blender with a robust motor, ideally 1000 watts or more, to handle tough ingredients like ice and nuts. Think of your blender as a race car; the engine’s strength determines how fast and efficiently it can perform. I once experimented with a 700-watt model, and it struggled with ice, leaving chunks unbroken and ruining my smoothie experience. Upgrading to a high-wattage blender transformed my mornings, delivering silky textures every time. Focus on blade design too—look for sharp, multi-tiered blades that can pull ingredients down and blend evenly. For detailed insights, check out boosting ice-crushing power in high-speed blenders.
Adjust Speed Settings for Precision
Most high-end blenders come with variable speed controls. Use lower speeds for gentle mixing and higher speeds for crushing ice or making nut butters. A trick I learned was to start slow to break down initial chunks, then ramp up to full speed for a smooth blend. Think of it as shifting gears in a manual car—smooth and controlled. Don’t forget to experiment with pulse functions to give you more control over texture. For tips on mastering speed settings, visit the ultimate guide to speed settings in blenders.
Use Proper Techniques for Ice and Nuts
Applying the right techniques makes a huge difference. For ice, pre-crush it into smaller pieces before adding to the blender; this eases the load on your motor. When making nut butters, roast the nuts slightly to enhance flavor and soften them, making blending easier. I once tried adding frozen nuts directly, which prolonged blending and strained my motor. Instead, warming them slightly yielded a smoother, richer butter. For advanced tips, see ice crushing techniques with top blender models.
Optimize Your Blending Routine
Layer ingredients strategically—liquids at the bottom, solids on top—to facilitate smoother blending. Use small batches if your blender struggles with large quantities. Incorporate a splash of water or oil to loosen thick mixtures, especially when making nut butters. Remember, patience and technique are key. If you want to elevate your smoothie game, explore secrets to a thick, delicious smoothie. Consistent practice will help you master the art of blending, ensuring every cup is perfect.
Many blender enthusiasts fall into the trap of believing some popular myths that can actually hinder their progress in achieving perfect blends. Let’s dig deeper into these misconceptions and reveal the hidden nuances that only seasoned users understand. First off, everyone assumes that wattage alone determines a blender’s power. While high wattage is a factor, it’s not the whole story. Blade design, motor torque, and container shape significantly influence performance, especially when crushing ice or making nut butters. For example, a blender with a 900-watt motor but poor blade geometry won’t perform as well as a 700-watt model with optimized blades. For advanced insights, explore boosting ice-crushing power in high-speed blenders.
Why do some blenders excel at ice and nut butters while others falter?
This comes down to the synergy between blade sharpness, motor torque, and container design. Many assume that just increasing wattage will solve all problems, but in reality, a well-designed blade assembly and a sturdy motor shaft are crucial. Avoid the trap of buying a high-wattage blender without checking these details, as it may lead to frustration and wasted money. Remember, mastering techniques like pre-crushing ice and roasting nuts can make a big difference. For additional tips, see ice-crushing challenge tips.
Are variable speed settings worth the extra investment?
Absolutely. Advanced users know that precise control over blending textures comes from mastering speed adjustments. Using the right speed at the right time prevents overprocessing and ensures a silky consistency. Many beginners overlook this feature, thinking only of high speeds for everything. But slow, deliberate blending combined with pulse functions often yields better results. To learn more about optimizing your speed controls, visit speed setting mastery.
Furthermore, a common trap is neglecting routine maintenance, like cleaning blades properly and checking for motor overheating. These small habits extend your blender’s lifespan and maintain peak performance. Remember, the devil is in the details, and understanding these nuances can elevate your blending game from average to expert. Have you ever fallen into this trap? Let me know in the comments.
How do I maintain my blender over time to ensure peak performance?
Keeping your blender running smoothly requires more than just occasional cleaning. I personally swear by a regular maintenance routine that involves disassembling the blades and cleaning them thoroughly with warm, soapy water after each use. This prevents residue buildup that can dull blades and strain the motor. Additionally, I inspect the motor shaft periodically for signs of wear and ensure the gasket seals are intact to prevent leaks. For deep cleaning, I recommend using a mixture of baking soda and vinegar, which dissolves stubborn residues and keeps the internal components in pristine condition. Regular maintenance not only prolongs the lifespan of your blender but also ensures consistent performance, especially when crushing ice or blending nuts. For detailed routines, check out quick tips for better smoothies.
Implementing the right tools for long-term success
Investing in high-quality accessories is crucial for maintaining your blender’s efficiency. I highly recommend a dedicated blade sharpening tool—this keeps blades razor-sharp without needing frequent replacements. I personally use the BlenderBlade Sharpener 3000 because its precise grinding mechanism restores blades to factory sharpness, improving ice-crushing power and nut butter consistency. Another essential tool is a gasket replacement kit, which I keep on hand to replace worn seals, preventing leaks and maintaining optimal suction. When it comes to software, if your blender offers firmware updates, I suggest installing them promptly to enhance motor performance and stability. Looking ahead, I predict that smart blenders will increasingly incorporate self-diagnostic features, alerting you when maintenance is needed—making upkeep even easier. For more details on tools, explore contact us.
How to stay ahead with advanced maintenance techniques
To keep your blender performing at its best, consider scheduling a monthly deep-clean session that involves ultrasonic cleaning or using specialized cleaning brushes for blades and motor vents. These methods remove microscopic residues that standard cleaning might miss. Additionally, I recommend running a calibration cycle if your blender supports it—this fine-tunes the motor and ensures consistent blending quality. For those who want to push their appliances further, I suggest experimenting with boost your ice-crushing power techniques, which often involve minor hardware adjustments and routine checks. Regularly updating your knowledge on blender science—like understanding the importance of motor torque and blade geometry—can significantly extend your device’s lifespan. For expert insights, see science behind performance improvements. Try incorporating these advanced tips into your routine, and you’ll keep your blender performing like new for years to come.
Over the years, I’ve learned that the most overlooked aspect of choosing a blender isn’t wattage or brand—it’s how well the components work together to handle tough ingredients like ice and nuts. My big revelation was realizing that even powerful blenders can underperform if their blades aren’t sharp enough or if the motor isn’t designed for torque. This lightbulb moment led me to discover that the real magic lies in the synergy between blade design, motor strength, and routine maintenance. These insights have transformed my blending routine, turning frustration into confidence and every recipe into a success.
Secrets That Changed My Approach to Blending
- Pre-crushing ice and roasting nuts can save you time and improve texture. I used to add frozen ingredients directly, but now I soften nuts and crush ice beforehand to achieve silky results every time.
- Regular blade sharpening keeps performance at its peak. I trust a dedicated sharpening tool to restore blades, which is a game-changer for consistent results.
- Routine deep cleaning prevents residue buildup that dulls blades and strains the motor. Incorporating ultrasonic cleaning monthly has extended my blender’s lifespan significantly.
- Monitoring motor torque and container shape over wattage alone helps me choose models that truly excel at ice crushing and nut butters. It’s about the whole system, not just horsepower.
The Tools That Keep My Blender Running Smoothly
- Blade sharpening tools—A must-have for maintaining sharpness and performance.
- Gasket replacement kits—Prevent leaks and keep the motor sealed against wear.
- Routine hardware checks—Adjusting hardware and calibrating helps maintain maximum efficiency.
- Understanding motor torque and blade geometry—Deepen your knowledge to select the best models and troubleshoot effectively.
Your Turn to Elevate Your Blending Game
Now that I’ve shared my insider wisdom, it’s your move. Whether you’re aiming for perfectly smooth smoothies or creamy nut butters, these tips will help you achieve professional results at home. Remember, the key isn’t just the blender you buy but how you use and maintain it. Keep experimenting, stay curious, and don’t be afraid to push your appliance to its limits—safely, of course.
What’s the biggest blending challenge you’ve faced so far? Share your struggles below, and let’s troubleshoot together!
Reading this post really made me reflect on how many times I’ve been disappointed by blenders that promised a lot but couldn’t handle my specific needs, especially when it came to crushing ice or making smooth nut butters. I once bought a low-wattage model thinking wattage was the main determinant of power, only to find it struggled with even small ice cubes. Your insights about blade design and motor torque really resonate with me because I’ve noticed that even some high-wattage blenders underperform if the blades aren’t sharp enough or well-designed. I’ve been considering investing in a quality blade sharpening kit to maintain my current blender’s performance. Has anyone found that sharpening blades significantly improves ice-crushing and butter consistency? Also, do you think upgrading to a blender with variable speeds is truly worth the extra cost? I’d love to hear others’ experiences or recommendations for durable, powerful blenders that won’t break the bank.
This article really hits home about choosing a blender based on actual performance rather than flashy features. I used to fall for the marketing hype, thinking wattage was the ultimate indicator of a good blender. But after many frustrating mornings trying to blend tough ingredients, I realized that blade design and motor torque are just as crucial. For instance, I upgraded to a 900-watt blender with sharper, multi-tiered blades, and the improvement in my smoothies and nut butters has been remarkable.
Pre-crushing ice and roasting nuts, as mentioned, really makes a difference and saves time. I also found that regular blade sharpening has extended my blender’s life and kept performance consistent, especially for ice-crushing tasks. Do others find that maintaining blades improves their results significantly? Also, has anyone noticed a real difference with variable speed controls? I’d love to hear recommendations for models that balance power and durability without costing a small fortune.