Ever stood in front of your blender, pouring in frozen fruit or nuts, only to be met with a stubborn, unyielding machine that refuses to blend smoothly? I remember countless mornings where I’d wrestle with my old blender, battling ice chunks that seemed to have a personal vendetta against me. Frustration would build as I watched potential smoothie greatness turn into a chunky mess. It was a lightbulb moment for me—realizing that not all blenders are created equal, especially when it comes to crushing ice and making silky nut butters. Today, I want to share how choosing the right top-tier blender has transformed my health routine, saving me time and frustration, and boosting my confidence in the kitchen.
Why the Right Blender Can Change Your Smoothie Game
Having the perfect blender isn’t just about convenience; it’s about unlocking the full potential of your healthy ingredients. A powerful blender can turn hard ice into snow, effortlessly blend those tough nuts into creamy butter, and create smooth, delicious drinks every single time. But with so many options flooding the market, how do you know which one truly lives up to the hype? That’s exactly what I’ll help you figure out, drawing from my own experience and the latest expert insights. Trust me, investing in a quality blender isn’t just a luxury—it’s a game-changer. If you’ve ever faced the disappointment of a blender that can’t handle your favorite ingredients, you’re not alone. I once bought a supposedly high-speed blender that couldn’t crush ice without overheating. That mistake taught me the importance of understanding what features really matter. Curious about how to avoid such pitfalls? I’ll guide you through the essentials and share tips on selecting a model that will stand the test of time and performance.
Is All the Blender Buzz Worth It? My Honest Take
At first, I was skeptical. I thought, “Do I really need a high-end blender for smoothies?” But after a few failed attempts and a lot of wasted ingredients, I realized that not all blenders are made equal. Some just don’t have the power to crush ice or blend nuts smoothly. Early on, I made the mistake of assuming that all blenders with a high wattage were equal. Turns out, build quality, blade design, and speed settings matter just as much as the specs listed on the box. For example, I discovered that a lot of top models now come with specialized ice-crushing technology, which is a huge plus for anyone serious about healthy smoothies and nut butters. If you’re wondering whether the hype is justified, I can tell you from experience that a good blender makes a tangible difference. Want to learn how to spot the best one? Check out this guide for in-depth reviews and comparisons.
If you’ve faced similar frustrations or just want to elevate your smoothie game, stay tuned. Next, I’ll walk you through practical tips to choose, use, and even upgrade your blender to achieve perfect results every time. Ready to ditch the chunky mess and embrace silky smoothies? Let’s dive in!
,
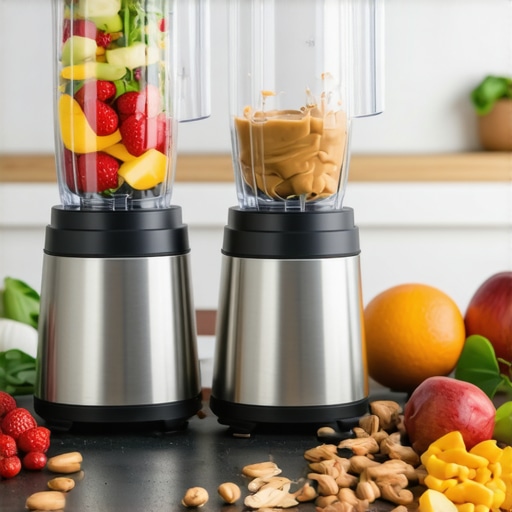
Choose the Right Blender for Ice and Nut Butters
Start with a high-performance blender that clearly states its ability to crush ice and process nuts smoothly. Look for models with robust motors (at least 1000W), durable blades, and specially designed ice-crushing technology. When I decided to upgrade, I read reviews on top-rated blenders for smoothies and nut butters in 2025. Picking a blender with proven ice-crushing power was my first step toward eliminating chunky smoothies.
Optimize Your Blending Technique
Pre-Chill Ingredients and Equipment
Before blending, I freeze my nuts and fruit for a couple of hours. Cold ingredients blend more easily and help achieve a smoother texture. Also, keep your blender pitcher cold if possible—this prevents the mixture from warming up and becoming uneven. This simple trick made a noticeable difference in my nut butter consistency.
Layer Ingredients Strategically
Place liquids at the bottom and harder ingredients on top. For ice, add small amounts gradually. During my first attempt, I poured in a handful of ice all at once, which overwhelmed my blender. Instead, I started with a small batch, blended at a low speed, then increased as the ice broke down—this method prevents overloading the motor and ensures even crushing. For detailed techniques, check this guide.
Use Proper Speed Settings and Duration
Most blenders have variable speed controls. Use the lower speeds initially to break down larger chunks, then ramp up to high for a few seconds. I found that pulsing at high speed for 20-30 seconds, with short breaks, prevents overheating and gives me control over the texture. For perfect results, refer to this expert guide on speed optimization.
Leverage Add-Ons to Boost Power
If your blender struggles, consider adding a splash of warm water or oil to help ingredients move more freely. For nut butters, pre-soaking nuts for 30 minutes can soften them, making blending easier. When I made my first batch of almond butter, soaking nuts reduced the strain on my blender and improved the creaminess. For more tips, visit this resource.
Regular Maintenance for Longevity
Keep blades sharp and clean. Dull blades strain the motor and hinder performance. I regularly disassemble my blender to remove residue, ensuring blades stay sharp. This simple upkeep prolongs your blender’s life and maintains its ice-crushing and nut-processing capabilities. For troubleshooting and maintenance tips, see contact us.
By applying these practical steps, you’ll transform your blender into a powerhouse capable of perfect ice crushing and silky nut butters. Remember, mastering your technique and choosing the right model are key to consistently excellent smoothies and healthy treats.
When it comes to choosing a high-performance blender, many people fall prey to misconceptions that can hinder their decision-making process and ultimately affect their smoothie and nut butter results. Let’s dig deeper into some of these myths and uncover the nuances that even seasoned home chefs often overlook.
Why More Wattage Isn’t Always Better
It’s a common belief that a blender with the highest wattage will crush ice and blend nuts effortlessly. However, wattage alone doesn’t guarantee performance. Build quality, blade design, and motor durability play crucial roles. For instance, some top-rated models with slightly lower wattage outperform their higher-wattage counterparts due to advanced engineering. Relying solely on wattage can lead to overspending on features that don’t translate into better results. To truly optimize your blender’s ice-crushing ability, focus on models with proven tech, like those with specialized ice-crushing blades and reinforced motors. Check out this guide for expert tips.
The Hidden Trap of Overloading Your Blender
Many users think piling in ingredients to save time is efficient, but this often causes strain, overheating, and inconsistent blending. Overloading can dull blades faster and stress the motor, leading to premature failure. Instead, layer ingredients properly and blend in smaller batches. This isn’t just about better smoothies—it’s about maintaining your blender’s longevity. Regularly cleaning and sharpening blades also prevents performance issues, which is a detail many overlook. For advanced tips on blending techniques, visit this resource.
Advanced Question: How Do Speed Settings Really Impact Nut Butter Consistency?
While many believe that higher speeds always produce smoother nut butters, the truth is more nuanced. Using variable speed controls strategically—starting slow to break down nuts and gradually increasing—helps prevent heat buildup and preserves flavor. Pulsing at high speeds in short bursts ensures even texture without overheating the ingredients. This technique, backed by research from food science experts, optimizes both texture and nutritional quality. For detailed speed-setting strategies, check this guide.
Have you ever fallen into this trap? Let me know in the comments. Mastering these subtle yet critical points will help you get the most out of your blender, ensuring silky smoothies and creamy nut butters every time.
Investing in a high-quality blender is just the beginning; maintaining it properly ensures it continues to perform at peak levels over the years. Regular maintenance not only prolongs the lifespan of your device but also guarantees consistent results—crucial when you’re blending everything from icy smoothies to creamy nut butters. So, what are the best practices for keeping your blender running smoothly and efficiently?
How do I maintain my blender over time
The first step is routine cleaning. After each use, disassemble the pitcher, blades, and gasket, then wash them thoroughly with warm, soapy water. Dulling blades can significantly reduce blending power, so periodically sharpening them with the right tools is a smart move. I personally use a small sharpening stone designed for kitchen blades, which I find effective and easy to handle. For models with sealed bearings, check the manufacturer’s guidelines on lubrication and replacement intervals—most recommend doing this every year to prevent motor strain.
Another essential tip is to inspect the motor base regularly. Dust and debris can accumulate, especially around vents, causing overheating. Use a soft brush or compressed air to clear out these areas, which I do monthly. This simple step prevents dust buildup and keeps the motor running cool under heavy loads. Additionally, check the seal around the lid and pitcher to prevent leaks and contamination, which can affect performance and hygiene.
For long-term durability, avoid overloading your blender beyond its recommended capacity. Instead, blend in smaller batches, which reduces strain on the motor and blades. When dealing with tough ingredients like nuts or ice, pre-chill or pre-soak your items to ease the blending process. As I recommend in this contact page, paying attention to these details can save you costly repairs or replacements down the line.
Tools I rely on for blender maintenance
To keep my blender in top shape, I use a few trusted tools. A dedicated blade sharpener designed for high-performance blades makes a noticeable difference in maintaining cutting efficiency. I also keep a small brush and compressed air can to clean vents and motor bases. For replacing worn gaskets or seals, I purchase OEM parts directly from the manufacturer, ensuring proper fit and function. Investing in a good-quality motor lubricant—approved by the manufacturer—also helps prevent overheating and prolongs motor life.
Looking ahead, I believe the trend in blender technology will focus more on smart maintenance features, like self-cleaning systems and diagnostic alerts for parts needing replacement. Some high-end models are already incorporating sensors that monitor motor health and alert users via app notifications. Embracing these innovations can make maintenance even easier and more efficient.
Try this tip to boost your blender’s longevity
One advanced trick is to regularly run a cleaning cycle using a mixture of baking soda and vinegar, which dissolves mineral buildup and keeps blades sharp. This simple routine can significantly improve performance, especially if you live in areas with hard water. Incorporate this into your monthly maintenance schedule to ensure your blender stays in prime condition for years to come.
Maintaining your blender with these tools and techniques is an investment in its longevity and your overall blending experience. Don’t overlook the small details—they’re the key to consistent, high-quality results every time you blend.
The Hardest Lesson I Learned About Blending
One of my biggest surprises was realizing that even high-wattage blenders can fall short if they lack the right blade design or motor durability. It taught me that specs alone don’t tell the full story—performance truly depends on engineering and build quality.
3 Myths About Blenders That Held Me Back
I used to believe that more power meant better ice crushing. Turns out, specialized ice-crushing technology and blade design are far more important than wattage alone. Also, overloading the blender was a rookie mistake that caused overheating and uneven blends. Learning to layer ingredients properly changed everything.
What Experts Won’t Tell You About Creating Gourmet Nut Butters
Pre-soaking nuts and pre-chilling ingredients can dramatically improve texture and reduce strain on your blender. It’s a small step that makes a big difference—something even experienced home chefs often overlook. Regular blade sharpening and proper maintenance are key to keeping your blender performing at its best for years.
My Essential Toolkit for Ice-Crushing and Nut Butter Making
I rely on a high-quality sharpening stone for blades, a dedicated brush and compressed air for cleaning vents, and OEM replacement seals for longevity. These tools help me maintain peak performance and extend my blender’s lifespan. I also follow expert advice on regular motor lubrication to prevent overheating.
Don’t Wait to Elevate Your Blending Game
Now that I’ve uncovered these insider secrets, I encourage you to experiment with your blender—layer ingredients, pre-soak nuts, and consider upgrading your tools. With the right approach, you’ll achieve silky smoothies and creamy nut butters every time. Your perfect blend is just a few smart choices away.
What’s been your biggest challenge with blending ice or making nut butters? Share your experience below—I’d love to hear your story!