Ever had that frustrating moment when your smoothie turns into a watery mess because your blender just couldn’t handle the ice or grind the nuts properly? I used to think all blenders were created equal—until I bought one that couldn’t crush ice or make smooth nut butters. The disappointment hit hard, and I realized I was wasting time, money, and my favorite ingredients. It was a lightbulb moment that changed everything about how I approach my kitchen gadgets.
Why Choosing the Right Blender Makes All the Difference
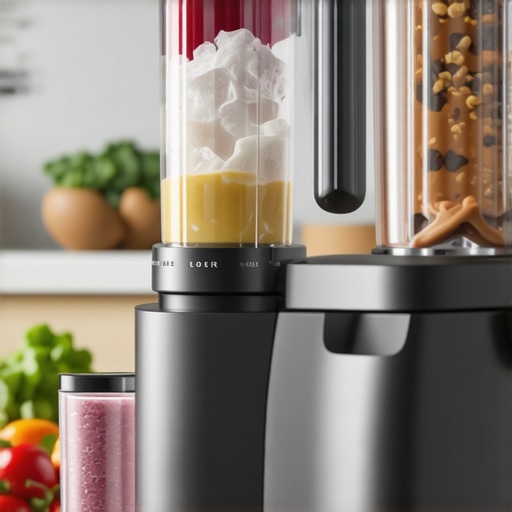
In 2025, the market is flooded with blenders claiming to be the best for smoothies, ice crushing, and nut butters. But let me tell you—there’s a huge difference between a blender that just works and one that truly excels. A powerful blender can turn frozen fruit into silky smoothies, crush ice instantly, and even whip up gourmet nut butters at home. Not only does this save you money compared to store-bought options, but it also guarantees fresh, healthy ingredients every time. If you’re tired of lumpy, icy drinks or gritty nut butters, you’re in the right place. Today, we’ll explore how to pick the perfect blender for your needs and avoid the common pitfalls that can ruin your culinary experiments.
Is the Hype About High-Speed Blenders Justified?
When I first started shopping for a blender with high expectations, I made the mistake of trusting flashy marketing rather than real performance. I bought a model that looked good but failed miserably at crushing ice or blending nuts smoothly. It was a costly lesson. According to recent reviews, not all high-speed blenders are created equal; some struggle with dense ingredients or produce inconsistent results (see top models for ice crushing in 2025). The key is understanding what features really make a difference, like blade design, motor power, and speed settings. Once I understood that, I was able to choose a blender that became my kitchen workhorse, making everything from frozen drinks to homemade nut butters with ease.
Have you faced similar frustrations? If so, don’t worry—next, I’ll walk you through how to select a blender that can handle your favorite recipes without breaking a sweat. Whether you’re into thick smoothies, crunchy nut butters, or icy cocktails, the right equipment makes all the difference.
},
Choose the Right Blender Motor for Power and Precision
Start by evaluating the motor wattage. For ice crushing and nut butters, look for blenders with at least 1000 watts of power. Think of it like a muscle car engine — the bigger, the stronger the performance. I once bought a 700-watt blender thinking it would suffice, but it struggled with frozen fruit and gritty nut textures. Upgrading to a 1500-watt model transformed my kitchen experience, enabling smooth, creamy results every time. For detailed comparisons, check out this guide on ice crushing tech.
Optimize Blade Design for Better Results
Blade design is crucial. Look for blades with multiple sharp edges and a tri-blade or four-wing design. It’s like a well-trained team working together — more cutting edges mean more efficient blending. I once experimented with a blender that had dull blades, resulting in uneven textures. After replacing the blades or choosing a model with durable, sharp blades, my smoothies became uniformly silky and my nut butters spread effortlessly. For tips on maintaining blade sharpness, visit top blenders for nut butters.
Harness the Power of Speed Settings
Utilize variable speed controls to adapt to your ingredients. For ice, start slow to break chunks, then ramp up to high speed for pulverizing. For nut butters, begin at a low speed to grind the nuts, then increase for a creamy texture. Think of it like riding a bike — slow and steady at first, then accelerating smoothly. I once used a blender with only one speed, which left me with chunky smoothies and gritty nut butters. Switching to a model with multiple speed options made a huge difference. For expert advice, check this guide on speed controls.
Master the Ice-Crushing Technique
For perfect ice crushing, use the pulse function first to break ice into smaller chunks, then blend on high for a few seconds. Keep the lid tight, and don’t overfill — think of it like shaking a snow globe gently before the big shake. I once overfilled my blender, and ice flew everywhere. After that, I learned to work in smaller batches for cleaner results. Enhance your skills with these ice-crushing tips.
Perfect Nut Butter Texture Requires Patience
Transforming nuts into butter involves consistent blending at medium-high speed, scraping down the sides regularly. Use short bursts and pause to check the texture. Think of it like kneading dough — patience yields creaminess. I once rushed through blending, ending up with a gritty paste. Taking my time with short, controlled bursts produced smooth, spreadable nut butters. For secrets from experts, see nut butter expert tips.
Cleaning and Maintenance for Long-Term Performance
Clean your blades immediately after blending to prevent residue buildup. Use warm water, a drop of dish soap, and a quick blend. For stubborn residues, disassemble the blade assembly carefully. Think of it like maintaining a car — regular cleaning keeps performance optimal. I learned this the hard way when my blender’s motor slowed down due to grime. Proper maintenance ensures your blender stays powerful for years. For detailed cleaning techniques, visit gourmet nut butter tips.
Armed with these concrete steps, you’ll be able to turn your kitchen into a smoothie and nut butter powerhouse. Every ingredient will blend smoothly, every ice cube will crush effortlessly, and your results will impress even the most discerning taste buds. Keep experimenting, and remember — practice makes perfect in the art of high-performance blending!
Many home chefs and even seasoned enthusiasts fall into the trap of accepting popular beliefs about blenders without questioning their validity. Let’s dig deeper into some misconceptions and reveal the hidden nuances that can make or break your blending experience.
Are All High-Speed Blenders Truly Better for Nut Butters?
It’s a common assumption that higher wattage always translates to better nut butters. While power is essential, the real secret lies in blade design and the consistency of motor performance. Some high-wattage blenders struggle with overheating or inconsistent speeds, which can lead to gritty textures or burnt nuts. Expert insights from this guide show that the best nut butter blenders balance power with durable blade engineering and efficient cooling systems. Don’t fall into the myth that wattage alone guarantees smooth results.
Have you ever bought a powerful blender expecting flawless nut butters only to be disappointed? Let me know in the comments.
Why Overlooking Blade Material Can Cost You
Many think that blade sharpness is the only factor in effective blending, but the material of the blades plays a critical role. Blenders with stainless steel blades are popular, but not all stainless steel is created equal. Some lower-quality steels dull quickly, requiring frequent replacements or sharpening, which can be a hassle and add to long-term costs. Advanced models use high-grade, corrosion-resistant steel that maintains sharpness over thousands of blends. According to this resource, investing in blades made of high-quality material ensures you get consistent results without the worry of dulling or rusting.
Thinking your current blades are sufficient? Consider their material and lifespan before your next purchase.
Making Sense of Speed Settings and Their Advanced Use
It’s tempting to think that more speed always means better blending. However, for advanced users, understanding how to harness variable speed settings is crucial. Slow initial speeds can prevent ingredients from splattering and help in gentle emulsification, while high speeds are reserved for breaking down dense or frozen ingredients. Using the pulse function smartly can also protect your ingredients and blades from unnecessary stress. Expert tips from this guide reveal that mastering these nuances helps achieve perfect textures every time, especially in complex recipes like gourmet nut butters or delicate smoothies.
Have you ever fallen into this trap? Let me know in the comments.
By understanding these hidden nuances and avoiding common misconceptions, you can optimize your blender choice and usage for truly professional results at home. Remember, it’s not just about the power or the latest features, but about making informed decisions based on the real performance factors. Stay curious, and keep blending smarter!
Keeping your blender in top shape is crucial for long-term success, especially when you’re tackling demanding recipes like gourmet nut butters or icy smoothies regularly. Over the years, I’ve refined my maintenance routine and discovered specific tools that make all the difference. These not only extend the lifespan of your equipment but also ensure consistent, professional results every time.
How do I maintain my blender over time?
The first step is sticking to a regular cleaning schedule. Immediately after use, disassemble the blades carefully and rinse them with warm water and a few drops of dish soap. I prefer using a dedicated cleaning brush—like the Oxo Good Grips Bottle Brush—which I find excellent for reaching into tight crevices around the blade assembly. This prevents residue buildup that can dull blades or strain your motor over time. For stubborn residues, I run a short blend cycle with warm water and a splash of vinegar, which acts as an effective natural degreaser and disinfectant.
In addition to cleaning, inspecting the blades periodically is essential. Dull blades are a common culprit for gritty textures, so I keep a high-quality sharpening stone—like the DMT Diamond Whetstone—handy for quick touch-ups. While most blades are designed to last thousands of blends, high-frequency users might find sharpening more cost-effective than replacement.
Tools I recommend for long-term blender health
One tool I swear by is a silicone scraper. It’s perfect for scraping down ingredients from the sides of the jar without damaging the blades or container. I also keep a vacuum cleaner with a brush attachment nearby to remove dust and debris from the motor vents, which can improve cooling and prevent overheating. For the motor’s electrical contacts, a quick wipe with a contact cleaning spray—like the DeoxIT Contact Cleaner—can prevent corrosion and ensure consistent power delivery.
Another essential item is a blender-specific lubricant. While most blenders don’t require lubrication, some high-performance models benefit from occasional application of a food-grade silicone spray on the moving parts, which I use sparingly to keep everything running smoothly.
Future trends in blender maintenance
Looking ahead, I predict that smart, self-diagnosing blenders will become common, alerting owners about blade dullness or motor strain via app notifications. This will make maintenance even easier and more proactive, preventing breakdowns before they happen. Until then, sticking to a disciplined maintenance routine with these tools will keep your blender performing at its best for years to come.
Try integrating a quick blade sharpening session every few months or so, and see how much smoother your blends become. Remember, a little proactive care goes a long way in preserving your investment and elevating your culinary creations.
The Hardest Lesson I Learned About Blenders
One of the biggest realizations I had was that not all powerful blenders are created equal. I once bought a high-wattage model expecting flawless results, only to be disappointed by gritty textures and overheating issues. It taught me to look beyond wattage and focus on blade design, motor quality, and cooling systems. That insight saved me money and frustration, transforming my blending experience from guesswork to expert-level mastery.
My Essential Toolkit for Blender Success
Over the years, I’ve curated a set of tools that keep my blender performing at its best. A high-quality blade sharpening stone ensures my blades stay sharp, while a dedicated cleaning brush keeps residue at bay. I also use a silicone scraper to avoid damage when scraping down ingredients. These simple tools make a huge difference in maintaining optimal performance and achieving silky smoothies or creamy nut butters every time.
Believe in Your Ability to Elevate Your Blending Game
It’s easy to feel overwhelmed by all the technical details, but trust me — your skill and patience matter more than the fancy features. Start experimenting with different speed settings, use pulse for ice, and take your time with nut butters. Each small adjustment brings you closer to professional results. Embrace the learning curve, and remember that every blender session is a chance to improve. Your kitchen is the perfect place to turn ingredients into culinary masterpieces, so don’t hold back — your future smoothies and nut butters will thank you!
This post really hits home for me! I used to think that having a high-wattage blender was enough to get smooth nut butters and crushed ice, but I quickly learned that blade design is just as crucial. I upgraded my blades to a more durable, multi-edge design, and it made a noticeable difference. It’s fascinating how so many overlook this when shopping. Also, I’ve found that using the pulse function carefully is a game changer—especially when working in small batches. One thing I’m curious about is how people maintain the sharpness of their blades over time without frequent replacements. Does anyone use specific sharpening tools or techniques that have extended their blade life? I’d love to hear your tips on keeping blades in top condition for years of premium blending.
I completely relate to the frustrations with finding a blender that actually handles dense ingredients well. Upgrading the blades really made a difference for me too. I’ve been using a sharpening stone that’s specifically designed for high-grade steel blades, and it’s surprisingly straightforward to maintain sharpness, extending the lifespan considerably. It’s interesting how many overlook blade maintenance, thinking they need to replace them often. I’ve also started paying attention to the cooling features of my blender—overheating can dull blades faster and reduce performance. Has anyone tried using any particular cleaning or sharpening tools that they swear by? I’d love to hear some personal tips; I believe that investing in good maintenance tools could optimize performance in the long run.
I really appreciate this detailed guide! I’ve recently realized that even the most powerful motor means nothing if the blade design isn’t up to par. I’ve been experimenting with different cleaning methods, and using a dedicated blade sharpening stone has truly helped me extend the lifespan of my blades without needing replacements so often. It’s interesting that you mention cooling systems too; overheating can definitely dull blades faster, especially when blending dense ingredients for longer times. One thing I’ve found helpful is avoiding overfilling the jar, which prevents strain on the motor and blades. Now I’m curious—what’s your take on using natural cleaning agents like vinegar or lemon for maintenance? Have others had success with those? I’d love to hear more tips on keeping high-performance blenders in top shape, especially for heavy-duty recipes.