Have you ever stared at your blender, frustrated because your homemade nut butter turns out grainy or your ice drinks aren’t as smooth as you imagined? I’ve been there too. I remember countless mornings when I’d toss ingredients into my blender, only to end up with a chunky mess or an uneven blend that made me want to give up. That lightbulb moment hit me hard when I realized I was making simple mistakes that anyone could fix with a few insider secrets. Now, I want to share those tried-and-true tips with you so you can skip the frustration and enjoy perfectly blended nut butters and icy drinks every time.
Why Your Blender Technique Could Be Holding You Back
It’s not just about having a high-powered blender; it’s about knowing how to use it efficiently. Many home enthusiasts pour ingredients into their blenders and hit the highest speed, only to find their results lacking. I used to think that more power alone would do the trick. Turns out, the way you handle your blender makes all the difference. A common mistake I made early on was overloading the blender, which caused uneven blending and strain on the motor. After some research and experimentation, I discovered that mastering specific techniques, like proper ingredient prep and optimal speed settings, can truly transform your blending game. Want to learn how to do it right? Keep reading, because I’ll walk you through the secrets that will elevate your nut butter and ice blending skills in 2025.
Is It Really Worth the Effort to Fine-Tune Your Blender Skills?
Absolutely. I once believed that investing time in learning these tricks wasn’t necessary, but I was wrong. Properly blending nut butters at home, for example, requires more than just throwing nuts in and hoping for the best. The right techniques can make your nut butters creamier, smoother, and more spreadable—without burning out your blender motor. Similarly, perfecting ice crushing can turn your smoothies into icy masterpieces in seconds. According to a recent study, the efficiency of blender performance can be significantly improved through correct speed settings and techniques, leading to better textures and longer-lasting equipment (source: The Science Behind Blender Performance). If you’ve faced inconsistent results or struggled with texture, then the good news is: you’re not alone, and there’s plenty of room for improvement.
So, have you ever felt that your blender just doesn’t deliver the consistency you want? Don’t worry, I’ve been there. The good news is that with a handful of expert tips, you can turn your kitchen into a professional-grade nut butter and ice-blending station. Ready to discover the secrets that will change your blending routine forever? Let’s dive into the practical steps that will make 2025 your best year yet for smoothies and nut butters.
Refine Your Ingredient Prep
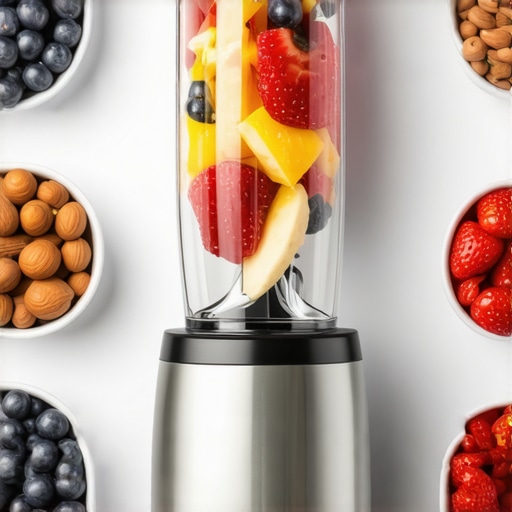
Start by chopping nuts or ice into smaller pieces before blending. I remember once trying to blend whole almonds for nut butter and ending up with a gritty mess. Instead, I quickly pulse the nuts a few times to break them down, which speeds up the process and results in a smoother texture. Smaller pieces reduce strain on your blender and improve consistency. For ice, crushing it into smaller chunks or using pre-crushed cubes is a game-changer. This step ensures even blending and prevents your motor from struggling. Want to see how to prep ice for optimal crushing? Check out Ice Crushing Techniques.
Adjust Your Speed Settings Intentionally
Many people make the mistake of starting at max speed immediately. Instead, gradually increase speed to allow ingredients to move smoothly and reduce overheating. Think of it like driving a car: shifting gears smoothly prevents jerks and engine stress. Use the low setting to initially mix ingredients, then ramp up to high for a thorough blend. This technique is especially critical for nut butters, which require enough shear force to break down oils and solids into a creamy consistency. For detailed speed strategies, explore Speed Settings Guide.
Use the Tamper to Guide and Push
If your blender has a tamper, don’t hesitate to use it. It acts like a gentle hand, pushing ingredients toward the blades without stopping the machine. I once struggled with a stubborn batch of almond butter until I used the tamper to keep everything moving. This not only speeds up the process but also ensures the ingredients are evenly blended, preventing clumps. Just be cautious not to overuse it, as excessive force can strain your blender. For tips on using your tamper effectively, see Ice Crushing Power Tips.
Layer Ingredients Correctly
Layer your ingredients strategically: add liquids first, followed by softer ingredients, then tougher nuts or ice last. This method creates a vortex that pulls everything toward the blades, making blending more efficient. I remember pouring nuts on top of liquids, which caused uneven blending and longer run times. By layering properly, I achieved a silky smooth nut butter in half the time. For more layering techniques, visit Gourmet Nut Butters.
Optimize Your Blending Cycles
Instead of continuous blending, use short bursts—about 20-30 seconds—then pause to scrape down sides. This prevents overheating and allows ingredients to settle evenly. During one session, I blended in 3 bursts, scraping in between, which resulted in a perfectly creamy consistency without burning out my motor. This approach also gives you better control over texture. To learn more about cycle optimization, check Quick Tips for Better Blends.
Keep Your Blender Well-Maintained
Regularly clean the blades and jar to prevent residue buildup that hampers performance. I once ignored this and noticed my blends became chunkier over time. A simple cleaning with warm water and dish soap restored my blender’s efficiency. Also, check that your seals are intact to prevent leaks and maintain motor health. For detailed maintenance routines, see Privacy & Maintenance Info.
Many home chefs believe that having a powerful blender is enough to achieve perfect nut butters and icy drinks. However, what most people overlook are the nuanced techniques and common pitfalls that can sabotage even high-end machines. Let’s dig deeper into these hidden traps and reveal what truly separates amateur blending from expert mastery.
Why the Overload Trap Can Ruin Your Blender’s Longevity
One of the biggest misconceptions is that filling your blender to the brim will speed up your process. In reality, overloading causes uneven blending, puts excessive strain on the motor, and accelerates wear and tear. For instance, pushing large quantities of nuts or ice without pre-processing can lead to clogs, overheating, and even motor burnout. According to a study from The Science Behind Blender Performance, optimal results come from working in smaller batches and respecting your machine’s capacity. So, the secret is to balance quantity with technique, ensuring your blender’s longevity and performance.
Advanced Mistake: Relying Solely on Power Instead of Technique
Many believe that cranking your blender to maximum speed will solve all blending issues. While high power helps, the real trick lies in how you use that power. Gradually increasing speed, starting with low or medium settings, prevents ingredient spillage and reduces motor strain. This controlled approach allows ingredients to emulsify more evenly, producing smoother textures. For expert tips on speed management, explore The Ultimate Guide to Speed Settings. Remember, finesse beats brute force every time.
How Poor Ingredient Prep Sabotages Your Results
Everyone tells you to toss in nuts or ice and blend away, but the devil’s in the details. Failing to pre-chop nuts into smaller pieces or crushing ice beforehand creates uneven textures and strains your blender. This common oversight leads to longer blending times and inconsistent results. An advanced tip? Use a pulse function to break down ingredients first, then switch to continuous blending. This method ensures even shear force distribution and prevents motor overheating. For detailed prep techniques, visit Mastering Nut Butter Preparation.
Have You Fallen Into This Trap?
Many enthusiasts neglect regular maintenance, assuming their blender will perform indefinitely without care. However, residue buildup on blades and seals can drastically reduce efficiency, causing clumps and uneven blends. Regular cleaning with warm water and a gentle brush can keep your blender in top shape, extending its lifespan. Remember, a well-maintained machine is an expert’s best tool. For more maintenance tips, see Blender Maintenance.
In conclusion, mastering your blender involves more than just powerful motor specs. It’s about understanding load limits, employing proper techniques, prepping ingredients correctly, and maintaining your equipment. Have you ever fallen into any of these traps? Let me know in the comments, and share your own tips for perfect blends!
Maintaining your blender isn’t just about fixing it when it breaks; it’s about proactive care that extends its lifespan and keeps it performing at peak efficiency. Over the years, I’ve discovered that a few dedicated habits and the right tools can make all the difference in ensuring my blender continues to deliver perfect smoothies, nut butters, and ice-blended drinks. Whether you’re a casual home cook or an aspiring culinary enthusiast, incorporating these maintenance practices will save you time, money, and frustration.
Tools That Make Maintenance Easier
First, investing in a quality cleaning brush designed specifically for blender blades is a game-changer. I use a silicone brush with stiff bristles that reach into the nooks and crannies of the blades, removing residue that a sponge might miss. For deep cleaning, I rely on a mixture of warm water, a few drops of dish soap, and a splash of vinegar, which breaks down oils and mineral deposits. This simple routine keeps the blades sharp and prevents buildup that can impair performance. Additionally, a flexible spatula helps in scraping down ingredients and cleaning the jar without risking scratches or damage.
How do I maintain my blender over time?
Regular inspection is key. I check the seals and gaskets monthly to ensure there are no cracks or leaks. Replacing worn seals before they fail prevents liquid ingress that can damage the motor. It’s also crucial to keep the motor base clean and free of dust. A soft, damp cloth is sufficient for wiping down the exterior; avoid using abrasive cleaners that could scratch the surface. For the blades, I recommend removing and soaking them weekly to prevent sticky buildup. Remember, a well-maintained blender not only performs better but also lasts longer, saving you money in the long run.
Why consistent cleaning boosts performance
Consistency is the secret. After every use, I rinse the jar immediately to prevent dried-on residue. Once a week, I give the entire unit a more thorough cleaning, including the base and blades. This habit prevents clogs and ensures the blades stay sharp, which is especially important when blending tough ingredients like nuts or ice. A clean blender also reduces the risk of cross-contamination, which is vital if you prepare different recipes or dietary plans. To keep your blender in top shape, check out this detailed maintenance guide.
Future Trends in Blender Maintenance
As technology advances, I predict more blenders will feature self-cleaning modes or sensors that alert you when maintenance is needed. Smart accessories, like ultrasonic cleaning devices, might become common, making upkeep even easier. Staying ahead with regular maintenance now ensures you’re prepared for these innovations and can fully leverage their benefits. For the most effective results, try incorporating a weekly cleaning cycle with a dedicated brush and natural cleaning solutions.
Start today by setting a reminder to inspect your seals and give your blender a thorough clean. Small, consistent efforts will keep your blender running like new and improve your blending results every time. If you haven’t already, explore tools like a specialized cleaning brush or ultrasonic cleaner, which can make maintenance faster and more effective. Remember, a little care goes a long way in preserving your investment and ensuring every blend is smooth and flawless. Ready to give your blender the care it deserves? Dive into the habit of regular maintenance and enjoy consistent, professional-grade results for years to come.
The Hardest Lesson I Learned About Blender Mastery
One of the most eye-opening lessons was realizing that even powerful blenders need proper technique to perform at their best. Relying solely on high wattage led me to burnout and uneven results. It taught me that patience, ingredient prep, and gentle handling matter more than brute force.
Three Mistakes I Won’t Make Again When Blending
- Overloading the blender with large quantities of nuts or ice causes strain and poor texture. Smaller batches and proper prep prevent this.
- Starting at maximum speed instantly creates splashes and motor stress. Gradually increasing speed ensures smoother operation and better results.
- Ignoring regular cleaning and maintenance shortens the lifespan of my blender. Consistent upkeep keeps my machine performing like new.
Why Technique Outshines Power in 2025
In the coming years, the difference between a good blender and a great one will come down to technique. Mastering ingredient prep, layering, and cycle optimization can elevate your blending quality without always needing the latest high-end model. Plus, proper maintenance extends your equipment’s life, saving money and frustration.
Curated Tools for Effortless Blending and Maintenance
- Specialized cleaning brushes: My silicone brush helps remove residue from blades, ensuring consistent performance. Trust me, clean blades make all the difference.
- Natural cleaning solutions: A mix of warm water, dish soap, and vinegar keeps blades sharp and free of buildup. I swear by this routine for hassle-free maintenance.
- Replacement seals and gaskets: Regularly inspecting and swapping worn parts prevents leaks and motor damage. I keep a few on hand for peace of mind.
- Ultrasonic cleaning devices: Future tech that could revolutionize blender maintenance, making it faster and more effective. Stay tuned for how these innovations will improve your routine.
Believe in Your Blending Journey
Imagine transforming your kitchen into a haven for creamy nut butters and icy smoothies—every time. By refining your technique, investing in proper tools, and committing to regular maintenance, you’re setting yourself up for success. The future of blending is bright, and you’re capable of mastering it in 2025 and beyond.
What’s the biggest blending challenge you’ve faced, and how did you overcome it? Share your story below—your experience might inspire someone else to elevate their game!
This post really hit close to home! I used to struggle with making smooth nut butters and icy drinks because I didn’t realize how much ingredient prep and technique matter. I’ve started chopping nuts into smaller pieces and layering ingredients properly, which has noticeably improved my results. The tip about gradually increasing speed is a game changer—I used to run my blender at full blast immediately, and it would often lead to splashes and uneven blends. I also love the idea of using short bursts and scraping down the sides; it’s such a simple adjustment but makes a big difference. I’m curious, has anyone experimented with using a tamper to get even more creaminess? I have a blender that came with one, but I’ve mostly kept it aside. Would love to hear how others incorporate it into their routine and see if it really speeds things up or improves texture overall.